 |
VOOZH | about |
|
VOOZH | about |
AVIF (AV1 Image File Format) is an open-source, royalty-free image format based on the keyframes of the AV1 video codec. It was developed as a successor to VP9 by the Alliance for Open Media, a group that includes several video-on-demand providers such as Google, Amazon, Microsoft, and Netflix.
👁 AVIF image formatAfter its release in 2018, it quickly established itself as a top video codec. Companies like Facebook and Netflix tested it to see how it would perform for their own streaming video infrastructures — and they were impressed with the results.
The brains behind the AV1 codec also decided to create an image file format that used the same compression algorithms to produce high-quality images at lower file sizes, eventually leading to the development of the AVIF format, which was formally approved in February 2019.
This article will show you how to use this image format to compress images that retain visual fidelity, which ultimately provides a better experience for your users.
The Replay is a weekly newsletter for dev and engineering leaders.
Delivered once a week, it's your curated guide to the most important conversations around frontend dev, emerging AI tools, and the state of modern software.
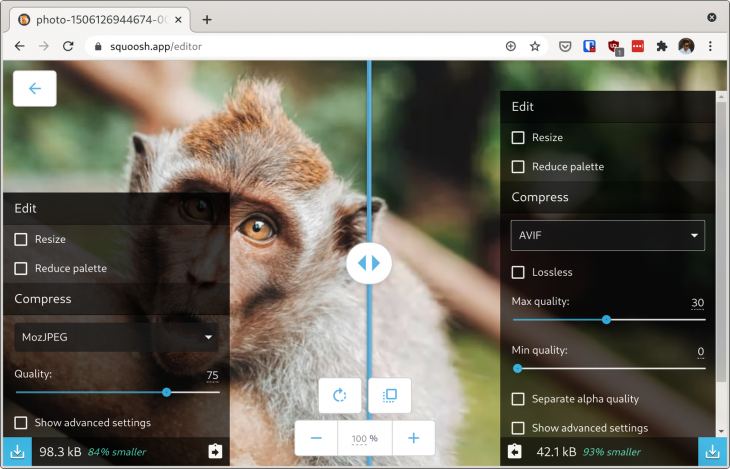
The AVIF format offers a notable reduction in file size compared to JPEG and WebP formats. Here’s a comparison of each format at roughly the same visual quality:
The above example shows a notable difference between the file sizes despite the fact that the visual differences are negligible. The JPEG version is the largest at 98.3kB, while the WebP version is about 30% smaller at 69. kB. The AVIF version comes in at 42.1kB, 58% smaller than the JPEG version, which is quite a significant difference.
The images above were created with Squoosh using the default settings for each format. Here’s a link to the master image if you want to try it yourself.
Squoosh is straightforward and easy to use. You can select an image from your file system or use one of the sample images provided by the editor.
Once the image is loaded, you can select from a number of compression methods, including MozJPEG, AVIF, WebP, and OptiPNG. You can do this using both the right and left sides of the editor so that you can compare one compression method to another one or to the original image. You can also adjust the level of compression, as well as dive into more advanced settings.
As you make changes to the settings, you’ll see the expected file size of the result compared to the settings on the other side of the editor, and there’s a slider button smack in the middle that you can drag in either direction so you can easily compare the two results.
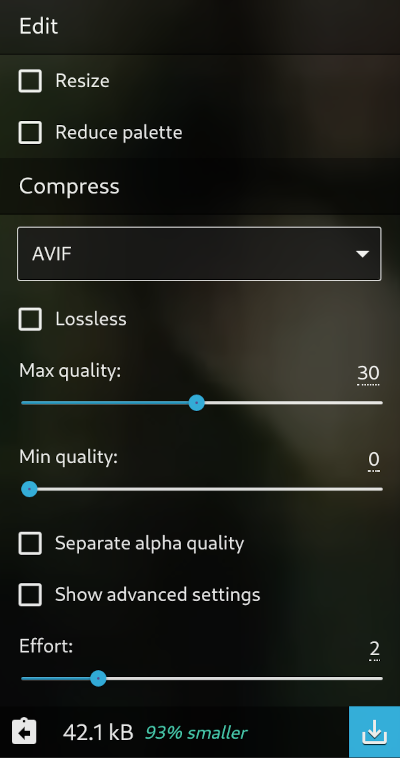
The settings for the AVIF format are easy to understand. You can adjust the minimum and maximum image quality (between 0 and 62), and select an effort level (the higher the value, the longer it will take to produce a result). If you adjust these settings, you’ll see impressive results at acceptable quality levels.
👁 Sqooush AVIF file image compression
The downside to using Squoosh for creating AVIF files is that it can only convert one image at a time. To batch-process images, you can rely on the open source go-aviftool. It’s written in Go and supports the encoding of JPEG and PNG files to AVIF.
First, you need to install the tool. If you have Go installed on your computer, use the command below to compile the tool and install the binary to your $GOPATH/bin:
go get github.com/Kagami/go-avif/...
Otherwise, you can download a precompiled binary for Windows, macOS, or Linux on the releases page and copy it to your $PATH. The simplest usage of go-avif is shown below. This converts a single JPEG image to AVIF using the default settings.
avif -e cat.jpg -o kitty.avif
Let’s create a script so that we can easily process many images at once. Create a new avif.sh file and type the following code into it:
#!/bin/bash
for f in *.{jpg,jpeg,png}
 do
 name=$(echo "$f" | cut -f 1 -d '.') # Extract the filename without the extension
 avif -e $f -o $name.avif # Encode to AVIF

 # Fetch and print size information
 input=`wc -c $f | cut -d' ' -f1`
 output=`wc -c $name.avif | cut -d' ' -f1`
 echo "File $f — Original file size: $(($input/1000)) kB, AVIF file size: $(($output/1000)) kB."
 done
This script will process all JPEG and PNG images in the current folder and convert them to the AVIF format using the default settings of the go-avif tool. You can display the other settings available to you with avif --help and experiment with them to get different results.
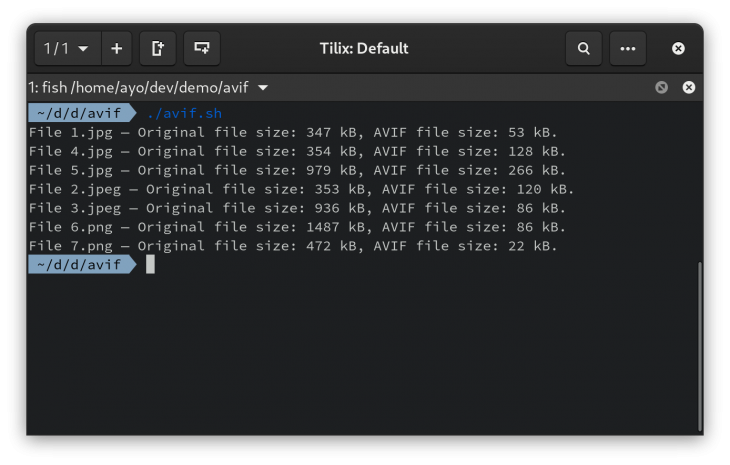
Move the script to the folder containing your images, mark it as executable, and execute it:
chmod +x avif.sh
./avif.sh
This will process each image and place the AVIF output in the same folder. You’ll also see a file size comparison after each conversion. As you can see from the image below, you can get some incredible savings even without tweaking any settings.
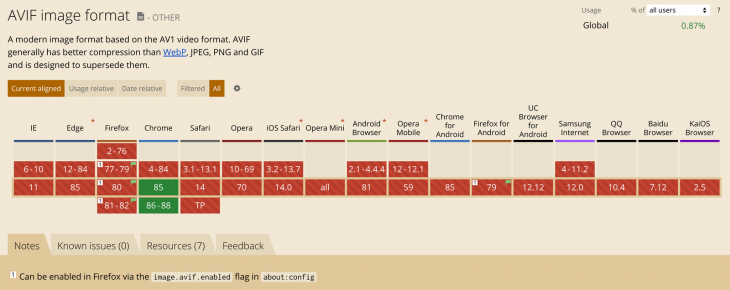
Let’s get the issue of browser support out of the way. AVIF has very limited support at the moment. It’s only supported in desktop Chrome (version 85 and later), although official Firefox support is expected to arrive soon (you can enable experimental support in Firefox 77 or later through the image.avif.enabled flag in about:config). As for Safari, let’s just it doesn’t take 10 years to add support like WebP.
👁 AVIF supported browsers chrome firefox
In any case, you don’t have to wait for all browsers to support it before utilizing AVIF in your websites and applications. You can use the <picture> element to provide a JPEG or WebP fall-back when AVIF isn’t supported:
<picture>
 <source srcset="image.avif" type="image/avif">
 <source srcset="image.webp" type="image/webp">
 <source srcset="image.jpg" type="image/jpeg">
 <img src="image.jpeg" alt="Description of the image">
</picture>
The above snippet will work in every browser, even those that do not support the <picture> element (all versions of Internet Explorer). In such cases, the source specified in the <img> tag will be displayed. Here’s a polyfill you can use if you need <picture> to work everywhere.
In addition to the obvious browser support limitation of the AVIF format (which is bound to get better with time), here are two of the major disadvantages of adopting AVIF for web use.
Standard JPEG and WebP images are loaded line by line from top to bottom until the image is fully loaded. The JPEG format also supports a progressive encoding method that causes a blurry version of the full image to load first, which gradually becomes sharper as the rest of the bytes arrive.
The advantage of progressive rendering is that you get to see the whole image even when only a fraction of the file has been downloaded. It also makes the image loading feel faster than the top-to-bottom render because the entire image is visible from the get-go.
Unfortunately, AVIF supports neither top-to-bottom or progressive rendering. You either see the fully loaded image, or you see nothing, as demonstrated in the above video (credit to Jake Archibald for creating the demo). This makes the format potentially unsuitable for large images. It’s something to consider before you deploy AVIF on your websites.
AVIF is a new format, so it’s lacking the ubiquitous support that long-standing formats like JPEG and PNG have. At the moment, only a minuscule of image viewers support AVIF files, and that’s not likely to change anytime soon. This poses a potential problem if your website’s users tend to save images to their devices because they will end up downloading a file they can’t do anything with.
One way to mitigate this issue is to provide an explicit download link that points to a JPEG or PNG version of the image so that the compatibility benefits of either format are retained even when adopting AVIF.
Despite of the current limited browser support and other cons discussed above, the AVIF format is one that is well worth looking into due to its impressive savings in file size compared to JPEG, PNG, and WebP files at comparable levels of visual quality.
By adopting AVIF on your website, you’ll lower your page load times without degrading image quality. You can start by deploying it for a subset of images, and then expand your usage over time. So go forth and try it out today — it’ll be worth it!
Install LogRocket via npm or script tag. LogRocket.init() must be called client-side, not
server-side
$ npm i --save logrocket

// Code:

import LogRocket from 'logrocket';
LogRocket.init('app/id');
// Add to your HTML:

<script src="https://cdn.lr-ingest.com/LogRocket.min.js"></script>
<script>window.LogRocket && window.LogRocket.init('app/id');</script>
Learn how to use Gemini CLI subagents to delegate frontend, backend, testing, and docs tasks to specialized agents with guardrails and clear ownership.
Learn how next-browser gives AI agents runtime context for debugging Next.js apps, including React props, hydration, PPR, forms, and performance.
Build dynamic LLM routing in Next.js with OpenRouter, TanStack AI, task classification, model fallbacks, and cost-aware routing.
TSRX adds first-class control flow, conditional hooks, and scoped styles to React via a TypeScript compiler extension — no new framework required.
Would you be interested in joining LogRocket's developer community?
Join LogRocket’s Content Advisory Board. You’ll help inform the type of content we create and get access to exclusive meetups, social accreditation, and swag.
Sign up now