 |
VOOZH | about |
|
VOOZH | about |
NestJS is a framework for creating scalable, server-side Node.js applications. It uses modern JavaScript, fully supports and is built using TypeScript, and combines elements of object-oriented, functional, and functional reactive programming.
👁 How To Use NestJS With PrismaThis tutorial will demonstrate how to use Nest and Prisma to build a REST API. As a quick note, the demonstration was run using Prisma v3.11.0. Here’s what we’ll cover:
todo moduleThe Replay is a weekly newsletter for dev and engineering leaders.
Delivered once a week, it's your curated guide to the most important conversations around frontend dev, emerging AI tools, and the state of modern software.
Prisma is a next-generation Node and TypeScript object-relational mapper (ORM). It provides an open source database toolkit for PostgreSQL, MySQL, SQL Server, SQLite, and MongoDB (currently in preview), enabling developers to build apps faster and with fewer errors.
Prisma provides you with a declarative method for defining your app’s data models and relations in a more legible format. Plus, if you already have a database, you don’t have to go through the pain of creating database models from scratch because Prisma’s introspection features handle that for you — it’s that flexible.
Prisma improves type safety by simplifying database access, saving and reducing repetitive CRUD boilerplate. Prisma is easy to integrate into your preferred framework and is an ideal database toolkit for creating dependable and scalable web APIs. Prisma integrates quickly with various frameworks, such as GraphQL, Next.js, Nest, Apollo, and Express.js
Prisma addresses many shortcomings of traditional ORMs, such as a lack of type safety, mixed business and storage logic, and unpredictable queries caused by lazy loading.
To get started with this tutorial, ensure you have:
Before we start building a Nest application, you need to install the Nest CLI with the command below:
npm i -g @nestjs/cli
Wait for the installation to finish. Once the installation is complete, create a new Nest application with the command below:
nest new prisma-api
Choose npm as the preferred package manager and hit Enter. The application will go through some installation processes. You can grab a cup of coffee while you wait.
Once npm has installed all the packages required to run the application, change the directory to the project folder and run the server with the command below:
npm run start:dev
This tutorial uses Prisma v3.11.0. Install the Prisma CLI as a development dependency with command below:
npm install prisma --save-dev
Once the installation is finished, invoke the Prisma CLI locally using npx with the command below:
npx prisma
Now, create your initial Prisma setup using the Prisma init command:
npx prisma init
The above command creates a new Prisma directory with the following files:
schema.prisma: specifies your database connection and contains the database schema.env: a dotenv file typically used to store your database credentials in a group of environment variablesWith Prisma installed, setup on your computer is pretty easy. For the demonstration in this tutorial, we’ll connect to an SQLite database. To get started, open the datasource/schema.prisma file and update the content with the code snippet below:
generator client {
 provider = "prisma-client-js"
}

datasource db {
 provider = "sqlite"
 url = env("DATABASE_URL")
}
In the above snippet, we specified sqlite as our database provider. Now, modify the .env file to specify the location of the database file.
DATABASE_URL="file:./todos.sqlite"
With the database connection set up, you can now create your database tables by defining a schema in the schema.prisma file. For the demonstration in this tutorial, we’ll define a Todo schema, with the code snippet below:
model Todo {
 id Int @id @default(autoincrement())
 title String
 description String?
 completed Boolean? @default(false)
 user String
}
Generate your SQL migration files and run them against the database with the command below:
npx prisma migrate dev --name init
The above command will generate the folder structure below:
prisma
 ┣ migrations
 ┃ ┣ 20220315212227_init
 ┃ ┃ ┗ migration.sql
 ┃ ┗ migration_lock.toml
 ┣ schema.prisma
 ┣ todos.sqlite
 ┗ todos.sqlite-journal
Prisma Client is a type-safe database client generated from your Prisma model definition. It exposes the CRUD operations tailored specifically to your models.
Install Prisma Client with the command below:
npm install @prisma/client
With Prisma Client set up, create a prisma.service file in the src folder to abstract away the Prisma Client API for database queries within a service with the code snippet below:
import { INestApplication, Injectable, OnModuleInit } from '@nestjs/common';
import { PrismaClient } from '@prisma/client';

@Injectable()
export class PrismaService extends PrismaClient implements OnModuleInit {
 async onModuleInit() {
 await this.$connect();
 }

 async enableShutdownHooks(app: INestApplication) {
 this.$on('beforeExit', async () => {
 await app.close();
 });
 }
}
In the above code snippet, we created a new PrismaService that takes care of instantiating PrismaClient and connecting to your database.
todo moduleWith the Prisma service set up, generate a todo module for all the todo logic with the command below:
nest generate module todo
Next, generate a service file for the user module with the command below:
nest generate service todo/service/todo --flat
Then, update the content of the todo.service file with the code snippet below:
import { Injectable } from '@nestjs/common';
import { PrismaService } from '../../prisma.service';
import { Todo, Prisma } from '@prisma/client';
@Injectable()
export class TodoService {
 constructor(private prisma: PrismaService) {}
 async getAllTodo(): Promise<Todo[]> {
 return this.prisma.todo.findMany();
 }
 async getTodo(id: number): Promise<Todo | null> {
 return this.prisma.todo.findUnique({ where: { id: Number(id) } });
 }
 async createTodo(data: Todo): Promise<Todo> {
 return this.prisma.todo.create({
 data,
 });
 }
 async updateTodo(id: number): Promise<Todo> {
 return this.prisma.todo.update({
 where: { id: Number(id) },
 data: { completed: true },
 });
 }
 async deleteTodo(id: number): Promise<Todo> {
 return this.prisma.todo.delete({
 where: { id: Number(id) },
 });
 }
}
In the above code snippet, we’ve created all the CRUD operations for our user’s service.
Now, generate a todo controller to define all the API routes for the user service with the command below:
nest generate controller tod/controller/todo --flat
Update the contents of the todo.controller.ts file with the code snippet below:
import {
 Controller,
 Get,
 Param,
 Post,
 Body,
 Put,
 Delete,
} from '@nestjs/common';
import { TodoService } from '../service/todo.service';
import { Todo } from '@prisma/client';
@Controller('api/v1/todo')
export class TodoController {
 constructor(private readonly todoService: TodoService) {}
 @Get()
 async getAllTodo(): Promise<Todo[]> {
 return this.todoService.getAllTodo();
 }
 @Post()
 async createTodo(@Body() postData: Todo): Promise<Todo> {
 return this.todoService.createTodo(postData);
 }
 @Get(':id')
 async getTodo(@Param('id') id: number): Promise<Todo | null> {
 return this.todoService.getTodo(id);
 }
 @Put(':id')
 async Update(@Param('id') id: number): Promise<Todo> {
 return this.todoService.updateTodo(id);
 }
 @Delete(':id')
 async Delete(@Param('id') id: number): Promise<Todo> {
 return this.todoService.deleteTodo(id);
 }
}
Open the todo.module.ts file, import the PrismaService, and add it to the array of providers with the code snippet below:
...
import { PrismaService } from 'src/prisma.service';

@Module({
 controllers: [...],
 providers: [..., PrismaService],
})
...
At this point, you have successfully created your Nest Prisma REST API! Now let’s test the application using Postman.
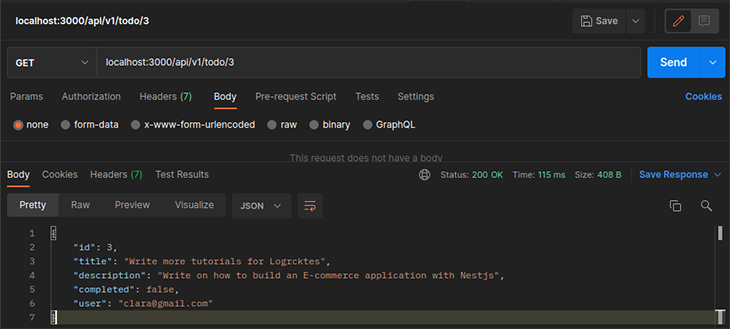
With all the API routes for the demo application created, launch Postman and test the endpoints.
Add todo route:
Get todo route:
Go ahead and play around with the other endpoints. The code for this tutorial is available on my GitHub repository, feel free to clone it!
Throughout this tutorial, you’ve learned how to use NestJS with Prisma to build a REST API. We started with an introduction to these tools, learned how to create a Nest project, and set up Prisma with SQLite. We also defined a todo schema, made migrations, and performed CRUD operations using Prisma.
Now that you have this knowledge, how would you use Prisma in your next Nest project? Perhaps you can learn more about Prisma CRUD operations and add more features to the demo application.
Install LogRocket via npm or script tag. LogRocket.init() must be called client-side, not
server-side
$ npm i --save logrocket

// Code:

import LogRocket from 'logrocket';
LogRocket.init('app/id');
// Add to your HTML:

<script src="https://cdn.lr-ingest.com/LogRocket.min.js"></script>
<script>window.LogRocket && window.LogRocket.init('app/id');</script>
Learn how to use Gemini CLI subagents to delegate frontend, backend, testing, and docs tasks to specialized agents with guardrails and clear ownership.
Learn how next-browser gives AI agents runtime context for debugging Next.js apps, including React props, hydration, PPR, forms, and performance.
Build dynamic LLM routing in Next.js with OpenRouter, TanStack AI, task classification, model fallbacks, and cost-aware routing.
TSRX adds first-class control flow, conditional hooks, and scoped styles to React via a TypeScript compiler extension — no new framework required.
Would you be interested in joining LogRocket's developer community?
Join LogRocket’s Content Advisory Board. You’ll help inform the type of content we create and get access to exclusive meetups, social accreditation, and swag.
Sign up now