 |
VOOZH | about |
|
VOOZH | about |
Over the last few years, state management in React has undergone a major evolution. With solutions like the built-in React Context API and React Redux, it has never been easier to keep a global state and track changes. However, one persisting challenge when implementing these tools is optimizing performance and preventing components from unnecessarily re-rendering.
👁 Optimize Re rendering React TrackedWhile in a smaller application, excessive re-rendering may be unnoticeable or have no negative impact, as your application grows, each re-render may cause delays or lags in your UI. In this tutorial, we’ll use React Tracked, a library for state usage tracking, to optimize our application’s performance by preventing unnecessary re-renders.
The Replay is a weekly newsletter for dev and engineering leaders.
Delivered once a week, it's your curated guide to the most important conversations around frontend dev, emerging AI tools, and the state of modern software.
To get started, set up a new React project on your machine. Open the project in the terminal and add the following command to install the React Tracked library:
yarn add react-tracked scheduler
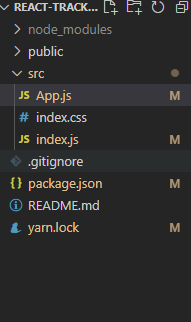
Now, let’s clean up our project by giving it the following structure:
👁 React Tracked Project Structure
Let’s compare React Tracked with the vanilla React implementation of a shared state. We’ll create a simple global context that has two counter components, each using one value.
Add the following code in App.js:
import Counter1 from "./Counter1";
import Counter2 from "./Counter2";

import { SharedStateProvider } from "./store";

function App() {
 return (
 <>
 <SharedStateProvider>
 <div
 style={{
 display: "flex",
 flexDirection: "row",
 border: "1px solid black",
 justifyContent: "space-around",
 }}
 >
 <Counter1 />
 <Counter2 />
 </div>
 </SharedStateProvider>
 </>
 );
}

export default App;
To create the counter components, add the following code in each file:
Counter1import React from "react";
import { useSharedState } from "./store";
export default function Counter1() {
const [state, setState] = useSharedState();
const increment = () => {
setState((prev) => ({ ...prev, count1: prev.count1 + 1 }));
};
return (
<div>
{state.count1}
{console.log("render counter 1")}
<button onClick={increment}>Increment count1</button>
</div>
);
}
Counter2import React from "react";
import { useSharedState } from "./store";
export default function Counter2() {
const [state, setState] = useSharedState();
const increment = () => {
setState((prev) => ({ ...prev, count2: prev.count2 + 1 }));
};
return (
<div>
{state.count1}
{console.log("render counter 2")}
<button onClick={increment}>Increment count2</button>
</div>
);
}
store.jsLastly, let’s create our store.js file, which uses the global counter context and the useSharedState() Hook for the states in the counter component:
import React, { createContext, useState, useContext } from "react";

const initialState = {
 count1: 0,
 count2: 0,
};

const useValue = () => useState(initialState);

const MyContext = createContext(null);

export const useSharedState = () => {
 const value = useContext(MyContext);
 return value;
};

export const SharedStateProvider = ({ children }) => (
 <MyContext.Provider value={useValue()}>{children}</MyContext.Provider>
);
To run the project, add the following command:
yarn start
Now, we’ll see the following output on the browser screen:
👁 React Tracked Counter Increment Button
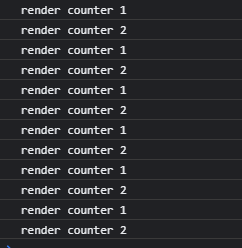
Open the browser console and hit each Increment button three times. We’ll receive the following output:
👁 Increment Button Re-render Output
Each component re-rendered regardless of whether the state was updated. Ideally, the component should re-render only when the state is changed.
In our example, there should have been a total of six re-renders, three for both components, however, we wound up with 12, indicating that both components re-rendered on each click.
Now, let’s try rendering a large list of elements. Add the code below to both Counter1 and Counter2 to generate a list of 10,000 random numbers in each component:
import React, { useEffect, useState } from "react";
import { useSharedState } from "./store";

export default function Counter1() {
 const [state, setState] = useSharedState();

 const [randomNumbers, setRandomNumbers] = useState([]);
 const increment = () => {
 setState((prev) => ({ ...prev, count1: prev.count1 + 1 }));
 };
 const generateHugeList = () => {
 let list = [];
 for (let i = 0; i < 10000; i++) {
 list.push(Math.floor(Math.random() * 10));
 }
 setRandomNumbers(list);
 };
 useEffect(() => {
 generateHugeList();
 }, []);
 return (
 <div>
 {state.count1}
 {console.log("render counter 1")}

 <button onClick={increment}>Increment count1</button>
 {randomNumbers.map((number) => {
 return <p>{number}</p>;
 })}
 </div>
 );
}
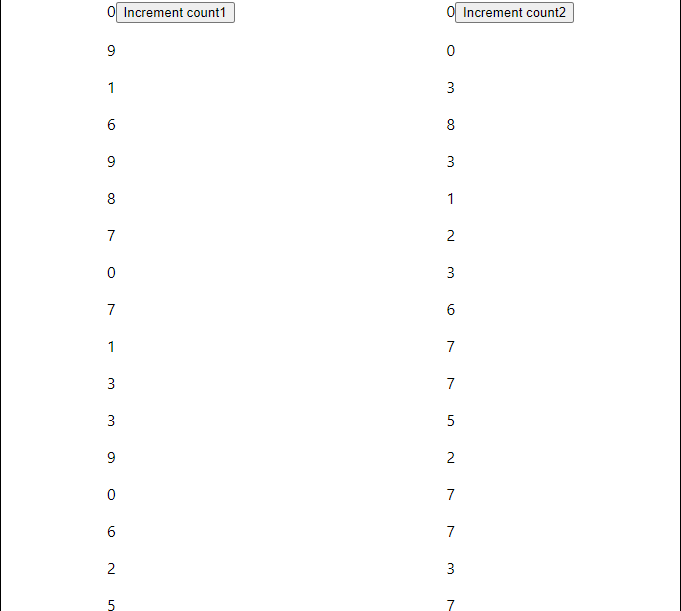
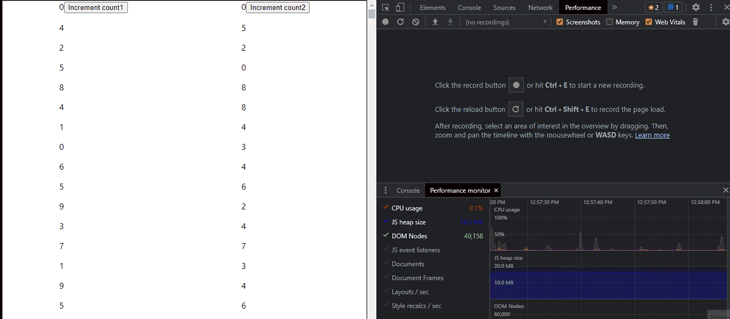
The counter components render the list on the browser, producing an output similar to the following:
👁 Random Numbers Counter Components
With the introduction of these new elements, our application requires more time to load:
👁 Application Load Time New Elements
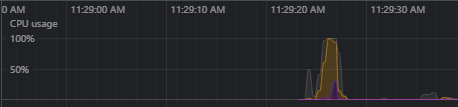
On the first load, CPU usage jumps to 100 percent:
React will paint all the elements to the browser DOM on the first render, so 100 percent CPU usage is typical. However, after clicking the Increment button on each counter component, the CPU usage remains at 100 percent, indicating that both counters are re-rendered constantly:
👁 React Re-rendering CPU Usage Graph
One popular method for preventing re-renders is using Selectors in React Redux, which are functions that subscribe to the Redux store and run whenever an action is dispatched. Selectors use === as a strict quality check, re-rendering the component whenever data is changed. While this process works well for variables, functions, which return a new reference each time the data is changed, are re-rendered constantly.
On the other hand, React Tracked wraps the context object and returns its own provider by using JavaScript proxies to track changes to the individual attribute of the state.
Proxies wrap a single object, intercepting or changing its fundamental operations. React Tracked implements proxies that examine the state inside of a component, re-rendering it only if the information changes. To see proxies in action, let’s implement React Tracked in our application.
First, we need to modify the store.js file that we created earlier by adding the following code:
import { useState } from "react";
import { createContainer } from "react-tracked";

const initialState = {
 count1: 0,
 count2: 0,
};

const useMyState = () => useState(initialState);

export const { Provider: SharedStateProvider, useTracked: useSharedState } =
 createContainer(useMyState);
In the code above, we import createContainer(), which returns a React Tracked provider. The useTracked Hook creates a proxy for our state.
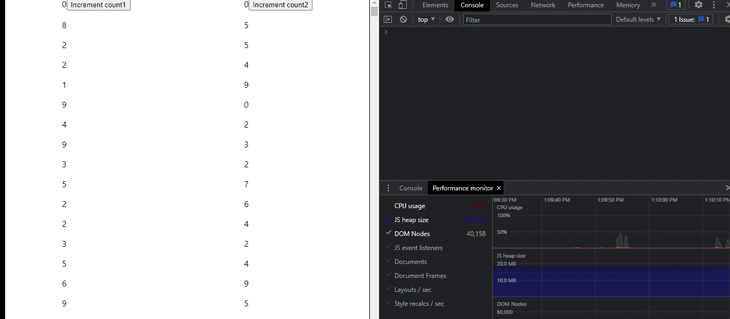
Now, let’s rebuild the project and compare the output from earlier to the output with React Tracked:
👁 React Tracked CPU Usage Graph
As an example, when we select the Increment count1 button, on the first render, both Counter1 and Counter2 are rendered. However, on subsequent clicks, only Counter1 is re-rendered, reducing CPU usage overall and improving our app’s performance.
In this tutorial, we explored the unwanted performance drawbacks that are caused by unnecessary re-rendering. While tools like React Redux and the React Context API make it easy to track changes in your application’s state, they do not provide a straightforward solution to minimizing re-renders.
Using the React Tracked library, we built an application and minimized the number of times our counter components were re-rendered, decreasing the usage of our CPU and improving performance overall. I hope you enjoyed this tutorial!
Install LogRocket via npm or script tag. LogRocket.init() must be called client-side, not
server-side
$ npm i --save logrocket

// Code:

import LogRocket from 'logrocket';
LogRocket.init('app/id');
// Add to your HTML:

<script src="https://cdn.lr-ingest.com/LogRocket.min.js"></script>
<script>window.LogRocket && window.LogRocket.init('app/id');</script>
Learn how to use Gemini CLI subagents to delegate frontend, backend, testing, and docs tasks to specialized agents with guardrails and clear ownership.
Learn how next-browser gives AI agents runtime context for debugging Next.js apps, including React props, hydration, PPR, forms, and performance.
Build dynamic LLM routing in Next.js with OpenRouter, TanStack AI, task classification, model fallbacks, and cost-aware routing.
TSRX adds first-class control flow, conditional hooks, and scoped styles to React via a TypeScript compiler extension — no new framework required.
Would you be interested in joining LogRocket's developer community?
Join LogRocket’s Content Advisory Board. You’ll help inform the type of content we create and get access to exclusive meetups, social accreditation, and swag.
Sign up now