 |
VOOZH | about |
|
VOOZH | about |
A screenshot test is a comparison of screenshots between the older UI of an app and the new UI. The difference between the two is usually highlighted with red, like so:
👁 Jest and Reach Logos for Screenshot TestingNotice that one of the screenshots above failed the test because there were 6414 differing pixels due to the color change of the text.
There is probably no other way to inspect visual regressions today because all other tests inspect only the code and not the image displayed in the browser.
That being said, the two most popular Jest screenshot testing libs for React today are jest-image-snapshot and react-screenshot-test.
The Replay is a weekly newsletter for dev and engineering leaders.
Delivered once a week, it's your curated guide to the most important conversations around frontend dev, emerging AI tools, and the state of modern software.
Here’s a short introduction to both of these tests and a side-by-side comparison:
👁 Jest vs React Screenshot Testing Comparison
Both libs are capable of taking screenshots by using Puppeteer, a Node.js library that provides a high-level API to control headless Chrome or Chromium over the DevTools Protocol, but jest-image-snapshot can work with other screenshot tools as well.
jest-image-snapshot requires Puppeteer configuration on the app side, whereas react-screenshot-test encapsulates the entire process, providing its own API for screenshot testing.
Now let’s dive into setup and usage detail differences.
First, jest-image-snapshot, react-screenshot-test, and Puppeteer should be installed to begin local testing:
npm i jest-image-snapshot puppeteer
or
npm i react-screenshot-test puppeteer
Setting up jest-image-snapshot boils down to adding one extra method to the Jest expect:
// setupTests.js

import { toMatchImageSnapshot } from "jest-image-snapshot";
expect.extend({ toMatchImageSnapshot });
On the other hand, the react-screenshot-test configuration lives in the jest.screenshot.config.js file:
// jest.screenshot.config.js

module.exports = {
 testEnvironment: "node",
 globalSetup: "react-screenshot-test/global-setup",
 globalTeardown: "react-screenshot-test/global-teardown",
 testMatch: ["**/?(*.)+(screenshot).[jt]s?(x)"],
 transform: {
 "^.+\\.[t|j]sx?$": "babel-jest", // or ts-jest
 "^.+\\.module\\.css$": "react-screenshot-test/css-modules-transform",
 "^.+\\.css$": "react-screenshot-test/css-transform",
 "^.+\\.scss$": "react-screenshot-test/sass-transform",
 "^.+\\.(jpg|jpeg|png|gif|eot|otf|webp|svg|ttf|woff|woff2|mp4|webm|wav|mp3|m4a|aac|oga)$":
 "react-screenshot-test/asset-transform"
 },
 transformIgnorePatterns: ["node_modules/.+\\.js"]
};
It should be paired with babel.config.js:
// babel.config.js

module.exports = {
 presets: ["babel-preset-react-app"]
};
The react-screenshot-test lib requires more configuration because it builds parts of the React app for testing purposes but doesn’t use the build script of react-scripts. This approach allows testing components of the app in isolation, just like regular Jest snapshot testing.
A jest-image-snapshot test looks as follows:
// src/screenshot.test.js

import puppeteer from 'puppeteer'

it('main page screenshot test', async () => {
 const browser = await puppeteer.launch({});
 const page = await browser.newPage();
 await page.goto('http://localhost:5000');

 const image = await page.screenshot();
 expect(image).toMatchImageSnapshot();
 await browser.close();
});
The code above is a standard Puppeteer workflow. It will launch a browser, open the page, navigate, and finally, take a screenshot.
The only line of code that is test related is from the setup section: expect(image).toMatchImageSnapshot().
This line of test code is responsible for difference detection and different image generation — or a new screenshot generation in case there wasn’t a screenshot taken previously.
Let’s now take a look at react-screenshot-test, which has its own minimal and convenient API for testing. Here is a typical test:
// src/index.screenshot.js

import React from "react";
import { ReactScreenshotTest } from "react-screenshot-test";
import "./index.css";
import App from "./index";

ReactScreenshotTest.create("App")
 .viewport("Desktop", {
 width: 1024,
 height: 768
 })
 .viewport("iPhone X", {
 width: 375,
 height: 812,
 deviceScaleFactor: 3,
 isMobile: true,
 hasTouch: true,
 isLandscape: false
 })
 .shoot("main page", <App />)
 .run();
The benefits of this approach can be easily seen in an example with a large amount of states possible, such as button styles and sizes or responsive rendering for all of the breakpoints.
For example, for all button styles in one place:
ReactScreenshotTest.create("Buttons")
 .viewport("Desktop", {
 width: 1024,
 height: 768
 })
 .shoot("primary", <Button type="primary" />)
 .shoot("secondary", <Button type="secondary" />)
 .shoot("ghost", <Button type="info" />)
 .shoot("danger", <Button type="danger" />)
 .shoot("warning", <Button type="warning" />)
 .run();
For five breakpoints in one place:
ReactScreenshotTest.create("Header")
 .viewport("XS", {
 width: 365,
 height: 768
 })
 .viewport("S", {
 width: 768,
 height: 768
 })
 .viewport("M", {
 width: 1024,
 height: 768
 })
 .viewport("L", {
 width: 1200,
 height: 768
 })
 .viewport("XL", {
 width: 1600,
 height: 768
 })
 .shoot("responsive", <Header />)
 .run();
jest-image-snapshot needs the app to be served using some web server, such as using the “serve” package before screenshot tests can be run. This can be achieved locally using two console windows, one for the server and the other for testing or alternatively using the convenience package start-server-and-test.
Minimal package.json for the jest-image-snapshot should look like this:
{
 "dependencies": {
 "jest-image-snapshot": "latest",
 "puppeteer": "latest",
 "react": "latest",
 "react-dom": "latest",
 "react-scripts": "latest",
 "serve": "latest",
 "start-server-and-test": "latest"
 },
 "scripts": {
 "build": "react-scripts build",
 "serve": "serve -s build",
 "test": "react-scripts test",
 "test:jest-image-snapshot": "npm run build && start-server-and-test serve http://localhost:5000 test"
 }
}
According to the package.json above, the only command that needs to be executed for screenshot tests is:
npm run test:jest-image-snapshot
Now, for react-screenshot-test minimal package.json:
{
 "dependencies": {
 "puppeteer": "latest",
 "react": "latest",
 "react-dom": "latest",
 "react-screenshot-test": "latest"
 },
 "scripts": {
 "test:react-screenshot-test": "SCREENSHOT_MODE=local jest -c jest.screenshot.config.js"
 }
}
Notice that package.json is short. Only one command needs to be executed for running the tests:
npm run test:react-screenshot-test
There is no clear winner in the libs comparison: both react-screenshot-test and jest-image-snapshot add value using their own approach.
Using jest-image-snapshot package would be a great choice if you already use or plan to use Puppeteer on the project for e2e tests (e.g., checking text on the page, clicking on buttons, etc).
The gold standard for testing by Kent C. Dodds is applied perfectly here: “The more your tests resemble the way your software is used, the more confidence they can give you.”
On the other hand, react-screenshot-test package’s value is the ease of pairing every single component in the app with a screenshot of how the component should look with various options and screen resolutions in a single test.
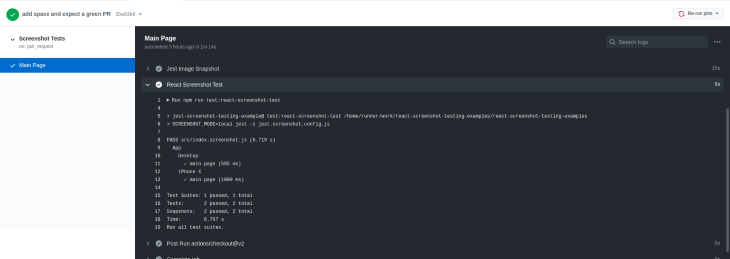
If it’s difficult to decide on which lib to use, keep in mind that they both can work just fine together. In fact, here’s a CI workflow example (and source code for the demo project):
// .github/workflows/screenshot-tests.yml

name: Screenshot Tests

on:
 pull_request:
 branches:
 - main

jobs:
 screenshot:
 name: Main Page
 runs-on: ubuntu-16.04
 timeout-minutes: 5
 steps:
 - uses: actions/checkout@v2

 - name: Use Node.js
 uses: actions/setup-node@v1
 with:
 node-version: "12"

 - name: Install Dependencies
 run: yarn

 - name: Jest Image Snapshot
 run: npm run test:jest-image-snapshot

 - name: React Screenshot Test
 run: npm run test:react-screenshot-test
Happy testing!
Install LogRocket via npm or script tag. LogRocket.init() must be called client-side, not
server-side
$ npm i --save logrocket

// Code:

import LogRocket from 'logrocket';
LogRocket.init('app/id');
// Add to your HTML:

<script src="https://cdn.lr-ingest.com/LogRocket.min.js"></script>
<script>window.LogRocket && window.LogRocket.init('app/id');</script>
Learn how to use Gemini CLI subagents to delegate frontend, backend, testing, and docs tasks to specialized agents with guardrails and clear ownership.
Learn how next-browser gives AI agents runtime context for debugging Next.js apps, including React props, hydration, PPR, forms, and performance.
Build dynamic LLM routing in Next.js with OpenRouter, TanStack AI, task classification, model fallbacks, and cost-aware routing.
TSRX adds first-class control flow, conditional hooks, and scoped styles to React via a TypeScript compiler extension — no new framework required.
Hey there, want to help make our blog better?
Join LogRocket’s Content Advisory Board. You’ll help inform the type of content we create and get access to exclusive meetups, social accreditation, and swag.
Sign up now