 |
VOOZH | about |
|
VOOZH | about |
In 2022, Shopify released an ecommerce stack for headless commerce called Hydrogen. Hydrogen’s innovative technology has made shopping experiences exceptionally dynamic while maintaining high performance.
👁 Using Shopify Hydrogen To Build Modern Ecommerce StorefrontsThis new framework has a quick-start build environment, smart caching, out-of-the-box components, and built-in cache defaults, so it’s no surprise ecommerce developers are excited about it.
In this post, we’ll go over how to build a modern ecommerce store with Shopify Hydrogen and Shopify’s Storefront API.
Jump ahead:
As a prerequisite for this tutorial, you should have a basic understanding of React, Vite, and Tailwind CSS, along with an active Shopify store.
Hydrogen is a React framework that uses Vite for server-side rendering and a hydration middleware that builds on the Shopify storefront API. This means that it uses data from Shopify to create an interactive frontend application.
To get started with Shopify Hydrogen, log in to Shopify and create a Shopify store if you don’t already have one. I’m calling mine Sneakers Kiosk.
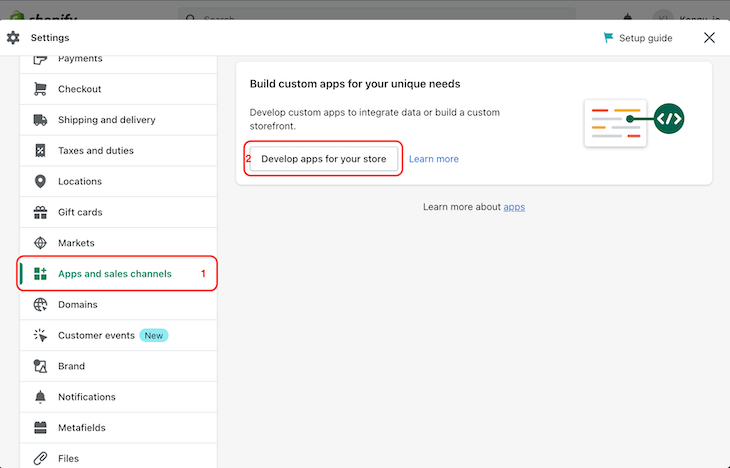
Next, click on the “Settings” icon at the bottom left side of the page:
Navigate to the “Apps and sales channels” tab and click on the “Develop apps for your store” button to create a custom app:
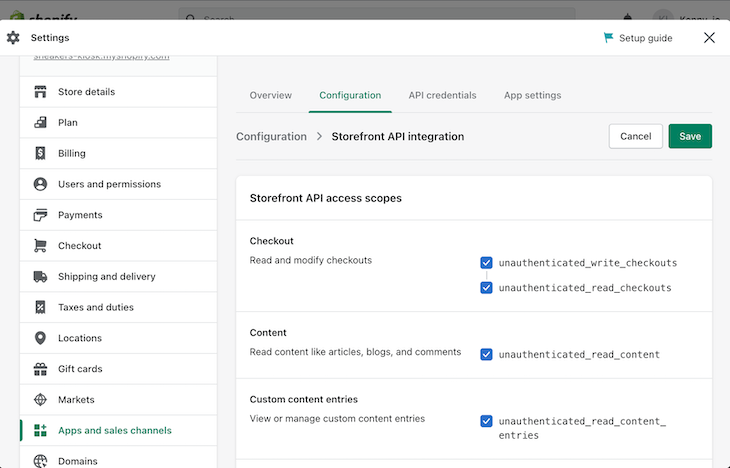
After creating the custom application, click on the “Configure Storefront API scopes” button to configure the app’s storefront API token:
On the store configuration page, we will save our configurations as shown below:
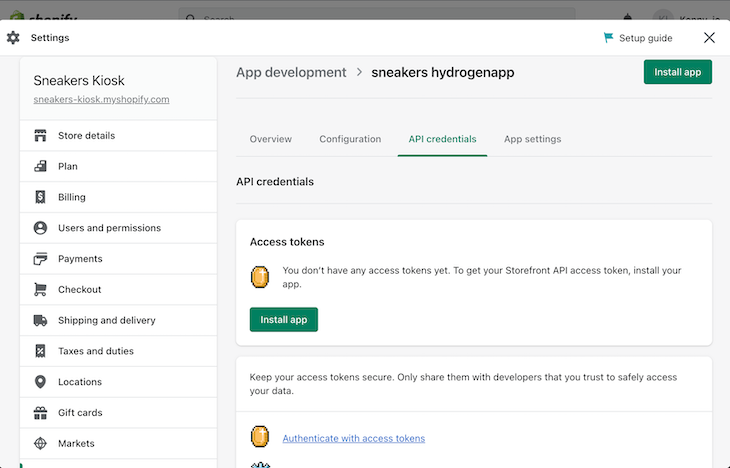
Once we have successfully saved our configurations, we will navigate to the “API credentials” tab. There, we will see an option to install the app on our store:
👁 Shopify Store Settings Api Credentials Tab Showing Option To Install Newly Created App On Store
On the next screen, we will see our access tokens. Copy and save these tokens — we’ll use them later to interact with our Shopify store.
With the store set up, we can now upload our products. There are two ways we can do this.
First, we could manually upload individual products to our store, like so:
Second, we could install Simple Sample Data from the Shopify Store to generate dummy data for the storefront. Navigate to the “Apps” tab of the menu bar and search for “simple sample data”:
Select the app and click the button to install. Then, select a product category and the collections we want to generate. Finally, click the “Generate” button to populate the store with the selected products. With that, our store is ready.
Run the following command to install the Hydrogen starter app with some hello-world text:
yarn create @shopify/hydrogen --template hello-world
Next, let’s connect our Shopify store to the Hydrogen app in the hydrogen.config.js file with the following snippets:
// hydrogen.config.js
import { defineConfig } from "@shopify/hydrogen/config";
export default defineConfig({
 shopify: {
 storeDomain: "<your store url>", //without the "https://" part
 storefrontToken: "<your generated access token>",
 storefrontApiVersion: "2022-07",
 },
});
With the above snippet, we now have access to our store data locally.
Now, let’s fetch our dummy products into our Hydrogen application. Create a components folder and create a FeaturedProducts.server.jsx file within. Update the file with the following snippet:
// src/components/FeaturedProducts.server.jsx
import { Image, Link, gql, useShopQuery, CacheLong } from "@shopify/hydrogen";

const QUERY = gql`
 query Home {
 products(first: 3) {
 nodes {
 id
 title
 handle
 featuredImage {
 height
 width
 altText
 URL
 }
 }
 }
 }
`;

export default function FeaturedProducts() {
 const {
 data: { products },
 } = useShopQuery({
 query: QUERY,
 cache: CacheLong(),
 });
 // return() function here
}
In the snippet above, we imported useQuery and gql from @shopify/hydrogen. We also constructed a QUERY constant that will fetch the first three products and their properties. Finally, we fetched the products from our store by passing the QUERY constant into the useShopQuery, and destructured the response.
In the FeaturedProducts.server.jsx file, let’s display the fetched products by updating the return() function with the following snippets:
// src/components/FeaturedProducts.server.jsx

export default function FeaturedProducts() {
 // Define data and QUERY constants
 return (
 <>
 <h1>Featured Products</h1>
 <div>
 {products &&
 products.nodes.map((prod, index) => (
 <div key={index}>
 <div className="p-2">
 <Link to={`/product/${prod.handle}`} className="">
 <Image
 width={prod.featuredImage.width}
 height={prod.featuredImage.height}
 src={prod.featuredImage.url}
 alt={`Image of ${prod.featuredImage.alttext}`}
 />
 </Link>
 </div>
 <div>
 <Link to={`/product/${prod.handle}`}>
 <h3 className="font-medium">{prod.title}</h3>
 </Link>
 </div>
 </div>
 ))}
 </div>
 </>
 );
}
Here, we looped through the products and conditionally rendered them.
Next, let’s import and render the FeaturedProducts.server.jsx component in the src/routes/index.server.jsx file:
// src/routes/index.server.jsx

import { Suspense } from "react";
import Hero from "../components/Hero.server";
import { Layout } from "../components/Layout.server";
import FeaturedProducts from "../components/FeaturedProducts.server";

export default function Home() {
 return (
 <Layout>
 <Suspense>
 <Hero />
 <FeaturedProducts />
 </Suspense>
 </Layout>
 );
}
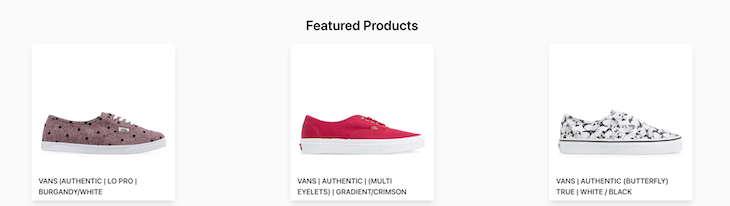
In the browser, the application will look something like the below:
👁 Featured Products Ui As Shown In Browser With Three Sneaker Styles Shown In Horizontal Row
You may see different featured products depending on which product category and collections you selected when setting up Simple Sample Data.
Next, create a single product display page. In the components folder, let’s create a ProductDetails.client.jsx file with the following snippet:
// src/components/ProductDetails.jsx
import { ProductOptionsProvider } from "@shopify/hydrogen";
export default function ProductDetails({ product }) {
 return (
 <ProductOptionsProvider data={product}>
 <section>
 <div>
 <div>
 <div>{/* product gallery here */}</div>
 </div>
 <div>
 <div>
 <h1>{product.title}</h1>
 <span>{product.vendor}</span>
 </div>
 {/* Product form here */}
 <div>
 <div
 dangerouslySetInnerHTML={{ __html: product.descriptionHtml }}
 ></div>
 </div>
 </div>
 </div>
 </section>
 </ProductOptionsProvider>
 );
}
In the above snippet, we imported ProductOptionsProvider from @shopify/hydrogen, created ProductDetails() function and passed product as props to it. We also wrapped our markup with the ProductOptionsProvider.
Next, let’s update the ProductDetails.jsx file to display the product images with the following snippets:
// src/components/ProductDetails.jsx
import { MediaFile } from "@shopify/hydrogen";

export default function ProductDetails({ product }) {
 return <div>product gallery</div>;
}

function ProductGallery({ media }) {
 if (!media.length) {
 return null;
 }
 return (
 <div>
 {media.map((med, i) => {
 let extraProps = {};
 if (med.mediaContentType === "MODEL_3D") {
 extraProps = {
 interactionPromptThreshold: "0",
 ar: true,
 loading: "eager",
 disableZoom: true,
 };
 }
 const data = {
 ...med,
 image: {
 ...med.image,
 altText: med.alt || "Product image",
 },
 };
 return (
 <div>
 <MediaFile
 tabIndex="0"
 data={data}
 options={{
 crop: "center",
 }}
 {...extraProps}
 />
 </div>
 );
 })}
 </div>
 );
}
In the above snippets, we imported MediaFile from @shopify/hydrogen and created the ProductGallery() function that takes in media files and renders them based on their media types using Shopify’s built-in media handler MediaFile.
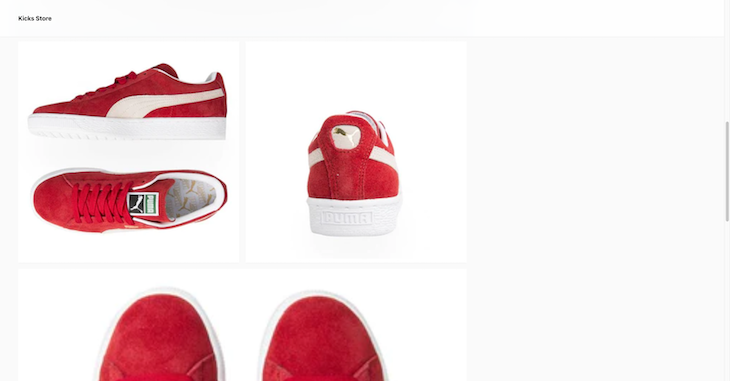
Next, render the ProductGallery inside the ProductDetails component to display the different product image variants:
// src/components/ProductDetails.jsx

export default function ProductDetails({ product }) {
 return (
 <ProductGallery />
 )
}
This should look like the following in the browser:
Next, create a form to handle the user’s product selection with the following snippet:
// src/components/ProductDetails.jsx

import { ProductPrice, BuyNowButton } from "@shopify/hydrogen";
function ProductForm({ product }) {
 const { options, selectedVariant } = useProductOptions();
 const isOutOfStock = !selectedVariant?.availableForSale || false;
 return (
 <form>
 {
 <div>
 {options.map(({ name, values }) => {
 if (values.length === 1) {
 return null;
 }
 return (
 <div key={name}>
 <legend>{name}</legend>
 <div>{/* OptionRadio goes below this line */}</div>
 </div>
 );
 })}
 </div>
 }
 <div>
 <ProductPrice
 priceType="compareAt"
 variantId={selectedVariant.id}
 data={product}
 />
 <ProductPrice variantId={selectedVariant.id} data={product} />
 </div>
 <div>
 {isOutOfStock ? (
 <span>Available in 2-3 weeks</span>
 ) : (
 <BuyNowButton variantId={selectedVariant.id}>
 <span>Buy it now</span>
 </BuyNowButton>
 )}
 </div>
 </form>
 );
}
The above snippet displays a form beside the product gallery with the product price and a “Buy it now” button. The form will look like the below:
As you can see in the form, the product can have multiple variant sizes. Hence, we need to add a component to handle the product variants. To do this, define a new OptionRadio() function in the components/ProductDetails.jsx file like this:
// src/components/ProductDetails.jsx

import { useProductOptions } from "@shopify/hydrogen";
function OptionRadio({ values, name }) {
 const { selectedOptions, setSelectedOption } = useProductOptions();
 return (
 <>
 {values.map((value) => {
 const checked = selectedOptions[name] === value;
 const id = `option-${name}-${value}`;
 return (
 <label key={id} htmlFor={id}>
 <input
 type="radio"
 id={id}
 name={`option[${name}]`}
 value={value}
 checked={checked}
 onChange={() => setSelectedOption(name, value)}
 />
 <div>{value}</div>
 </label>
 );
 })}
 </>
 );
}
In the above snippet, we import the useProductOptions hook from @shopify/hydrogen. We then create a function named OptionRadio that takes two properties name and values.
Additionally, we destructured selectedOptions and setSelectedOption from the useProductOptions hook. Lastly, we returned a markup that displays each value in the values array and imported OptionsRadio into our ProductForm component.
Finally, let’s create a product folder in our /src/routes directory. Then, we’ll create a file called /[handle].server.jsx to handle dynamic routes for individual products. Add the following snippet to the file:
// src/routes/[handle].server.jsx
import { Layout } from "../../components/Layout.server";
import { gql } from "@shopify/hydrogen";

export default function Product({ params }) {
 return <Layout>/* Product Display component goes here */</Layout>;
}

const PRODUCT_QUERY = gql`
 fragment MediaFields on Media {
 mediaContentType
 alt
 previewImage {
 url
 }
 ... on MediaImage {
 id
 image {
 url
 width
 height
 }
 }
 ... on Video {
 id
 sources {
 mimeType
 url
 }
 }
 ... on Model3d {
 id
 sources {
 mimeType
 url
 }
 }
 ... on ExternalVideo {
 id
 embedUrl
 host
 }
 }
 /* Products fetch by handle query goes here */
`;
The above snippet contains a GraphQL query that retrieves media from MediaFields based on their types. Next, let’s add a new query to fetch products dynamically by their handle as shown below:
// src/routes/product/[handle].server.jsx

query Product($handle: String!) {
 product(handle: $handle) {
 id
 title
 vendor
 descriptionHtml
 media(first: 7) {
 nodes {
 ...MediaFields
 }
 }
 variants(first: 100) {
 nodes {
 id
 availableForSale
 compareAtPriceV2 {
 amount
 currencyCode
 }
 selectedOptions {
 name
 value
 }
 image {
 id
 url
 altText
 width
 height
 }
 priceV2 {
 amount
 currencyCode
 }
 sku
 title
 unitPrice {
 amount
 currencyCode
 }
 }
 }
 }
 }
The above snippet fetches user-selected products with prices and variants dynamically using the handle passed as a parameter.
Lastly, we can now fetch this query using Shopify’s useShopQuery hook and render the page by adding the following snippet:
// src/routes/[handle].server.jsx

import { useShopQuery, useRouteParams } from "@shopify/hydrogen";
import { Layout } from "../../components/Layout.server";
import ProductDetails from "../../components/ProductDetails.client";
export default function Product({ params }) {
 const { handle } = useRouteParams();
 const {
 data: { product },
 } = useShopQuery({
 query: PRODUCT_QUERY,
 variables: {
 handle,
 },
 });
 return (
 <Layout>
 <ProductDetails product={product} />
 </Layout>
 );
}
In the above snippet, we imported useShopQuery and useRouteParams from @shopify/hydrogen, along with ProductDetails from the /components directory. We also destructured our handle variable from the useRouteParams hook.
Additionally, we passed our GraphQL product query into the useShopQuery hook and destructured the products from the data object. Finally, we passed products as a prop to our ProductDetails component.
Now we can successfully navigate to the individual pages for our products dynamically, as you can see below:
Finally, let’s deploy the Hydrogen storefront to Netlify. To achieve this, we will first install the following package as a devDependency:
yarn add @netlify/hydrogen-platform -D
Next, we will update our Vite configuration. Add the following snippet to our vite.config.js file:
// vite.config,js
import netlifyPlugin from '@netlify/hydrogen-platform/plugin'
export default defineConfig({
 plugins: [hydrogen(), netlifyPlugin()],
});
Next, we will commit our codebase and push it to GitHub. From there, we can leverage Netlify’s CI/CD workflow to deploy the site. You can access the deployed site on Netlify and check out the source code on GitHub.
This tutorial explored how to use Hydrogen — Shopify’s recently released framework for headless commerce — to build modern storefronts. To learn more about how Hydrogen works, check out the Shopify dev docs.
Hydrogen’s innovative technology has made shopping experiences exceptionally dynamic while maintaining high performance. If you are one of the many developers building storefronts with Shopify, I hope you found this tutorial useful.
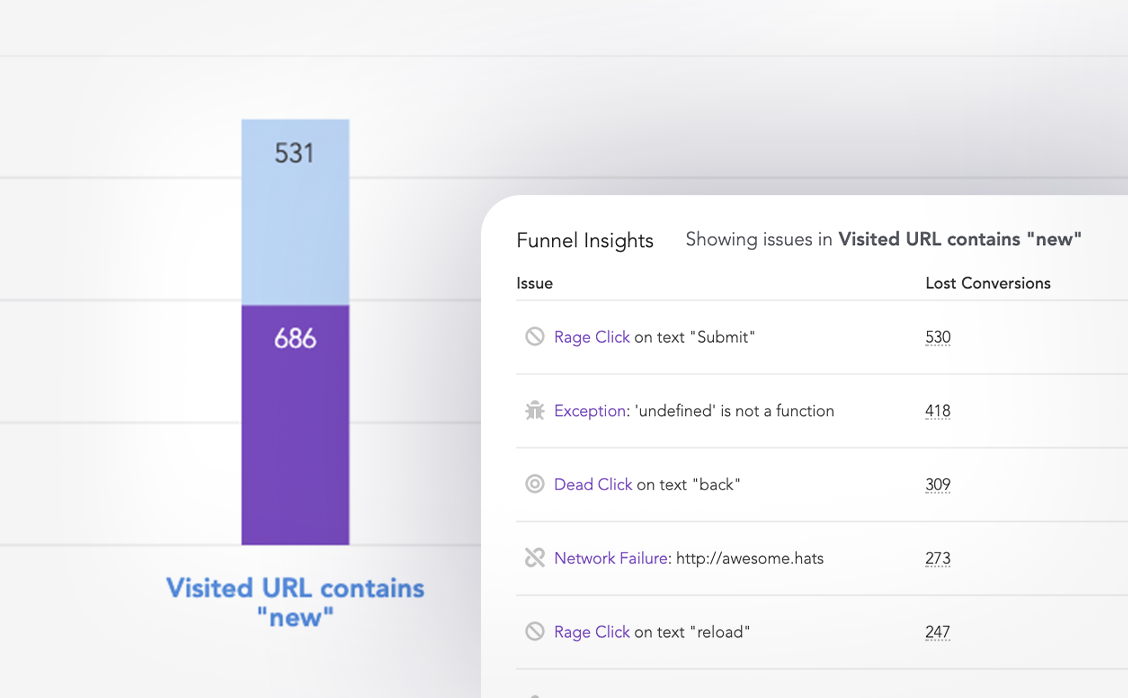
LogRocket lets you replay user sessions, eliminating guesswork around why users don't convert by showing exactly what users experienced. It captures console logs, errors, network requests, and pixel-perfect DOM recordings — compatible with all frameworks.
LogRocket's Galileo AI watches sessions for you, instantly identifying and explaining user struggles with automated monitoring of your entire product experience.
Start proactively monitoring your ecommerce apps — try LogRocket for free.
We built the same app in TanStack Start RSC and Next.js RSC. TanStack shipped 40% less JS and built 4x faster — but Next.js is still the safer production bet.
From RSC vulnerabilities and the Vercel breach to TypeScript 7.0 Beta and AI agents — the nine frontend storylines that defined H1 2026, ranked.
AI tools generate working React code fast, but miss race conditions, empty states, debouncing, and accessibility. Here’s how to catch bugs before production.
Learn how to use Gemini CLI subagents to delegate frontend, backend, testing, and docs tasks to specialized agents with guardrails and clear ownership.
Hey there, want to help make our blog better?
Join LogRocket’s Content Advisory Board. You’ll help inform the type of content we create and get access to exclusive meetups, social accreditation, and swag.
Sign up now