
MonkeyPlanner
AI 코딩 에이전트를 위한 로컬 우선 작업 메모리. 클릭 한 번으로 승인하면 나머지는 에이전트가 처리합니다. 클라우드 없음. 텔레메트리 없음. 영원히 무료, 영원히 MIT 라이선스.
Claude Code · Claude Desktop · Cursor · Continue · 모든 MCP 호환 클라이언트와 함께 작동합니다.
빠른 시작
# Docker (recommended)
docker run -p 8080:8080 -v $(pwd)/data:/data ghcr.io/kjm99d/monkeyplanner:latest

# then wire up your agent
monkey-planner mcp install --for claude-code # or --for cursor / --for claude-desktop
http://localhost:8080 을 열면 내장된 환영 보드가 나머지 과정을 안내합니다.
Related MCP server: task-orchestrator
주요 기능
이슈 및 보드 관리
칸반 보드 — 드래그 앤 드롭, 가로 스크롤, 필터링, 정렬 및 테이블 뷰 전환
이슈 생성 — 제목, 마크다운 본문 및 사용자 정의 속성
사용자 정의 속성 — 6가지 유형 지원:
텍스트
숫자
선택(Select)
다중 선택(Multi-select)
날짜
체크박스
승인 게이트
대기 중 → 승인됨 — 전용 승인 엔드포인트를 통해 수행 (일반 PATCH로는 불가)
승인 대기열 — 보드 전체의 모든 대기 중인 이슈를 일괄 승인
승인됨 → 진행 중 → 완료 — 유연한 상태 전환
거부 상태 — 거부 사유 기록
에이전트 기능
에이전트 지침 필드 — MCP 에이전트가 따를 상세 지침 제공
성공 기준 — 체크리스트로 완료 조건 관리
댓글 — 진행 상황 기록 및 이슈별 소통
의존성 — 이슈 간 차단 관계 표현
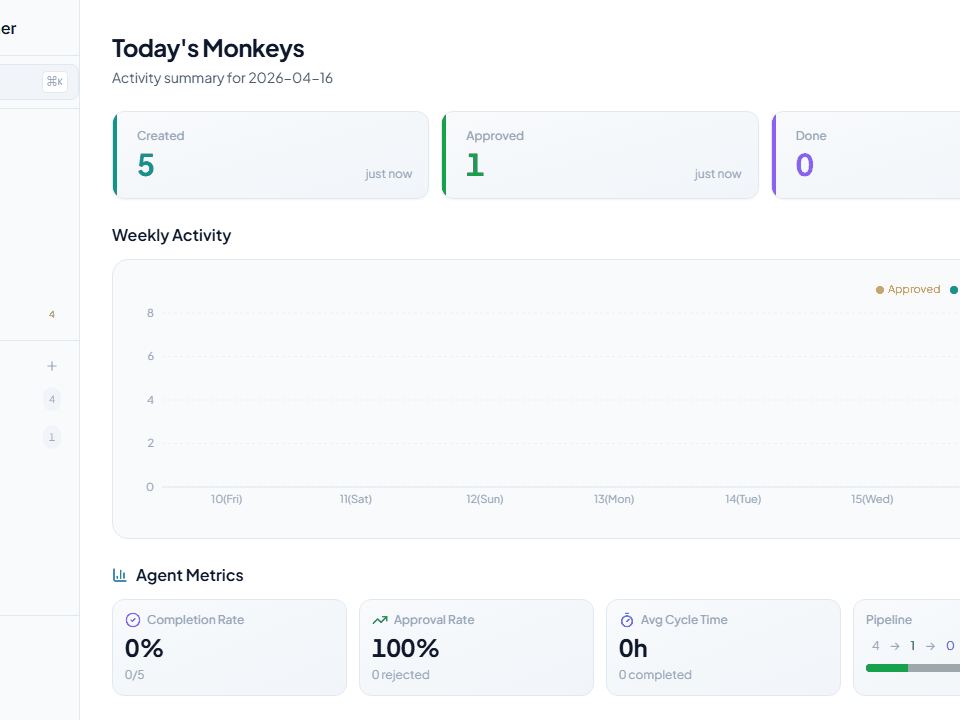
데이터 시각화
캘린더 — 월간 그리드 + 일일 활동 (생성, 승인, 완료 수)
대시보드 — 통계 카드 + 주간 활동 차트
사이드바 — 보드 목록, 이슈 수 및 최근 항목
사용자 경험
전역 검색 — Cmd+K를 통한 빠른 검색
키보드 단축키
h— 대시보드로 이동a— 승인 대기열로 이동?— 단축키 도움말 표시Cmd+S— 저장Escape— 모달/대화 상자 닫기
접이식 사이드바 — 화면 공간 최대화
다크 모드 — 테마 전환
국제화 — 한국어, 영어, 일본어, 중국어 지원
자동화 및 통합
웹훅 — Discord, Slack 및 Telegram 지원
이벤트:
issue.created,issue.approved,issue.status_changed,issue.updated,issue.deleted,comment.created
실시간 UI 동기화 (SSE) — MCP/CLI를 통한 변경 사항이 열려 있는 브라우저 탭에 자동으로 반영 (새로고침 불필요)
JSON 내보내기 — 모든 이슈 데이터 내보내기
우클릭 컨텍스트 메뉴 — 빠른 작업
이슈 템플릿 — 보드별 localStorage 유지
MCP 서버 (AI 에이전트 통합)
AI 에이전트 자동화를 위한 13가지 도구:
list_boards— 모든 보드 나열list_issues— 이슈 조회 (boardId, 상태별 필터링)get_issue— 지침, 기준, 댓글을 포함한 이슈 상세 정보create_issue— 새 이슈 생성approve_issue— 승인: 대기 중 → 승인됨claim_issue— 할당: 승인됨 → 진행 중submit_qa— QA 제출: 진행 중 → QAcomplete_issue— 완료: QA → 완료 (선택적 댓글)reject_issue— 거부: QA → 진행 중 (필수 사유 포함)add_comment— 이슈에 댓글 추가update_criteria— 성공 기준 체크 또는 체크 해제search_issues— 제목으로 이슈 검색get_version— MCP 서버 버전 확인 (진단용)
기술 스택
백엔드
언어: Go 1.26
라우터: chi/v5
데이터베이스: SQLite / PostgreSQL (설정 가능)
마이그레이션: goose/v3
임베디드 파일: embed.FS (단일 바이너리 배포)
프론트엔드
프레임워크: React 18
언어: TypeScript
번들러: Vite 6
CSS: Tailwind CSS
상태 관리: React Query (TanStack)
드래그 앤 드롭: @dnd-kit/core, @dnd-kit/sortable
아이콘: lucide-react
차트: recharts
i18n: react-i18next
마크다운: react-markdown + rehype-sanitize
MCP
프로토콜: stdio 기반 JSON-RPC 2.0
대상: Claude Code, Claude Desktop
시작하기
요구 사항
Go 1.26 이상
Node.js 18 이상
npm 또는 yarn
설치 및 실행
1. 복제 및 초기화
git clone https://github.com/kjm99d/MonkeyPlanner.git
cd monkey-planner
make init
2. 프로덕션 빌드 (단일 바이너리)
make build
./bin/monkey-planner
서버는 프론트엔드가 내장된 상태로 http://localhost:8080에서 실행됩니다.
3. 개발 모드 (별도 프로세스)
터미널 1 — 백엔드:
make run-backend터미널 2 — 프론트엔드 (Vite 개발 서버, :5173):
make run-frontend프론트엔드는 /api 요청을 자동으로 :8080으로 프록시합니다.
환경 변수
# Server address (default: :8080)
export MP_ADDR=":8080"

# Database connection string
# SQLite (default: sqlite://./data/monkey.db)
export MP_DSN="sqlite://./data/monkey.db"

# PostgreSQL example
export MP_DSN="postgres://user:password@localhost:5432/monkey_planner"
MCP 서버 설정
권장: CLI를 통한 자동 구성
# Claude Code (writes .mcp.json in the current directory)
monkey-planner mcp install --for claude-code

# Claude Desktop (writes the OS-native config file)
monkey-planner mcp install --for claude-desktop

# Cursor (writes .cursor/mcp.json)
monkey-planner mcp install --for cursor
플래그: --dry-run (미리보기), --scope user (전역 설정 ~/.mcp.json), --force (덮어쓰기), --base-url <url> (기본값이 아닌 서버 지정).
설정 후 클라이언트를 재시작하여 구성을 다시 읽도록 하세요.
수동 구성
Claude Code (.mcp.json), Claude Desktop (OS 기본 설정), Cursor (.cursor/mcp.json)에서 동일하게 작동합니다:
{
 "mcpServers": {
 "monkey-planner": {
 "command": "/path/to/monkey-planner",
 "args": ["mcp"],
 "env": {
 "MP_BASE_URL": "http://localhost:8080"
 }
 }
 }
}
바이너리는 HTTP 서버에 도달할 수 있어야 합니다 (MP_BASE_URL로 설정). 둘 다 같은 머신에서 실행 중이라면 기본값을 그대로 두세요.
MCP 도구 사용 예시
AI: List all boards
→ list_boards()

AI: Find issues related to "authentication"
→ search_issues(query="authentication")

AI: Approve the first pending issue, claim it, work on it, and submit for QA
→ approve_issue() → claim_issue() → submit_qa()
워크플로우 — 실제 사용 시나리오
아래는 언어 전환기 버그를 수정하는 실제 워크플로우로, 사람과 AI 에이전트가 MonkeyPlanner를 통해 어떻게 협업하는지 보여줍니다.
상태 흐름
Pending → Approved → InProgress → QA → Done
 ↑ │ (reject with reason)
 └──────────────┘
단계별 과정
1. 이슈 생성 — 사람이 버그를 발견하고 AI에게 등록 요청
Human: "The language selector dropdown doesn't appear when clicking the button. Create an issue."
AI: create_issue(boardId, title, body, instructions) → status: Pending
2. 승인 — 사람이 검토 후 승인
Human: (clicks Approve on the board or tells AI)
AI: approve_issue(issueId) → status: Approved
3. 작업 시작 — AI가 이슈를 할당받고 코딩 시작
AI: claim_issue(issueId) → status: InProgress
 - Reads code, identifies root cause
 - Implements fix, runs tests
 - Commits changes
4. QA 제출 — AI가 작업을 마치고 검토를 위해 제출
AI: submit_qa(issueId, comment: "commit abc1234 — fixed click handler")
 → status: QA
 add_comment(issueId, "Commit info: ...")
5. 검토 — 사람이 수정 사항 테스트
Human: Tests in browser, finds the dropdown is clipped by sidebar
 → reject_issue(issueId, reason: "Dropdown is hidden behind sidebar")
 → status: InProgress (back to step 3)

Human: Tests again after fix, everything works
 → complete_issue(issueId) → status: Done
6. 피드백 루프 — 댓글을 통한 지속적인 소통
Human: add_comment("Dropdown is clipped on the left side, fix it")
AI: get_issue() → reads comment → fixes → commit → submit_qa()
Human: Tests → complete_issue() → Done ✓
핵심 요약
사람이 게이트를 제어: 승인, QA 통과/거부, 완료
AI가 작업 수행: 코드 분석, 구현, 테스트, 커밋
댓글이 소통 채널: 양측 모두
add_comment를 사용하여 피드백 교환QA 루프가 조기 완료 방지: 이슈는 완료 상태가 되기 전 반드시 사람의 검토를 통과해야 함
API 참조
OpenAPI 3.0 사양: backend/docs/swagger.yaml
주요 엔드포인트
보드
GET /api/boards # List boards
POST /api/boards # Create board
PATCH /api/boards/{id} # Update board
DELETE /api/boards/{id} # Delete board
이슈
GET /api/issues # List issues (filter: boardId, status, parentId)
POST /api/issues # Create issue
GET /api/issues/{id} # Issue detail + child issues
PATCH /api/issues/{id} # Update issue (status, properties, title, etc.)
DELETE /api/issues/{id} # Delete issue
POST /api/issues/{id}/approve # Approve issue (Pending → Approved)
댓글
GET /api/issues/{issueId}/comments # List comments
POST /api/issues/{issueId}/comments # Add comment
DELETE /api/comments/{commentId} # Delete comment
속성 (사용자 정의 속성)
GET /api/boards/{boardId}/properties # List property definitions
POST /api/boards/{boardId}/properties # Create property
PATCH /api/boards/{boardId}/properties/{propId} # Update property
DELETE /api/boards/{boardId}/properties/{propId} # Delete property
웹훅
GET /api/boards/{boardId}/webhooks # List webhooks
POST /api/boards/{boardId}/webhooks # Create webhook
PATCH /api/boards/{boardId}/webhooks/{whId} # Update webhook
DELETE /api/boards/{boardId}/webhooks/{whId} # Delete webhook
캘린더
GET /api/calendar # Monthly stats (year, month required)
GET /api/calendar/day # Daily issue list (date required)
전체 스키마 세부 정보는 backend/docs/swagger.yaml을 참조하세요.
프로젝트 구조
monkey-planner/
├── backend/
│ ├── cmd/monkey-planner/
│ │ ├── main.go # Entry point (HTTP server)
│ │ └── mcp.go # MCP server (JSON-RPC stdio)
│ ├── internal/
│ │ ├── domain/ # Domain models (Issue, Board, etc.)
│ │ ├── service/ # Business logic
│ │ ├── storage/ # Database layer (SQLite/PostgreSQL)
│ │ ├── http/ # HTTP handlers & router
│ │ └── migrations/ # goose migration files
│ ├── web/ # Embedded frontend (embed.FS)
│ ├── docs/
│ │ └── swagger.yaml # OpenAPI 3.0 spec
│ ├── go.mod
│ └── go.sum
│
├── frontend/
│ ├── src/
│ │ ├── components/ # Reusable components
│ │ ├── features/ # Page & feature components
│ │ │ ├── home/ # Dashboard
│ │ │ ├── board/ # Board & Kanban
│ │ │ ├── issue/ # Issue detail
│ │ │ ├── calendar/ # Calendar
│ │ │ └── approval/ # Approval queue
│ │ ├── api/ # API hooks & client
│ │ ├── design/ # Tailwind tokens
│ │ ├── i18n/ # Translations (en.json, ko.json, ja.json, zh.json)
│ │ ├── App.tsx # Router
│ │ ├── index.css # Global styles
│ │ └── main.tsx
│ ├── package.json
│ ├── vite.config.ts
│ ├── tsconfig.json
│ └── tailwind.config.js
│
├── .mcp.json # Claude Code MCP config
├── Makefile # Build & dev commands
├── .githooks/ # Git hooks
└── data/ # SQLite database (default)
테스트
백엔드 테스트
make test-backend프론트엔드 테스트
make test-frontend접근성 테스트
make test-a11y전체 테스트
make test공통 명령어
# Initial setup after cloning
make init

# Production build
make build

# Run production server
./bin/monkey-planner

# Development mode
make run-backend # Terminal 1
make run-frontend # Terminal 2

# Clean build artifacts
make clean
상태 전환 규칙
Pending
 ↓ (approve endpoint)
Approved
 ↓ (PATCH status)
InProgress
 ↓ (PATCH status)
Done

Pending → Approved: POST /api/issues/{id}/approve (dedicated endpoint only)
Approved ↔ InProgress ↔ Done: Free transitions via PATCH
Pending: Cannot be re-entered from other statuses
Rejected: Separate rejection state with reason tracking
라이선스
MIT
기여
이슈 및 풀 리퀘스트는 언제나 환영합니다.
연락처
프로젝트에 대한 질문이나 피드백은 GitHub 이슈를 열어주세요.
This server cannot be installed
Maintenance
Latest Blog Posts
MCP directory API
We provide all the information about MCP servers via our MCP API.
curl -X GET 'https://glama.ai/api/mcp/v1/servers/kjm99d/MonkeyPlanner'
If you have feedback or need assistance with the MCP directory API, please join our Discord server