 |
VOOZH | about |
|
VOOZH | about |
Servlets are server-side Java programs used to create dynamic web applications by handling client requests and generating responses. They act as a bridge between web requests and backend processing, making them an important part of Java web development.
- Java 8 or above
- Eclipse IDE
- Apache Tomcat Server
Follow the below steps to create and run a basic Servlet example in Eclipse IDE using Apache Tomcat server.
In Eclipse, go to File -> New -> Dynamic Web Project and click on it.
👁 ImageEnter the project name, verify the project location and runtime settings, then click on Next to continue.
👁 ImageThe source folders on the build path and the classes folder will be displayed here. Click on Next.
👁 ImageThis step creates the web module where HTML and JSP files are stored. Select the web.xml checkbox to generate the deployment descriptor file, then click on Finish.
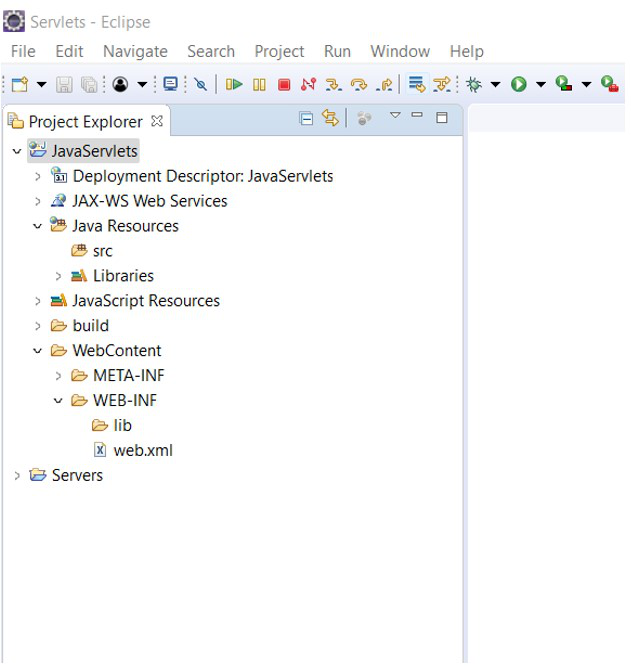
👁 ImageNow by Following above steps Finally the project structure should be created.
Add the Servlet API library required for Servlet development.
👁 ImageNote: If the servlet-api.jar file is not available with your server, download it from Maven Repository and add it as an external JAR to the project.
Open the Libraries tab. and Click on Add External JARs.
👁 ImageOnce the jar file is added, click on Apply and Close. The added jar file will be visible under the lib folder in your project.
👁 ImageTo create a Servlet, go to folder src -> New -> Servlet.
👁 ImageIf the Servlet option is not there, go to Other and search for Servlet and fill the details and make javax.servlet.http.HttpServlet class as superclass.
👁 ImageSpecify the URL mapping for the Servlet, modify the default mapping if needed, and click on Next.
👁 ImageHTTPServlet provides methods like init() for initialization and doGet() for handling GET requests. Select the doGet() checkbox to display a Welcome message, then click Finish.
👁 ImageIn the doGet() method, implement the logic to display the welcome message to the user.
HelloServlet.java:
Right-click on the HelloServlet.java class, Run As -> Run on Server.
👁 ImageIf we want to Debug the servlet, you can click on Debug also here.
👁 ImageMake sure the Tomcat server is configured properly on localhost and click on Next.
👁 ImageCheck the Project you created is in configured section and then click on Finish. If the project is showing in the Available section, select the project and click on Add to configure the project on the server.
Output:
👁 ImageExplanation: The servlet is successfully executed on the Apache Tomcat server, and the browser displays the “Welcome to GeeksForGeeks” response using the mapped URL pattern /HelloServlet.