Singleton and Prototype Bean Scopes in Java Spring
Last Updated : 27 Apr, 2026
In the Spring Framework, Singleton and Prototype bean scopes define how bean instances are created and managed by the Spring IoC container.
Bean scope defines how many objects of a bean are created in the Spring container.
Singleton creates only one shared instance of a bean.
Prototype creates a new instance every time the bean is requested.
Singleton Scope
The Singleton scope is the default scope in Spring. In this scope, the Spring container creates only one instance of the bean and shares it across the entire application.
The same object is shared across all components.
Created when the application context starts (by default).
Suitable for stateless services such as service classes and repositories
Add the Spring Context dependency to enable Spring IoC.
Explanation:
The name field stores data for the bean.
setName(): allows you to set the value of name (used in your client).
getName(): allows you to retrieve the value of name.
Step 4: Create Bean Class (HelloWorld.java)
Step 5: Create Spring XML Configuration File
Explanation:
<bean> tag registers HelloWorld with the Spring IoC container.
id="hw" is the unique identifier for this bean.
class="bean.HelloWorld" tells Spring which class to instantiate.
scope="singleton" specifies that Spring will create only one instance of this bean and reuse it every time it’s requested.
This XML acts as a map for the Spring container, so Spring knows how to manage the bean lifecycle.
Step 6: Create Client Class (Client.java)
Explanation:
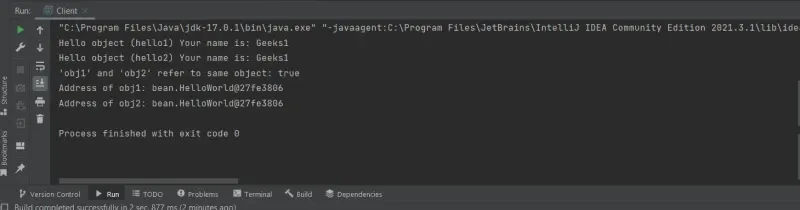
ApplicationContext context = new ClassPathXmlApplicationContext("spring.xml"): This line loads the Spring IoC container and reads spring.xml to know which beans to create.
HelloWorld Geeks1 = (HelloWorld) context.getBean("hw"): Requests the bean for the first time. Spring creates the singleton instance now.
Geeks1.setName("Geeks1"): Sets the name property of the singleton bean.
HelloWorld Geeks2 = (HelloWorld) context.getBean("hw"): Requests the bean a second time. Spring returns the same instance created earlier.
System.out.println(Geeks1.getName()); and System.out.println(Geeks2.getName()): Both print "Geeks1" because there is only one object shared between the two references.
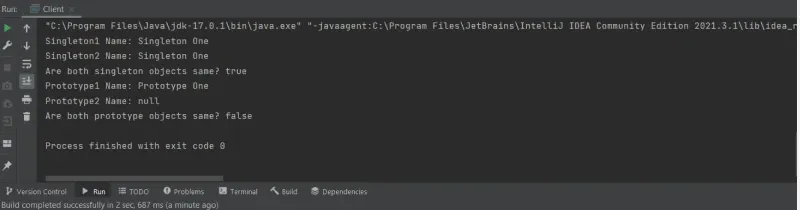
In the Prototype scope, the Spring container creates a new bean instance every time it is requested from the container. Unlike singleton, each request gets a completely new object.
Multiple objects are created.
A new instance is returned every time getBean() is called.
The container manages creation only, not the full lifecycle.
Steps to Create Prototype Scope
Step 1: Create a New Project
Open IntelliJ IDEA -> Click New Project.
Choose Java -> Maven (optional, but recommended for dependencies).
Give your project a name, e.g., SpringBeanScopesDemo.
