 |
VOOZH | about |
|
VOOZH | about |
CRUD stands for Create, Read/Retrieve, Update and Delete and these are the four basic operations that we perform on persistence storage. CRUD is data-oriented and the standardized use of HTTP methods. HTTP has a few methods which work as CRUD operations and do note they are very vital from a developmental point perspective in programming that also does helps us relate better web development and also aids us while dealing with databases.
So, standard CRUD Operations is as follows:
As the name suggests
So in this article, we are going to perform some basic CRUD Operations by creating a Spring Boot Application and using the MySQL Database. So here is a brief explanation of What's Spring Boot and What's MySQL Database.
Spring Boot
Spring Boot is built on the top of the spring and contains all the features of spring. And is becoming a favorite of developers these days because it’s a rapid production-ready environment that enables the developers to directly focus on the logic instead of struggling with the configuration and setup. Spring Boot is a microservice-based framework and making a production-ready application in it takes very little time.
MySQL Database
MySQL is an RDBMS (Relational Database Management System) based on the SQL (Structured Query Language), which is the popular language for accessing and managing the records in the database. MySQL is open-source and free software under the GNU license. It is supported by Oracle Company. The data in a MySQL database are stored in tables. A table is a collection of related data, and it consists of columns and rows. Some of the features of MySQL are listed below:
So to connect and perform CRUD operation with the MySQL DB with Spring Boot application we have to just configure it inside the application.properties file as follows:
# Configuration for MySQL Database

spring.jpa.hibernate.ddl-auto=update

spring.datasource.url = jdbc:mysql://localhost:3306/schooldb
(Datasource URL of your DB and "schooldb", here is your schema name)

spring.datasource.username=amiya559 (Your MySQL Workbench user name)
spring.datasource.password=password.123 (Your MySQL Workbench password)
spring.datasource.driver-class-name=com.mysql.cj.jdbc.Driver
spring.jpa.show-sql:true
JpaRepository is a JPA (Java Persistence API) specific extension of Repository. It contains the full API of CrudRepository and PagingAndSortingRepository. So it contains API for basic CRUD operations and also API for pagination and sorting.
Syntax:
public interface JpaRepository<T,ID> extends PagingAndSortingRepository<T,ID>, QueryByExampleExecutor<T>
Where
Illustration:
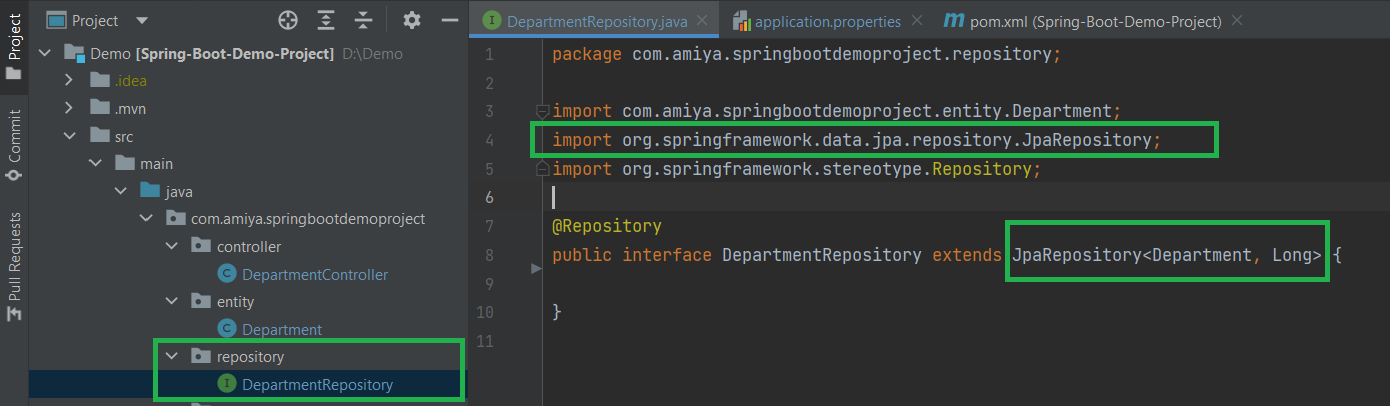
public interface DepartmentRepository extends JpaRepository<Department, Long> {}Example: We will be having a Spring Boot application that manages a Department entity with JpaRepository. The data is saved in the MySQL database. We use a RESTful controller.
Step 1: Create a Spring Boot project with say it be IntelliJ
Step 2: Add the following dependency as listed below as follows:
Below is the complete code for the pom.xml file.
Step 3: Create 4 packages as listed and create some classes and interfaces inside these packages as seen in the below image as shown:
Note:
- Green Rounded Icon 'I' Buttons are Interface
- Blue Rounded Icon 'C' Buttons are Classes
Step 4: Inside the entity package
It is done via creating a simple POJO class inside the Department.java file.
Step 5: Inside the repository package
Create a simple interface and name the interface as DepartmentRepository. This interface is going to extend the JpaRepository as we have discussed above.
👁 ImageExample
Step 6: Inside the service package
Example 1-A Inside the package create one interface named as DepartmentService and one class named as DepartmentServiceImpl.
Example 1-B
Step 7: Inside the controller package
Inside the package create one class named as DepartmentController.
Step 8: Below is the code for the application.properties file
server.port=8082

# Configuration for MySQL Database
spring.jpa.hibernate.ddl-auto=update
spring.datasource.url=jdbc:mysql://localhost:3306/schooldb
spring.datasource.username=amiya559
spring.datasource.password=password.123
spring.datasource.driver-class-name=com.mysql.cj.jdbc.Driver
spring.jpa.show-sql:true
Now run your application and let's test the endpoints in Postman and also refer to our H2 Database.
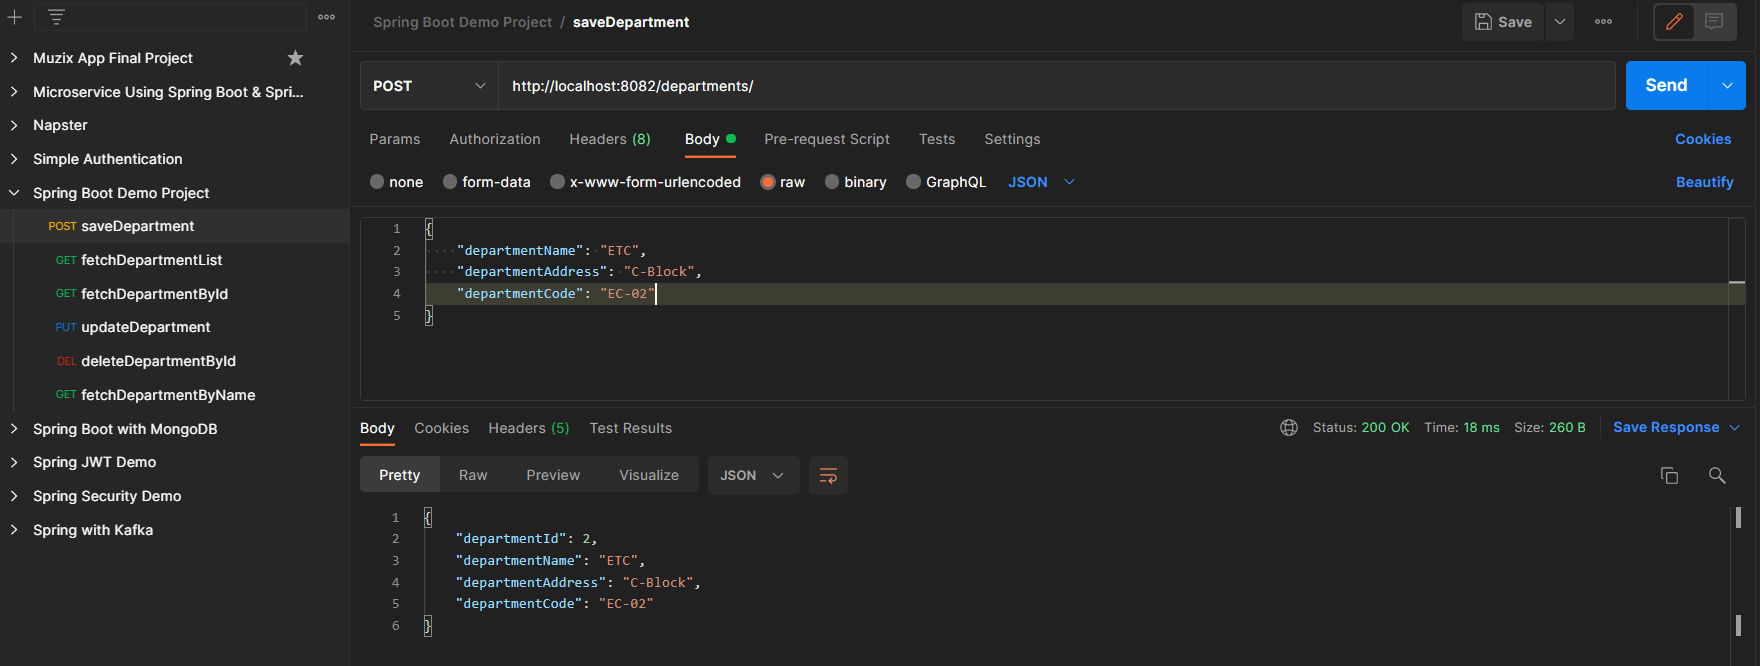
Endpoint 1: POST - http://localhost:8082/departments/
👁 ImageEndpoint 2: GET - http://localhost:8082/departments/
👁 ImageEndpoint 3: PUT - http://localhost:8082/departments/1
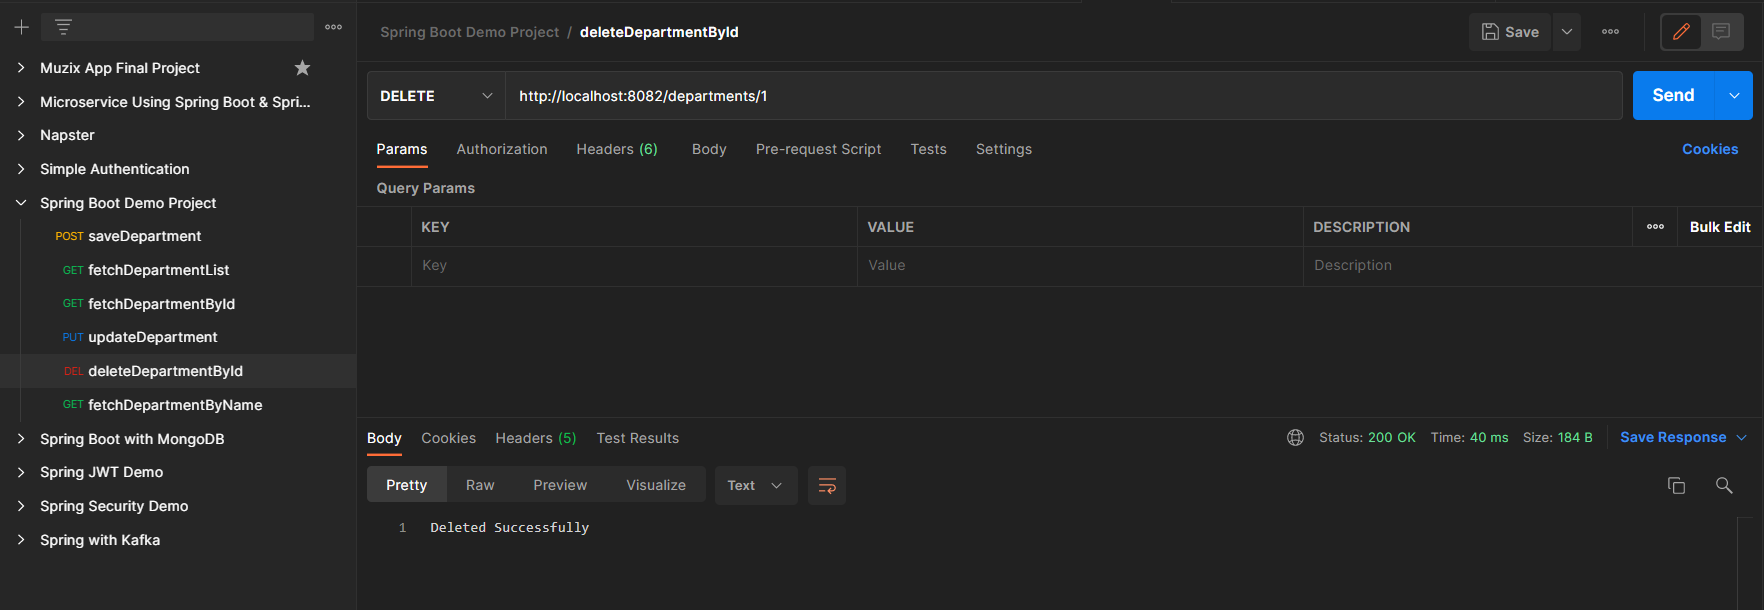
👁 ImageEndpoint 4: DELETE - http://localhost:8082/departments/1
👁 ImageMySQL Workbench will appear as shown below:
👁 Image