 |
VOOZH | about |
|
VOOZH | about |
Organizing a NestJS project with a well-planned folder structure is important for readability, scalability, and maintainability. A clear structure helps in managing code, configurations, modules, and other assets effectively. In this article, we are going to learn the folder structure of a NestJS project and explore the best practices for organizing it, including flat structure, modular structure, and Domain-Driven Design (DDD).
Table of Content
To understand the folder structure for a NestJS project, ensure you have:
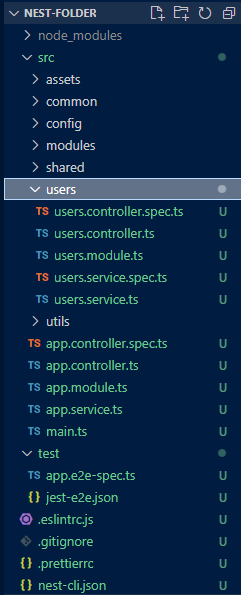
The folder structure of a NestJS application contains various files and directories that are essential for organizing the project's components, services, modules, and configurations. Here’s an overview of a typical NestJS folder structure:
Step 1: Install NestJS CLI
npm install -g @nestjs/cli Step 2: Create a new project
nest new project-name Steo 3: Navigate to the project directory
cd project-name Step 4: Generate a new module
nest generate module module-name Step 5: Generate a new controller
nest generate controller controller-name Step 6: Generate a new service
nest generate service service-name Step 7: Create Common Directories and Files
Create directories like common, config, modules, shared, utils, and assets to organize your code logically.
cd src
mkdir common
mkdir config
mkdir modules
mkdir shared
mkdir utils
mkdir assets
For managing the project in a more concise way, we can create these folders for better code organization. Here's a detailed breakdown of each folder and its purpose:
1. Common Folder: The common folder is used to store components that are shared across multiple modules and are fundamental to the application's structure. This can include:
2. Config Folder: The config folder is used for storing configuration files that manage different environments and settings. This includes:
3. Modules Folder: The modules folder is the core of your application, containing feature-specific modules. Each module encapsulates related controllers, services, DTOs, and entities, providing a clear separation of concerns and promoting modular design.
4. Shared Folder: The shared folder includes modules or services that are used across multiple features of the application. This ensures reusability and avoids duplication of common functionalities.
5. Utils Folder: The utils folder is used for utility functions and helper methods that can be utilized throughout the application. These functions typically include common operations like data formatting, calculations, or other reusable logic.
6. Assets Folder: The assets folder stores static assets like images, icons, fonts, and other media files. Organizing these assets in a dedicated directory keeps your project clean and makes it easy to locate and manage these files.
7. Styles Folder: The styles folder contains CSS or other styling files used to define the visual appearance of your application. This folder helps in maintaining a consistent style across the application and makes it easier to manage styles for different components and modules.
NestJS applications have a well-defined and intuitive folder structure that helps in organizing code efficiently. There are different approaches to structuring a NestJS application based on the size and complexity of the project:
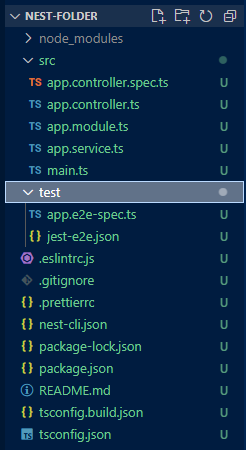
In a flat structure, all files are placed in a single directory or a few directories without much nesting. This approach is simple but can become unmanageable as the project grows.
Components:
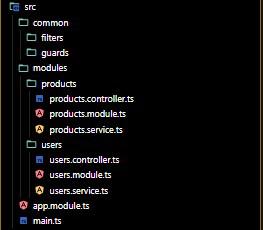
In a modular structure, the application is divided into separate modules, each with its own controller, service, and other related files. This structure is scalable and helps in organizing code better.
Components:
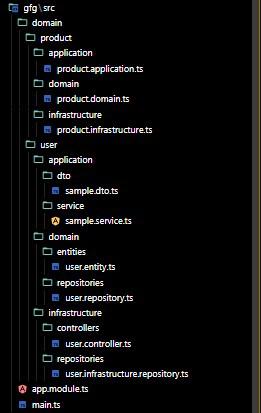
In a DDD structure, the application is organized around business domains. Each domain contains its own modules, controllers, services, and other related files. This approach is suitable for very large and complex applications.
Components: