 |
VOOZH | about |
|
VOOZH | about |
Android ImageButton is a user interface widget which is used to display a button having image and to perform exactly like button when we click on it but here, we add an image on Image button instead of text. There are different types of buttons available in android like ImageButton, ToggleButton, etc. We can add an image to the button simply by using attribute android:src in activity_main.xml file or by using setImageResource() method.
In android, we can create ImageButton control in two ways either manually or programmatically.
| XML Attributes | Description |
|---|---|
| android:id | Used to uniquely identify the control. |
| android:src | Used to specify the source file of the image. |
| android:onClick | Used to Specifies what to do when this button is clicked. |
| android:visibility | Used to set visibility of the image button. |
| android:background | Used to set background color of the Image button. |
| android:maxHeight | Used to set maximum height of the Image button view. |
| android:maxWidth | Used to set maximum width of the Image button view. |
| android:padding | Used to set the padding from left, right, top and bottom. |
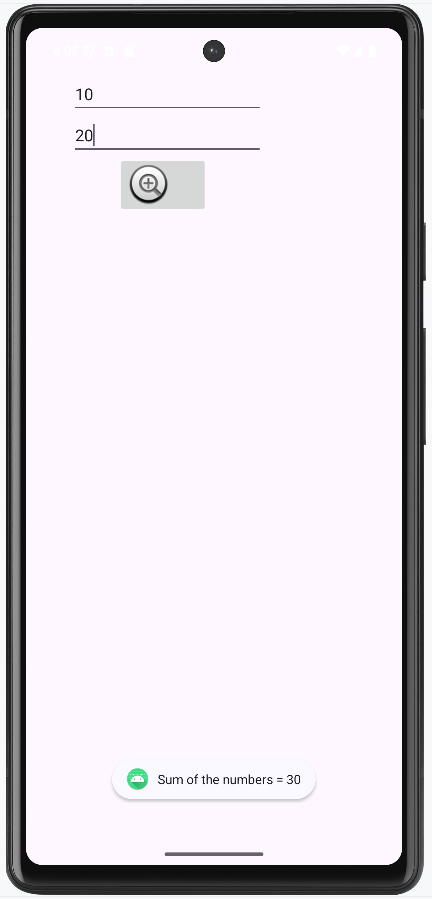
Let us check a example implementing the ImageButton in Android.
First we create a new project by following the below steps:
In this file, we include the Edittext and ImageButton and set their attributes like id, layout_width, hint etc.
First of all, we declare two variables num1 and num2 for both edittext and access them using the ids.
val num1 = findViewById(R.id.Num1)
val num2 = findViewById(R.id.Num2)
then, we declare variable imgbtn for the ImageButton and set the OnCLickListener to check the filled is empty or not
val imgbtn = findViewById(R.id.imageBtn)
imgbtn.setOnClickListener {
if (num1.text.toString().isEmpty() || num2.text.toString().isEmpty()) {
Toast.makeText(applicationContext,
"Enter both numbers", Toast.LENGTH_SHORT).show()
}