 |
VOOZH | about |
|
VOOZH | about |
Google Forms remains a powerhouse for creating surveys, quizzes, and registration forms. This user-friendly yet powerful platform offers endless possibilities for gathering valuable information efficiently.
In this article, we'll walk you through every step of creating, editing, and customizing Google Forms. From crafting your first form to implementing advanced design elements, you'll learn how to tailor Google Forms to fit your specific needs.
As long as you have a Google account you can use Google Forms for free unlike other form collection applications such as SurveyMonkey etc., where you have to pay for a premium plan Google Forms is totally free to use and if you talk about the tools then we get almost every tool possible that is required for us while making a form online.
So let us understand step by step, how to edit Google Forms, we will look at three different scenarios where we have to edit Google Forms:
In this article, we will cover all of the above scenarios so that you get the idea in order to edit the Google form easily.
If you want to create a Google form for your students colleagues or any other audience then here are the basic steps that you need to follow in order to create and edit the Google form before publishing it.
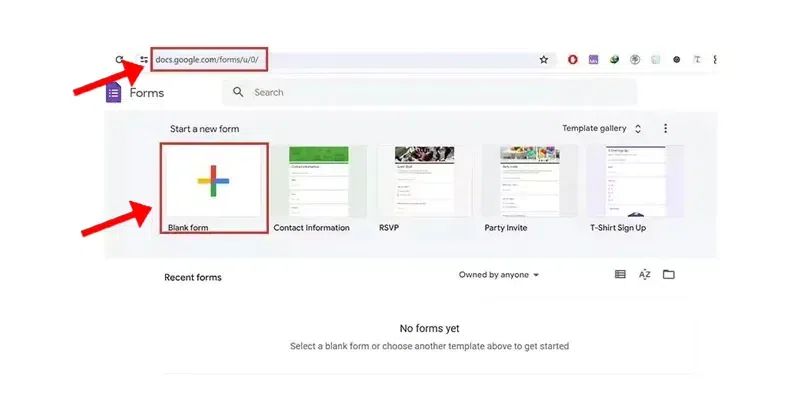
As you know Google Forms is a web-based application which means that Google Forms does not have any app on the App Store or Play Store so first we will need to head to the Google Form website.
After this, you will have an empty form labeled as Untitled form that you can edit. Once you have completed the above steps then you can move to the next steps where we will edit the form.
Now we have several options to choose from to edit or update our Google form as we want, we can make changes to the questions and add titles as well as sections images, and videos to our form. Along with these we also get options to make changes in the form settings. Let’s understand each process of editing the Google form separately.
👁 Add Section and Title in the Form
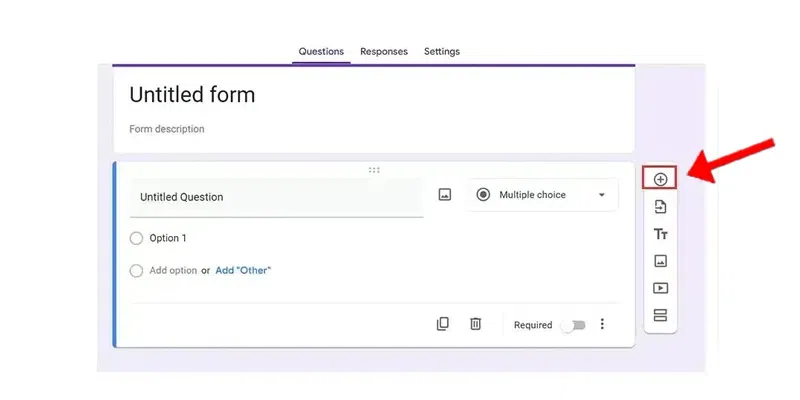
If you want to add a section then it is very simple to do so, all you have to do is simply choose the last option of the form, this option will allow you to turn a single question into a single section and so on.
👁 Click on the Section (Two Box) Icon
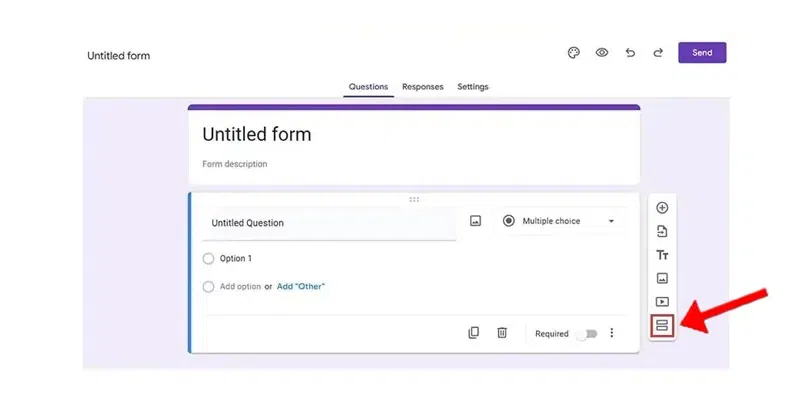
To edit a question, click on the desired question, enabling you to make changes directly.
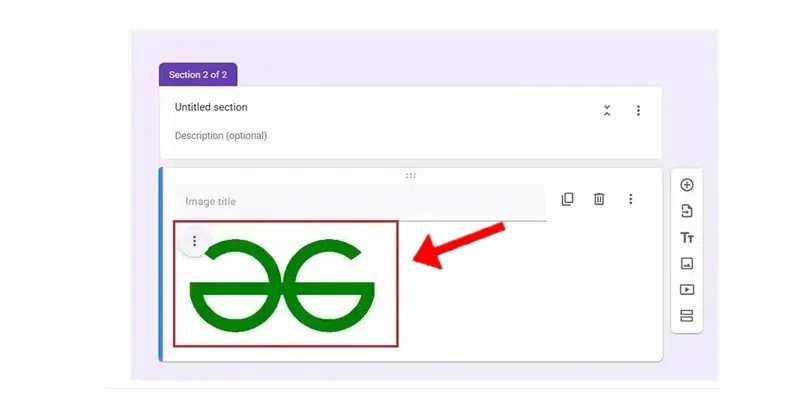
To add a new question, click on the plus icon located at the top of the right sidebar. This action allows you to create a new question, as illustrated in the image below:
👁 Click on the Add (Plus) Icon
Open the form in which you want to add image/video.
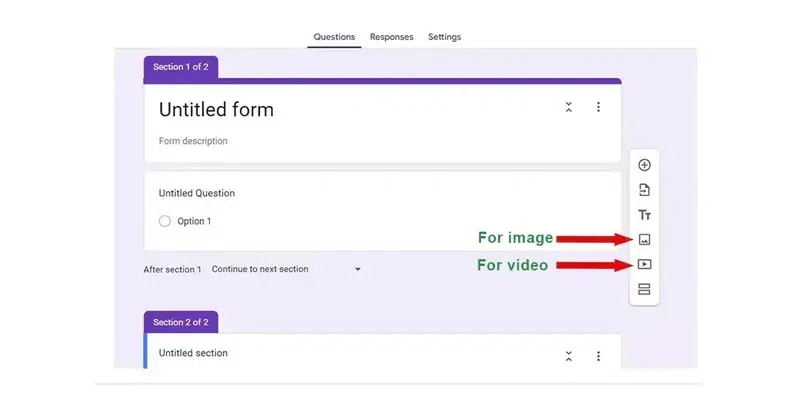
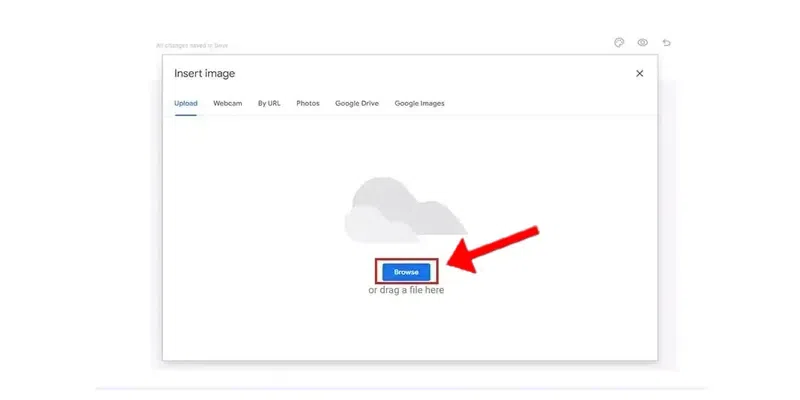
Now, if you want to add an image then select the fourth option from the right sidebar, and that will allow you to choose an image from your Google Drive folder:
👁 Fourth option for inserting image
If you are the administrator of the form and after publishing the form you want some changes to be made then you can easily do that as well, all you have to do is simply follow the steps mentioned below.
If you are the administrator and you want to enable the users to allow response editing, then you can do it by following the steps below:
Open the Google form in which you want to allow response editing.
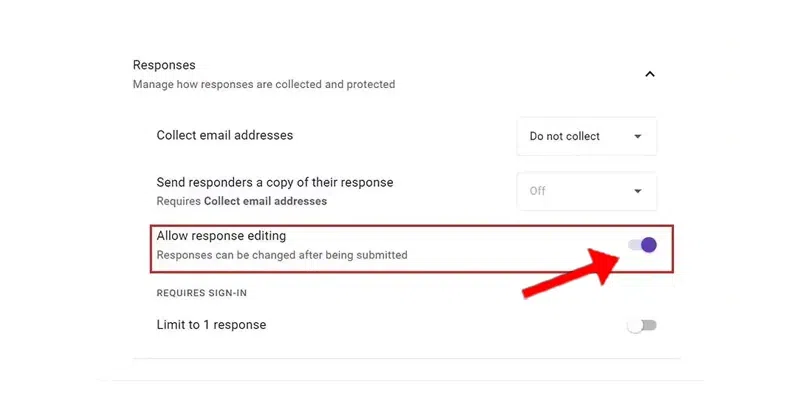
Go to the Settings tab, the settings tab is the 3rd tab available. Select the Responses option and click on the arrow option on the right, that will open the response settings.
You will see the allow response editing option, by default it is turned off, so in order to turn this option on, you will have to click on the side option which will turn it on. As you can see in the image below:
👁 Turn on the Allow Response Tab
All set, now any responder of your form will have the option to edit the response in case they make a mistake.
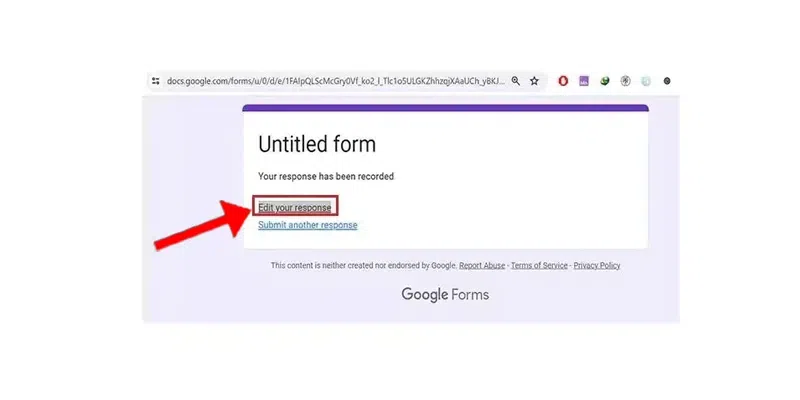
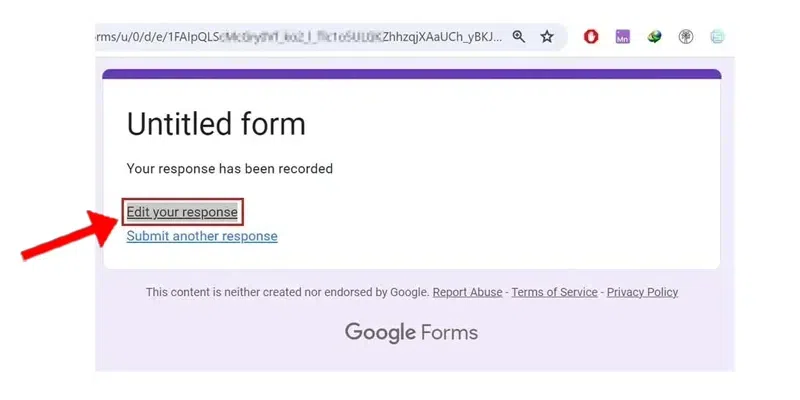
This is only possible if the administrator of the form has enabled response editing in his Google form settings. If you think that you have made some mistake then you can simply edit the response that you have submitted by following the steps mentioned:
Click on the “Edit your response” option, this option will be available to you once you submit the form. (As available in the image below.)
Note: If you have closed the window, then simply go to the link and open the form again and you will see this option to edit your response. Make the necessary changes that you want to the form and simply click on the submit button.
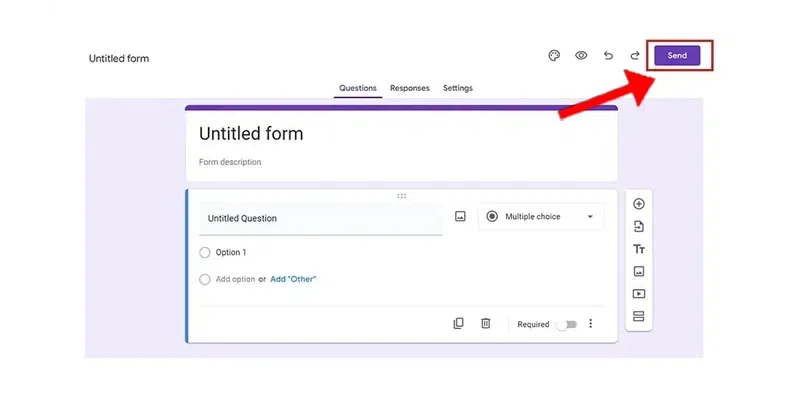
Now, once you have completed the form you can easily send it to anyone by using the Send button which you will find at the top right corner as you can see in the image below:
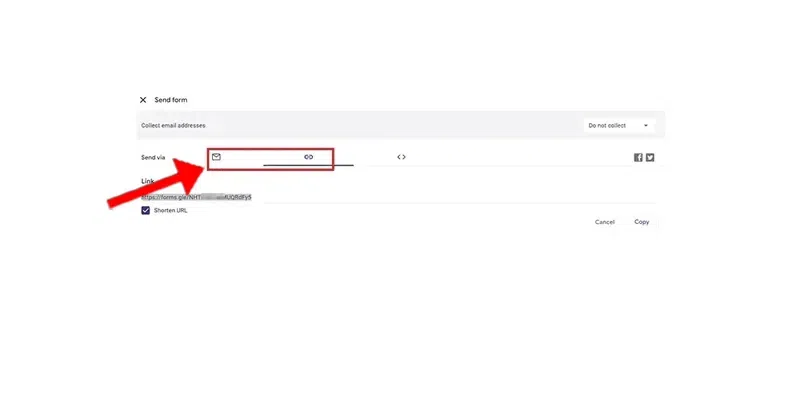
After this you can simply choose the method for sending the form, the most commonly used methods for sending the form are either through email or through the link. Both of the methods are available right next to each other as you can see:
So feel free to choose any of the methods you want to send the google form.
If you want to make changes to the Google forms that you have submitted then the steps for that are very easy, just follow the steps given below and you can easily change the submitted form:
Note: Changes in the submitted form is only allowed if the administrator has allowed making changes in the form.
You can easily change the form even if you have submitted the form but only if the administrator has enabled the option to edit your submitted response. it is up to the administrator of the form to enable this option or not. Either way, if the administrator has enabled the option then you can follow these steps to change the submitted form.
The first step is to open the link that you received for filling out the form, once you have opened the form then you will see a window similar to the one in the image below:
👁 Window after you have submitted the form
You can use the option provided in Google Forms to set up the editing link, the editing link is useful whenever you are making changes to the form, and through the link you can access the form. Following are some steps through which you can set up an editing link in the google forms:
Go to your Google form and open the form which you want to edit, once you have opened the form you will see the interface for editing your form, then move to the next step.
After following step 1, simply follow this step, in this you see the interface below simply click on the "send" button.
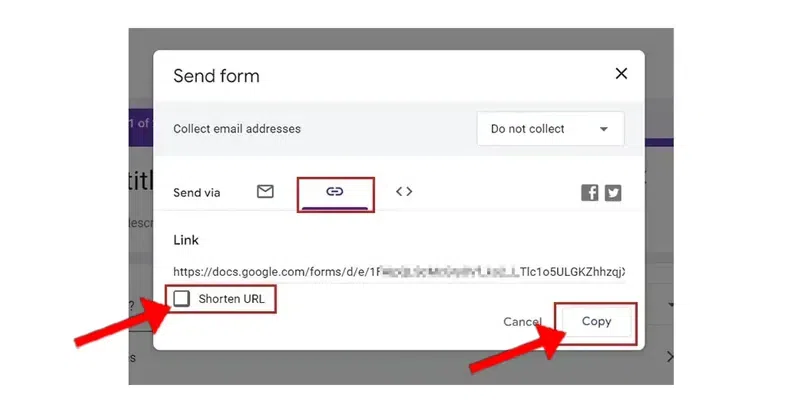
This is the final step, simply click on the middle link option as seen in the image below, this will allow you to get the link to your Google form, simply copy it using the copy button. You can also shorten the URL by using the Shorten URL option.
You can also create your own script, for this, you will have to use the Google Apps Script which is a Javascript language that is integrated with the Google Workspace. Following are the steps to create a script using Google Forms.
Go to your Google Forms and create a new form. you can also open any existing Google form if you want.
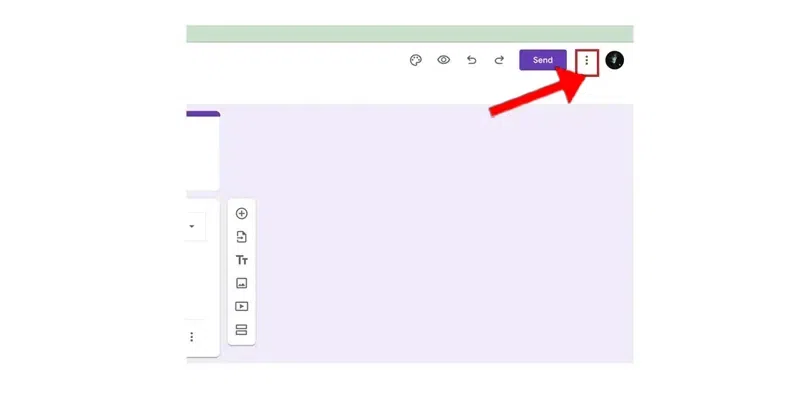
You will get to see a three-dotted menu, click on that three-dotted menu, and the menu will look similar to the one in the below image:
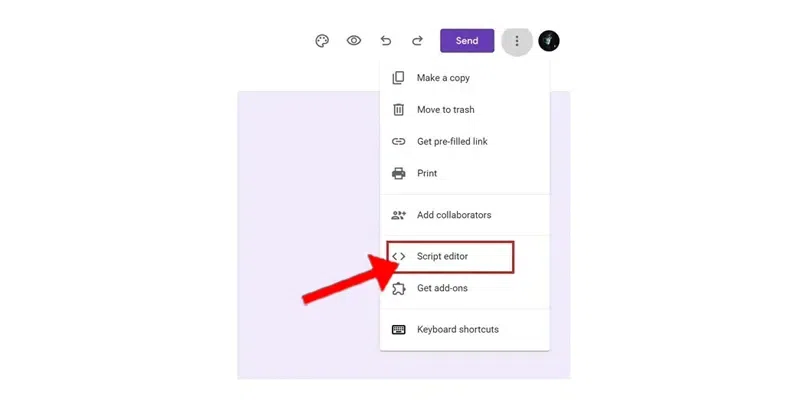
Then you will have to click on the "script editor" option. this will redirect you to another Google Apps page which will have the option to add your own script for the Google form that you have chosen.
👁 Click on Script Editor and Write your own script
This will open the script editor where you can add the script and deploy it easily.
Sometimes you may have to duplicate a property in Google Forms and it can become a boring and time-consuming task to write and make everything on your own again, so instead you can simply duplicate the question, image, or any other property.
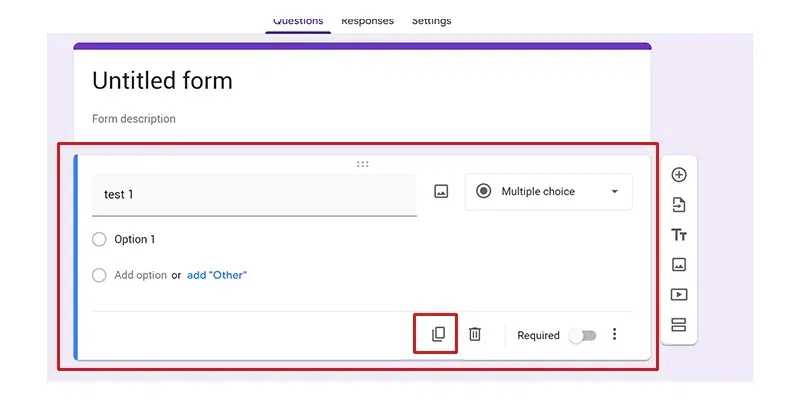
Go to Google Forms and open the form that you want to duplicate, for example, I have a form as you can see below in the image that I want to duplicate, after this select the specific section that you want to duplicate.
👁 Select the Property You Want to Duplicate
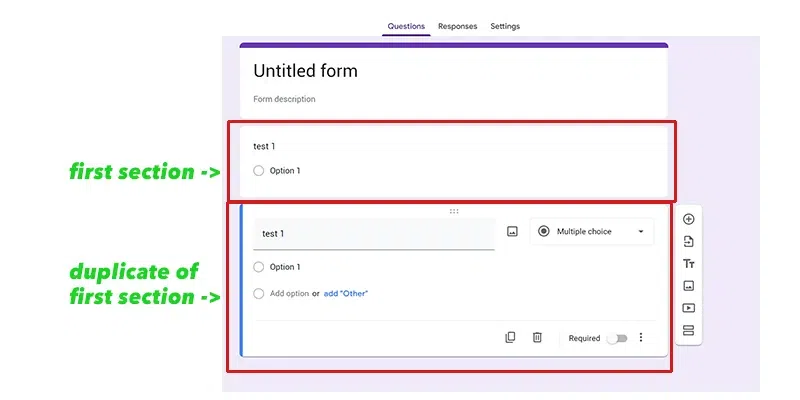
After this, simply click on the duplicate option which is available right next to the delete/trash option. When you click the duplicate option the property that you had selected will be duplicated.
👁 Click on the Duplicate Option
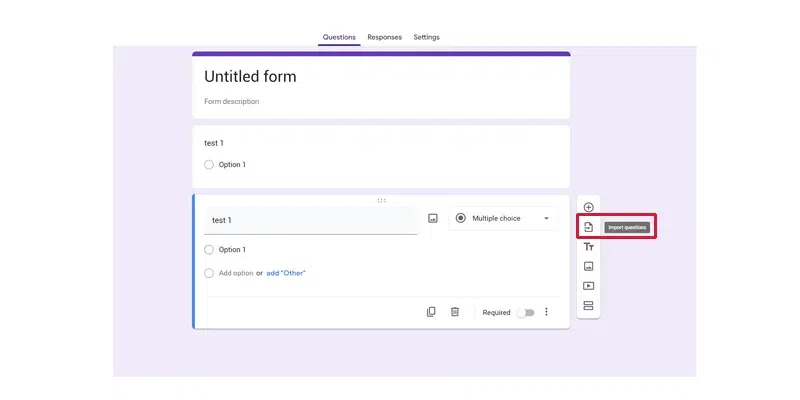
If you have multiple forms and some questions are also present in the previous form then instead of writing it from the start you can simply import it from the old form. For this, you have to:
Click on the "import questions" it's the second option available on the right side.
👁 Open the Import Questions Option
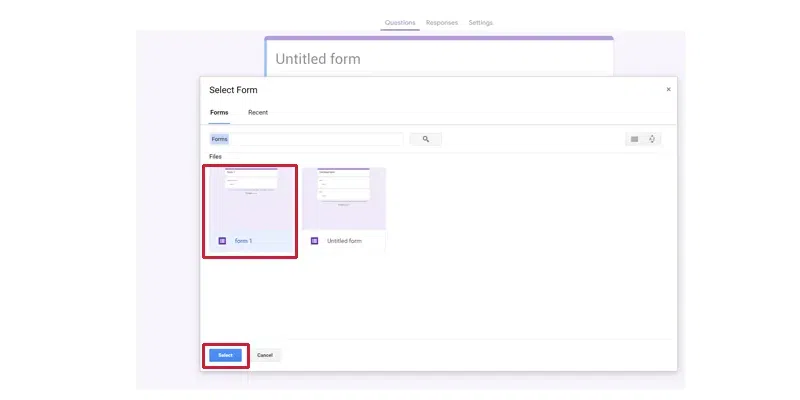
After following the 1st option, you can simply click on the form you want to import from that is available on the list of forms of your Google account. As you can see in the image below I have a form named "Form 1" that contains a question that you want to import so you will simply click on the form and then click on the "select" option.
👁 Select the Form to Import Questions from
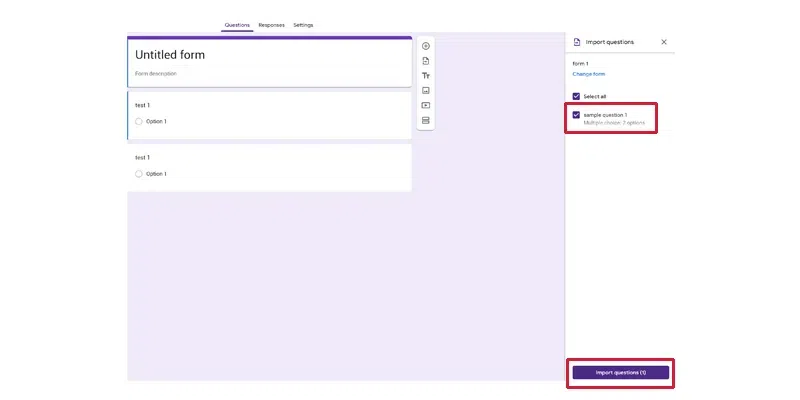
Once you have selected the form from which you want the question to be imported, you can see the list of sections and questions in the right sections, you can either import all the questions or select ones from this list.
👁 Import your Choice of Questions
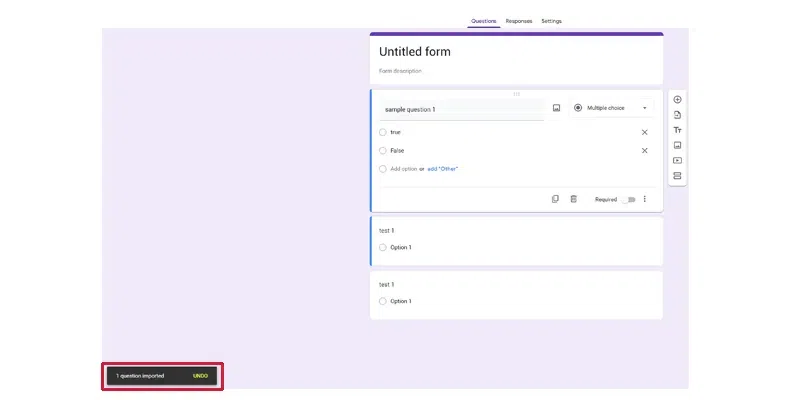
Once the above step is completed and you have selected the question you want to import, then simply click on the "import questions" option, this will import the questions to the current form that you are editing.
👁 Import the Selected Questions
Deleting any question, image, or section in the Google form is a very simple and straightforward process, for this, you can simply select the question, image, or section that you want to delete and then delete it using the trash icon available next to the duplicate option, as you can see in the image below:
👁 Deleting the question, image or section
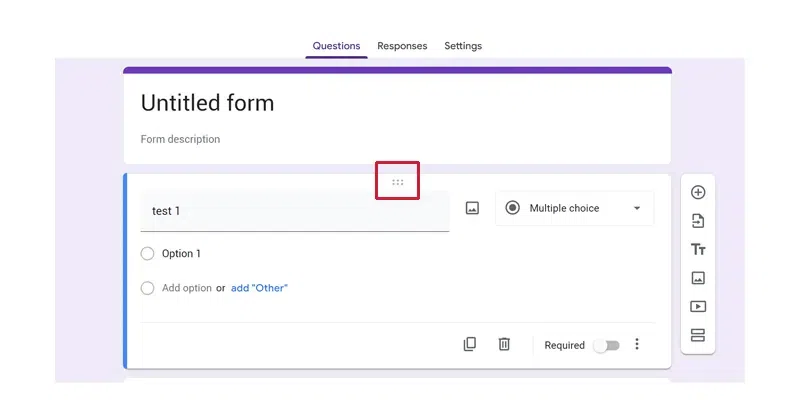
Google Forms allows a special record feature or button which can be used to reorder the form's sections, this option or button has the icon of 3 dots and below the 3 dots are another 3 dots, as you can see below:
👁 Reorder a Section in Google Forms
You can click on this option hold the mouse's button and record the form by moving it in the upper and lower directions.
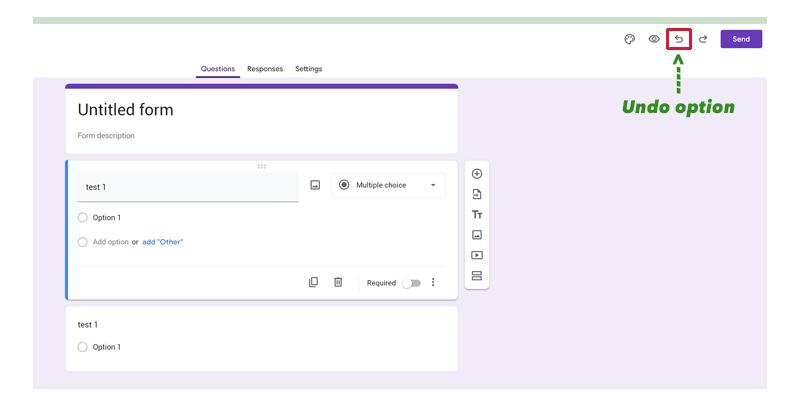
There is an option present at the top of the Google form with arrows to the backward side, this arrow can be used to undo any action that you may have performed in the Google form, this arrow is commonly used whenever mistakes occur in the form and you want to undo it, if you have pressed the undo option too many times then you can simply click on the forward arrow option known as "redo" which will again perform the actions that you just undoed.
Google Forms is a great way to collect feedback and information from our customers and users in order to provide a better environment for them. You can use the Google form for anyone by using the link or the option of email, In this article we also learned how to use Google Forms and add various sections, questions, images/videos to the form.
Apart from that we discovered various methods and features of Google Forms. So refer to this article and you will be able to use Google Forms easily.