 |
VOOZH | about |
|
VOOZH | about |
Headers and footers are essential components for professional documents, as they allow you to add consistent information like page numbers, document titles, or author names. Google Docs makes it simple to edit headers and footers to ensure your documents are formatted properly. Whether you're working on a report, a letter, or a business document, this guide will show you how to customize your header and footer with ease.
In this full guide, we’ll walk you through the steps to add and edit headers and footers in Google Docs, covering everything from basic formatting to advanced customization options. Whether you’re using a desktop or a mobile device, this guide will help you create polished and professional documents effortlessly.
This is the most straightforward method for adding headers or footers in Google Docs on the web. It allows you to place headers or footers at the top or bottom of every page in your document.
To begin, open Google Docs in your preferred web browser. You can either create a new document or open an existing one that you need to add headers or footers to.
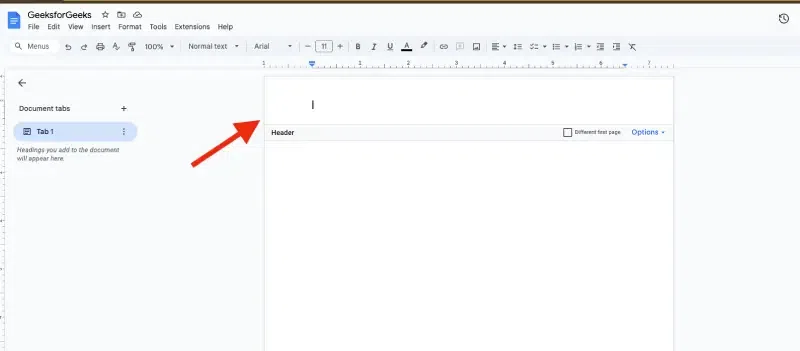
Next, navigate to the Insert tab located at the top of the screen. The Insert menu contains all the tools you need to add elements like images, tables, headers, footers, and more. Click on the Insert tab to expand the dropdown.
Under the Insert menu, hover over the Headers & Footers option. You’ll be given the choice to either add a Header or a Footer. Headers appear at the top of the page, while footers are placed at the bottom. Click on your desired option to insert it into the document.
Once you’ve inserted the header or footer, you can start typing the text you want to appear across your document. This could be a title, page numbers, or any other information that you want to be consistent across all pages.
Benefits: This method is simple and guarantees that the header or footer will appear consistently on every page, making it perfect for documents that require uniformity.Once added, you can begin typing the content directly in the header or footer section. By default, the header and footer will appear the same across all pages.
If you are looking for a quicker way to insert headers or footers, you can use keyboard shortcuts instead of navigating through the menu:
Windows/ChromeOS:
- Header: Press
Ctrl + Alt + OorCtrl + Alt + H.- Footer: Press
Ctrl + Alt + OorCtrl + Alt + F.Mac:
- Header: Press
Ctrl + Cmd + OorCtrl + Cmd + H.- Footer: Press
Ctrl + Cmd + OorCtrl + Cmd + F.
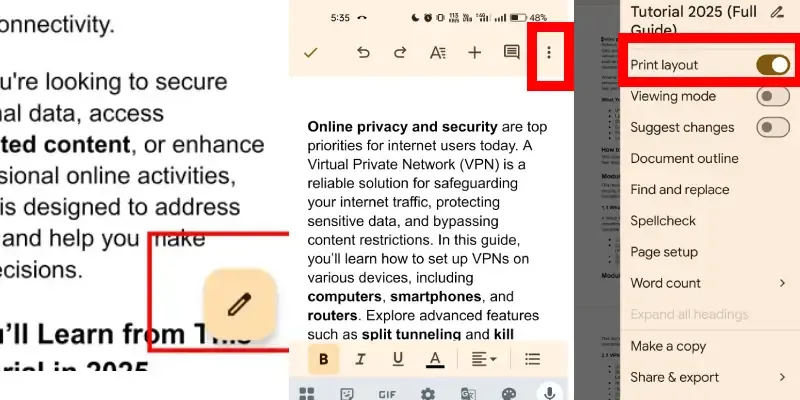
After adding the text for your header and footer, tap the checkmark icon at the top-right corner of your screen to save your changes.
Sometimes, you may need different headers or footers on different pages of your document, especially in reports or academic papers. Google Docs allows you to customize headers or footers for specific sections of the document.
Open your Google Docs document where you want to make customizations to the header or footer. Make sure you have a clear idea of where you need to change the header or footer.
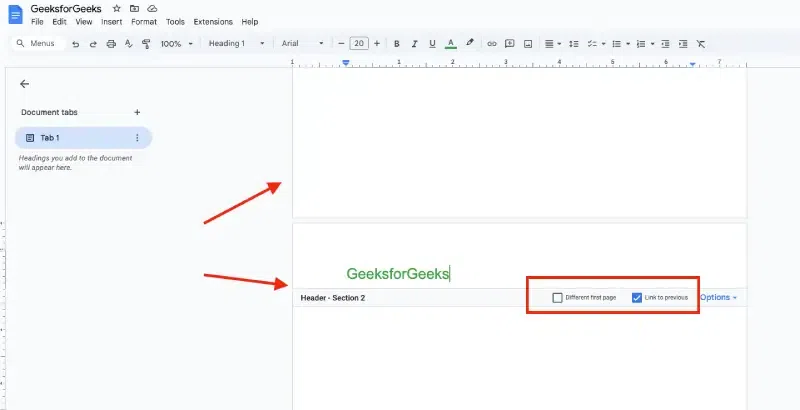
To create different headers or footers in different sections, you need to insert a Section Break. Place your cursor before the page where the change should occur. Then, go to the Insert menu, select Break, and click Section Break (Next Page). This will create a new section that can have a different header or footer.
After adding the section break, click into the header or footer area of the new section. You will see a checkbox called Link to Previous. Uncheck this box to unlink the header/footer from the previous section. This allows you to edit the header or footer in this section without affecting the earlier parts of the document.
Now you can customize the header or footer with different information for this section of the document. For example, you may want a different title, author, or page numbering system.
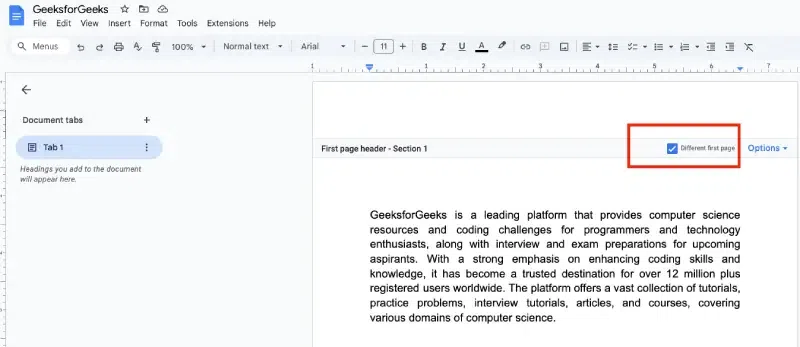
Google Docs provides a feature to make the header or footer content different on the first page. You might not want a header or footer to appear on the first page of your document, especially in cases where you have a title page or cover page. This is useful when you don’t want page numbers or other information appearing on the first page.
Start by inserting a header or footer using any of the methods described earlier. This will apply to all pages, including the first one.
Double-click inside the header or footer area to bring up the editing options. You will see an Options button. Click on it to open additional settings.
In the Options menu, check the Different first page box. This will remove the header or footer from the first page of the document. You can now customize the content of the first page’s header or footer separately.
Benefits: This is perfect for documents that require a title page with no header or footer, like Resumes or Business Reports.
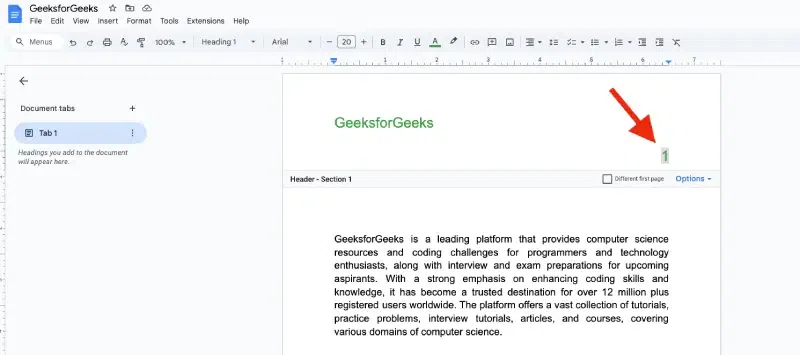
Inserting page numbers is one of the most common uses for headers or footers. This can be done automatically, ensuring that the numbers are consistent throughout your document.
Open your document in Google Docs, ensuring that you have already added a header or footer where you want to insert the page numbers.
Click on the Insert menu, then hover over Page number. You will see several options for placing page numbers: at the top (header) or bottom (footer) of the page, and whether you want the numbering to start from the first page.
You can choose whether the page numbers will appear starting from page 1 or from a different number, and whether the numbering should be on the left, center, or right of the header or footer. This will preview like this -
Benefits: Page numbers are crucial for long documents. This method automates the process of inserting page numbers and ensures they are consistent throughout the document.
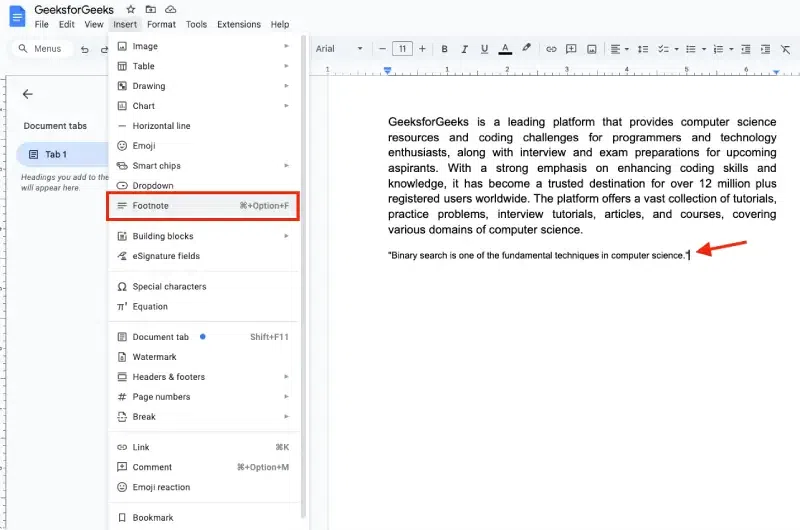
Footnotes are useful for adding extra information, citations, or references at the bottom of the page. This can be especially important in research papers or legal documents.
First, position your cursor at the place in your document where you want to insert the footnote reference number. Typically, this will be after a fact or quote that requires citation.
Go to the Insert menu, then select Footnote, or use the shortcut Ctrl + Alt + F (Windows) or Cmd + Alt + F (Mac). A superscript number will appear in the text, and a corresponding footnote will appear at the bottom of the page.
After inserting the footnote, simply type the additional information or reference in the footer area.
Benefits: Footnotes are essential for academic work, providing sources and additional context while keeping the main body of the text uncluttered.
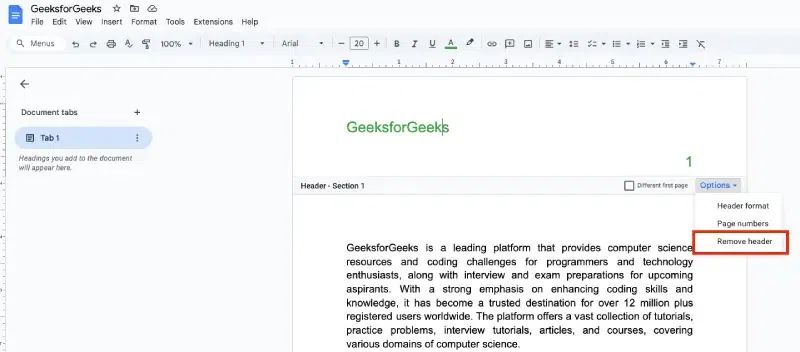
If you decide that you no longer need the header or footer in your document, Google Docs makes it easy to remove them.
To remove the header or footer, double-click inside the area where the header or footer is located. This will open the editing options.
Click on Options in the toolbar, then select Remove header or Remove footer from the menu. This will delete the header or footer entirely.
Editing the header and footer in Google Docs is a straightforward task that can significantly enhance the professionalism and organization of your document. Whether you’re adding page numbers, document titles, or other content, Google Docs gives you the flexibility to make these changes easily. By following these steps, you’ll be able to customize your documents for a more polished look.