 |
VOOZH | about |
|
VOOZH | about |
SVG Icons are selective icons that are used for infographic purposes on websites. An SVG icon has it's default color set & changing it's color can require a step of tasks, which however can be achieved on Figma. In this article, we will learn how to color an svg and also how to use overlay edits options in Figma.
An SVG Icon is an XML (Extensible Markup Language) vector image that is used for particular infographics. Here we will learn how can we change the color of an SVG Icon:
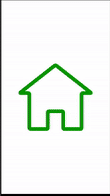
Changing the color the Green.
Overlay is a property in the Prototype section of Figma that allows us to create functionalities + animations in it. It has several properties on what would happen when we click, hover or drag mouse over a button & how would the background change, what would be the effect of another frame over it, etc.
This is the prototype section which lies in the top row & below are the steps to edit overlay in Figma:
Add the same icon in the frame outside & change it's color. Change the icon into a frame or add it in one.
Use the plus button in the frame to connect it to the other frame & the following properties will show up on your screen.
Add the background color which would appear when the frame 2 would take the place of Frame 1
This is the final animation in presentation view & here's how to open the design in presentation view. Click on the play icon in the top row:
Here is the final design:
On clicking Swap overlay instead of Open overlay, the frame would appear permanently on the screen & it would get swapped as the name suggests. The final design of Swap Overlay would be like this:
Overlay in Figma has the following three properties:
SVG Icons are handy in any design and they require at times change of colors & edits. The above steps to change colors of SVG are effective & the properties of overlay & the different ways to set it up help in building up the Prototype for a design. These help in enhancement of our design & make it look even better & appealing.
.png)
.png)
.png)
.png)
.png)
.png)
.png)
.png)
.png)
.png)
.png)
.png)
.png)