
Btrfs or B-tree file system is a GPL-licensed copy-on-write (COW) was developed by multiple companies as follows Oracle, Redhat, Fujitsu, Intel, Facebook, Linux Foundation, Suse, etc. Brtfs will support maximum up-to 16 exbibyte and filesize can be maximum up-to 8 exbibyte, due to limitation of kernel.
Files can be created in any characters except “/” and NULL. Btrfs has self-healing features and have the capability of spanning multiple volumes. In Btrfs we can shrink, grow the file-system, add or remove block device in online mode.
It also provides subvolumes, Subvolumes are not a separate block devices, we can create snapshots and restore the snapshot for those subvolumes. Instead of using LVM we can use btrfs. Btrfs file-system are still under testing not yet included in production, If we have any important data, currently advised not to use btrfs in Production environments.
Btrfs released it’s 3.18 version by last month Dec 2014 with several new features.
Features of Btrfs
This new version of btrfs filled with many new features as follows:
- By default mkfs skinny-metadata feature is available from kernel 3.10.
- To repair the severely corrupted file-systems with care.
- Added convert option to show progress.
- Ability to link lost files to lost+found. This is a fix for a recent kernel Bug.
- To see the overview of file-system usage rather than df.
- And many more bug-fixes with and improved documentation.
- Subvolumes for file-system.
My Environment Setup
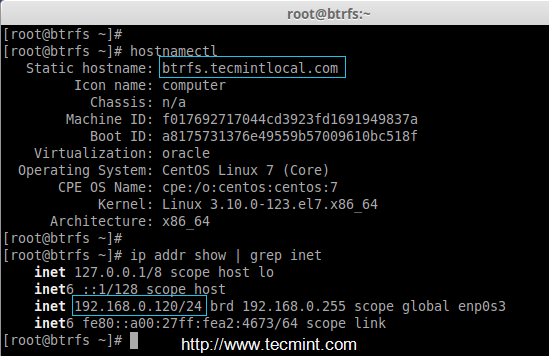
Hostname	:	btrfs.tecmintlocal.com
IP addrress 	:	192.168.0.120
Disk Size Used	:	8GB [/dev/sdb]
Step 1: Installing and Creating Btrfs Filesystem
1. In most of the today’s latest Linux distributions, btrfs package comes as pre-installed. If not, install btrfs package using the following command.
# yum install btrfs-progs -y		[On RedHat based Distro's]
# sudo apt-get install btrfs-tools -y	[On Debian based Distro's]
2. After btrfs package has been installed on the system, now we need to enable the Kernel module for btrfs using below command.
# modprobe btrfs
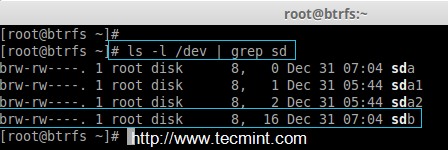
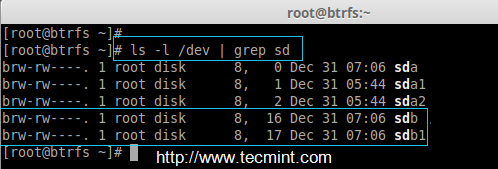
3. Here, we’ve used only one disk (i.e. /dev/sdb) in this disk, we’re going to setup logical volumes and create the btrfs file-system. Before creating them, let’s first verify the disk attached to the system.
# ls -l /dev | grep sd
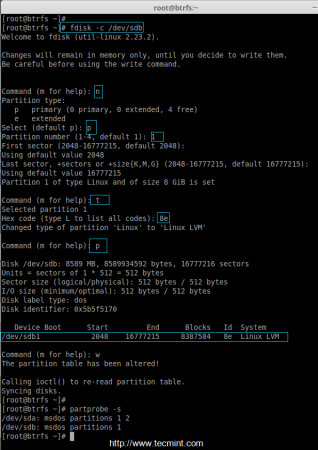
4. Once you’ve confirmed that the disk is properly attached to the system, now it’s time to create partition for LVM. We will use ‘fdisk‘ command to create partitions on the /dev/sdb disk. Follow the instructions as explained below to create new partition on the drive.
# fdisk -c /dev/sdb
- Press ‘n‘ for creating new partition.
- Then choose ‘P‘ for Primary partition.
- Next choose the partition number as 1.
- Define the default value by just pressing two times Enter key.
- Next press ‘P‘ to print the defined partition.
- Press ‘L‘ to list all available types.
- Type ‘t‘ to choose the partitions.
- Choose ‘8e‘ for Linux LVM and press Enter to apply.
- Then again use ‘p‘ to print the changes what we have made.
- Use ‘w‘ to write the changes.
5. Once you’ve created partition successfully, you need to update the partition table changes to kernel for that let us run the partprobe command to add the disk information to kernel and after that list the partition as shown below.
# partprobe -s
# ls -l /dev | grep sd
Setup Logical Volume
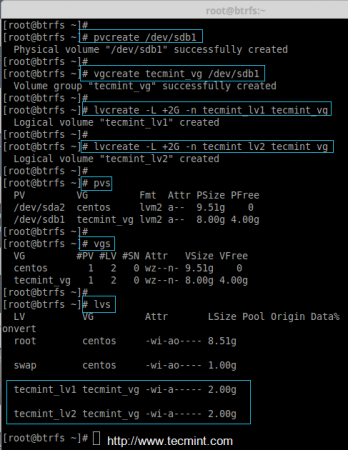
6. Create Physical volume and volume group on /dev/sdb1 disk using pvcreate and vgcreate command.
# pvcreate /dev/sdb1
# vgcreate tecmint_vg /dev/sdb1
7. Create Logical volume in the volume group. Here I have created two logical volumes.
# lvcreate -L +2G -n tecmint_lv1 tecmint_vg
# lvcreate -L +2G -n tecmint_lv2 tecmint_vg
8. List the created Physical volume, Volume group and logical volumes.
# pvs && vgs && lvs
Creating Btrfs Filesystem
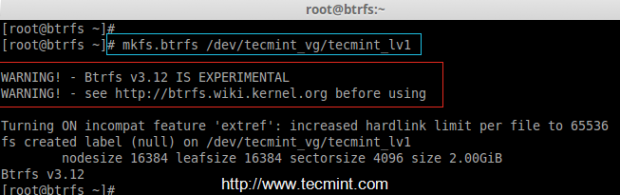
9. Let us create the file-system now for our logical volumes.
# mkfs.btrfs /dev/tecmint_vg/tecmint_lv1
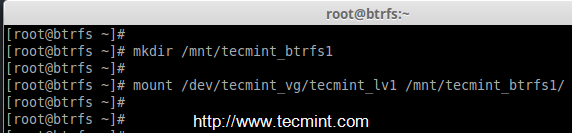
10. Next, create a mount point and mount the file-system.
# mkdir /mnt/tecmint_btrfs1
# mount /dev/tecmint_vg/tecmint_lv1 /mnt/tecmint_btrfs1/
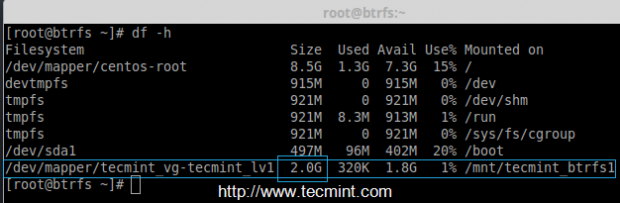
11. Verify the mount point with the help of df command.
# df -h
Here available size was 2 GB
If this article helped you solve a problem, consider buying a coffee. It helps keep TecMint free, supports the authors, and keeps the project going.
Got Something to Say? Join the Discussion... Cancel reply