VOOZH about

URL: https://www.tecmint.com/how-to-mount-and-unmount-an-iso-image-in-linux/

⇱ How to Mount and Unmount an ISO Image in Linux


Skip to content

An ISO image or .iso (International Organization for Standardization) file is an archive file that contains a disk image called ISO 9660 file system format.

Every ISO file has .iso an extension has a defined format name taken from the ISO 9660 file system and is specially used with CD/DVD ROMs. In simple words, an iso file is a disk image.

πŸ‘ How to mount iso image in linux
mount and unmount iso images in Linux

I have seen most of the Linux operating system images that we download from the internet are .ISO format. Typically an ISO image contains the installation of software such as operating system installation files, games installation files, or any other applications.

Sometimes it happens that we need to access files and view content from these ISO images, but without wasting disk space and time by burning them onto CD/DVD or USB drives using our tools.

This article describes how to mount and unmount an ISO image on a Linux Operating system to access and list the content of files.

How to Mount an ISO Image in Linux

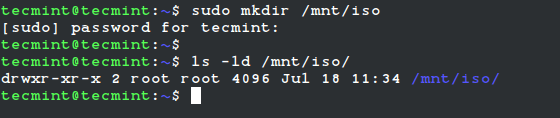
To mount an ISO image on RedHat-based or Debian-based Linux distributions, you must be logged in as a β€œroot” user or switch to β€œsudo” and run the following commands from a terminal to create a mount point.

# mkdir /mnt/iso
OR
$ sudo mkdir /mnt/iso
πŸ‘ Create Linux Mount Directory
Create Linux Mount Directory

Once you created a mount point, use the β€œmount” command to mount an iso file called β€œFedora-Server-dvd-x86_64-36-1.5.isoβ€œ.

# mount -t iso9660 -o loop /home/tecmint/Fedora-Server-dvd-x86_64-36-1.5.iso /mnt/iso/
OR
$ sudo mount -t iso9660 -o loop /home/tecmint/Fedora-Server-dvd-x86_64-36-1.5.iso /mnt/iso/
πŸ‘ Mount ISO File in Linux
Mount ISO File in Linux
Where Options
  • -t – This argument is used to indicate the given filesystem type.
  • ISO 9660 – It describes the standard and default filesystem structure to be used on CD/DVD ROMs.
  • -o – Options are necessary with a -o argument followed by a separated comma string of options.
  • loop -The loop device is a pseudo-device that is often used for mounting CD/DVD ISO images and makes those files accessible as a block device.

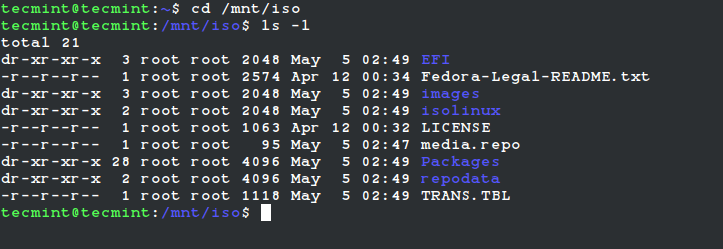
After the ISO image is mounted successfully, go to the mounted directory at /mnt/iso and list the content of an ISO image. It will only mount in read-only mode, so none of the files can be modified.

# cd /mnt/iso
# ls -l

You will see the list of files of an ISO image, that we have mounted in the above command. For example, the directory listing of a Fedora-Server-dvd-x86_64-36-1.5.iso image would look like this.

total 21
dr-xr-xr-x 3 root root 2048 May 5 02:49 EFI
-r--r--r-- 1 root root 2574 Apr 12 00:34 Fedora-Legal-README.txt
dr-xr-xr-x 3 root root 2048 May 5 02:49 images
dr-xr-xr-x 2 root root 2048 May 5 02:49 isolinux
-r--r--r-- 1 root root 1063 Apr 12 00:32 LICENSE
-r--r--r-- 1 root root 95 May 5 02:47 media.repo
dr-xr-xr-x 28 root root 4096 May 5 02:49 Packages
dr-xr-xr-x 2 root root 4096 May 5 02:49 repodata
-r--r--r-- 1 root root 1118 May 5 02:49 TRANS.TBL
πŸ‘ View ISO Files in Linux
View ISO Files in Linux

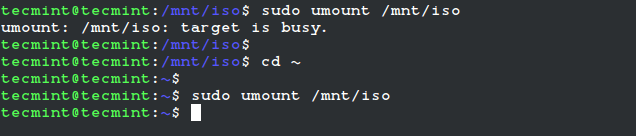
How to Unmount an ISO Image in Linux

Simply run the following command from the terminal either β€œroot” or β€œsudo” to unmount a mounted ISO image.

# umount /mnt/iso
OR
$ sudo umount /mnt/iso
πŸ‘ Unmount ISO File in Linux
Unmount ISO File in Linux

[ You might also like: How to Mount Windows Partition in Linux ]

If this article helped, share it with someone on your team.
TecMint Weekly Newsletter
Get the Learn Linux 7 Days Crash Course free when you join 34,000+ Linux professionals reading every Thursday.
Check your email for a magic link to get started.
Something went wrong. Please try again.
β˜•
TecMint has been free for 14 years. Help keep it that way.
Google AI Overviews and tools like ChatGPT have cut into search traffic for independent tech sites like TecMint. Running this site costs over $2,000 every month for hosting, infrastructure, and paying authors to keep the content accurate and tested.

If this article helped you solve a problem, consider buying a coffee. It helps keep TecMint free, supports the authors, and keeps the project going.
β˜• Buy Me a Coffee
Ravi Saive
I'm Ravi Saive, an award-winning entrepreneur and founder of several successful 5-figure online businesses, including TecMint.com, GeeksMint.com, UbuntuMint.com, and the premium learning hub Pro.Tecmint.com.

Each tutorial at TecMint is created by a team of experienced Linux system administrators so that it meets our high-quality standards.

23 Comments

Leave a Reply
  1. the mount is old. use fstab. it is easier than mount.

    Reply
    • It will be very funny when you remove the iso-file and reboot the system.

      Reply
  2. Unable to mount isos using latest kernel in RHEL6.6 using this method.

    When attempting to enter: mount -t iso9660 -o loop /patch/to/image.iso /mnt/path (with the proper iso name in the proper directory and /mnt/path created), receiving the error message:

    column: invalid option β€” β€˜o’
    usage: column [-tx] [-c columns] [file …]

    Tried in init 1/3, even an older release of the kernel, still nothing. HOWEVER, apparently the -t and -o options _DO_ work with sudo mount.

    Reply
  3. to mount iso permanently can i write this line to fstab?
    mount -t iso9660 -o loop /patch/to/image.iso /mnt/path

    Reply
    • @nsu2015,
      Yes, it should work…go ahead..

      Reply
      • but i have a problem
        in fstab i first add a line to auto mount an NTFS drive using ntfs-3g and it worked properly
        the iso image is in this NTFS drive and the above line (mount -t iso9660 -o loop /patch/to/image.iso /mnt/path) is added after NTFS.
        the ntfs drive mount on startup but the iso file not
        could you please help

        Reply
        • @Nsu2015,
          You can use following line to /etc/fstab file to auto mount your ISO file permanently at system startup.

          /patch/to/image.iso /mnt/path iso9660 loop 0 0
          
          Reply
          • Thank you very much
            it worked for me

  4. Thank you so much. I am a newbie in linux and his was of great help to me.

    Reply
  5. Hi ,can anyone guide me how can i create ISO image form Operating System.

    Reply
  6. Hi ,
    Can you help me to how to create iso image on Centos5.7 as well as rpm files.

    Reply
    • @Subrahmanyam,
      The given instructions works on CentOS 5.7 to create ISO images..I didn’t understand your question β€œas well as rpm files”?

      Reply
  7. Hi,

    If I have two iso images, how can i mount both together ? Does it work ?

    Reply
    • No, that’s not possible, you can mount one iso at a time under /mnt.

      Reply
      • Hi

        it is not possible to have two images mounted at the same time under /mnt folder, but you are free to create how many subfolders you want under /mnt and adjust the mount command to use these subfolders.

        mount -t iso9660 -o loop /patch/to/image1.iso /mnt/path1
        mount -t iso9660 -o loop /patch/to/image2.iso /mnt/path2
        etc.

        BR
        Roberto

        Reply
  8. Dear Sir

    I am new to linux, your site is help full for how are new to linux. I kindly request please do a tutorial on open vpn and ip tables.

    If you are providing training please let us know. If you are providing training videos also please let us know, not an issue we will pay and purchase from your site.

    Reply
    • Your request accepted, will soon write a complete guide on how to install OpenVPN in Linux, till then stay tuned for updates. We don’t provide any training, but we do provide paid services for Linux.

      Reply
  9. Hi there,
    I would like to know how to locate my rhel6 iso image in D DRIVE. Can u say me how to change the mount command

    Reply
  10. I want to do permanent mounting, so that i don’t have to run mount command again and again

    help plz

    Reply
    • Add the entry in /etc/fstab for permanent mounting.

      Reply
  11. That worked, Thanks !!
    Partha

    Reply
  12. Worked like a charm, thanks!

    Reply

Got Something to Say? Join the Discussion... Cancel reply

Free Course
Get a free Linux course before you go.
Subscribe to TecMint Weekly and get the Learn Linux 7 Days Crash Course free. Read by 34,000+ Linux professionals every Thursday.
Check your email for a magic link to get started.