
OneDrive is one of Microsoft's most useful products, allowing you to store and back up your files to the cloud. It's a service like many others, such as Google Drive, but it comes integrated right into Windows 11, which makes it a more appealing option right out of the gate.
But understanding OneDrive can be a bit complicated, so it's a good idea to take some time to familiarize yourself with the process of using OneDrive. In this guide, we'll take you through the basics of using OneDrive to manage your cloud files.
OneDrive explained: A comprehensive guide to Microsoft's cloud storage
Uncover the power of OneDrive and revolutionize your digital organization
How to access your OneDrive files
Thanks to its integration with Windows, OneDrive files are shown in the File Explorer as if they were stored on your PC, and they're fairly easy to access. When you open File Explorer, you'll see OneDrive as an option in the navigation tree on the left side of the window. It will be labeled with your name, as well as an indication of whether it's a personal or work account.
You can also search for OneDrive in the Start menu, which will open your OneDrive folder immediately. Finally, you can also access the folder by clicking the OneDrive icon on your taskbar and choosing Open folder.
Understanding OneDrive file status
The OneDrive folder looks mostly familiar to other folders on your PC, but there is one column you don't normally see, called Status. Under this column, you can see one of these icons:
- A white cloud with a blue outline - This means the file or folder is only available in OneDrive and requires internet connectivity to access.
- A white circle with green outline and green checkmark - When a OneDrive file is open on your PC, it will be downloaded and saved locally. This icon means the file is now available offline, but it can be deleted from your PC (reverting to its online-only status) when Windows tries to free up space automatically with Storage Sense.
- A green circle with a white checkmark - This icon indicates a file has been marked with the Always keep on this device option. These files are available offline and won't be deleted automatically to free up space
- People icon - This icon can appear next to the above icons, and it indicates that a given file is shared with other people.
Aside from these, when copying files to OneDrive, you may see icons indicating that a file is being synced to the cloud, represented by two blue arrows forming a circle. If you're downloading a file, you may also see a progress bar while the file is transferred to your PC.
OneDrive backups and how to manage them
Windows 11 annoyingly introduced new behavior for OneDrive that automatically backs up certain folders on your PC to OneDrive. In fact, OneDrive can sync five folders from your PC to the cloud automatically, those being Desktop, Documents, Pictures, Videos, and Music. By default, the Desktop, Documents, and Pictures folders are all backed up to OneDrive automatically, and when you access those folders in File Explorer, you're actually seeing straight into the respective OneDrive folders.
While this can be useful, it can also take a lot of space on your OneDrive, use a lot of bandwidth, and result in broken desktop icons if you have multiple PCs, so you may want to disable them.
Disable or enable OneDrive backups
To enable or disable your OneDrive backups, follow these steps:
- Click the OneDrive icon on your taskbar.
- Click the gear icon and choose Settings.
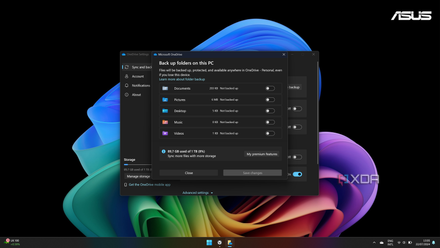
- In the Sync & backup tab, click Manage backup.
- Use the toggles to choose which folders should be synced to OneDrive automatically. You'll be asked for confirmation when turning them off.
- Click Save changes.
How to turn off OneDrive folder backup in Windows 11
Windows 11 comes with an annoying feature that automatically backs up and syncs certain folders with OneDrive. Here's how to turn it off.
What happens to your files after disabling backups
When you disable OneDrive backups, you'll notice that the folder in question is now mostly empty on your PC. Disabling backups unlinks your PC's local folders from the OneDrive folders, and any files created while backups were enabled will only be available on the OneDrive folder. You'll see a link to that folder in the place where your files used to be. Files that were available offline will continue to be available offline, however.
How to manage your OneDrive files
OneDrive's integration with Windows 11 uses a feature called "folders on demand", which means that all of your OneDrive files appear in File Explorer, but sometimes, they may not be available without an internet connection, which is why there are status icons for each file. This can create some confusion as to how you can manage these files without deleting them accidentally.
How to add files to OneDrive
Adding files and folders to OneDrive works just like any other folder on your PC. Simply copy the file or folder you want to put in OneDrive, then paste it in the OneDrive folder. Dragging and dropping files works, too.
When you copy or move a file from a local folder into OneDrive, that file continues to be available offline, as well as through the internet on other devices where you have signed in with the same Microsoft account.
How to make a file available offline
If you have a file in your OneDrive storage that you want to be able to access at all times, even without the internet, you can also do that. One option is to simply open the file. This will download it to your PC and make it available offline. However, files saved this way can be automatically deleted if your PC is running low on storage.
To prevent this, you can make a file always available offline:
- Right-click the file you want to always have access to
- Choose Always keep on this device.
This will make sure the file is always available offline, and it will also download the latest version if changes are made to the file on another device.
How to delete OneDrive files from your PC, but keep them in the cloud
If you want to save space on your PC, you can delete OneDrive files from your local storage while keeping them available online for safekeeping. Windows runs Storage Sense automatically to do this every so often, but if you want, you can do it manually.
- Find a file that has a checkmark icon and right-click it.
- Choose Free up space.
The file will be removed from your local storage, but remain available on OneDrive. The status icon will then change to a white cloud with a blue outline.
How to delete files from OneDrive
If you want to delete a file from both your PC and OneDrive, simply delete the file as you normally would. Deleted files are sent to the OneDrive Recycle Bin, which is separate from your PC's Recycle Bin. To delete files from OneDrive permanently, you need to access OneDrive on the web to see your Recycle Bin and empty it.
Moving files to your PC by cutting (Ctrl + X) and pasting them in a local folder will also delete them from OneDrive.
How to rename OneDrive files
Renaming OneDrive files through Windows works just like renaming any other file on your PC. Changing a file name in OneDrive will change it in the cloud, so the new name will be visible everywhere.
How to view your sync progress
If you upload or download files from OneDrive, or make changes to them, those changes will need to be synced between your PC and OneDrive. You may want to make sure changes have synced before turning off your PC or disconnecting from the internet.
To see your sync progress, you can simply click the OneDrive icon on your taskbar. Sync operations will be shown in the OneDrive flyout.
How to manage which files appear in File Explorer
By default, the OneDrive app for Windows will sync all your files from OneDrive and make them available in Windows. Since files are only downloaded on demand, this doesn't take up much space on your PC. However, if you want to reduce confusion, you can hide some folders from File Explorer to make things easier. Here's how:
- Click the OneDrive icon on the taskbar.
- Click the gear icon and then choose Settings.
- In the Account tab (it should open by default), click Choose folders.
- Check the boxes for the files and folders you want to see in File Explorer. Uncheck the ones you don't want to see.
- Click OK.
How to share OneDrive files
Since it's a cloud service, of course, OneDrive makes it easier to share files with other users. You can do this right within Windows, too. Here's how OneDrive sharing works:
- Right-click the file or folder you want to share and choose Share.
- To invite users via email, enter their email address or name in the To field and select them from the search results. You can add one person or group at a time.
-
Click the Pencil icon to choose the permissions users will have. By default, they'll have Edit permissions, which allows them to modify the file. You can change it to View if you don't want the file to be modified.
Alternatively, click Sharing settings to see advanced options:
- Choose whether to make the file accessible to Anyone (who has the link) or only Specific people. If you choose specific people, you'll have to enter the email address associated with their Microsoft account.
- Under More settings, you can choose between Can view and can edit. You can also set an expiration date for the share link, or set a password for accessing the file.
- Click Apply.
- To send email invitations, click Send (after entering the email addresses in step 2). If you want to send the link manually, click Copy, and then share it with whoever you want.
Alternatively, if you want to copy the link, you can use the Anyone with the link can edit button under the Copy section and manage sharing settings from there.
How to use the OneDrive Personal Vault
Personal Vault is a recent feature in OneDrive that stores your important files with an additional layer of security. Accessing these files requires you to use two-step verification, such as by using Microsoft's Authenticator app.
Personal Vault appears on your primary OneDrive folder as a standalone icon, but it acts like a folder. When you open it for the first time, it will set up the security layers necessary for things to work, and after that, you can access it at any time, as long as you have a security code handy. The Personal Vault is unlocked for 20 minutes after you use it, and it then locks itself up, requiring you to sign in. You can also manually lock it when you're done using it. This feature is designed to store sensitive files, like your ID.
You can drag and drop files into the Personal Vault as you would any other OneDrive folder, but if you have a free OneDrive account, you can only store three files inside it.
How to change the Personal Vault lock timer
By default, the Personal Vault locks itself after 20 minutes. However, you can change this in the OneDrive settings:
- Click the OneDrive icon on the taskbar.
- Click the gear icon and then choose Settings.
-
In the Account tab, use the Lock Personal Vault after menu to choose one of the following options:
- 20 minutes
- 1 hour
- 2 hours
- 4 hours
Your choice is saved automatically, so you can simply close the windows when you're done.
How to use OneDrive on the web
If you don't have a Windows PC or if you're using a computer that's not yours, you can always use OneDrive on the web. The web version of OneDrive is also the way to go to see files that aren't yours but that have been shared with you. To visit OneDrive on the web, you'll need to go to onedrive.live.com. It will look like this:
Most of the features available in Windows are also available here. The primary view includes the following elements:
- Home - The default view. This shows highlights from your photos (if you have any) at the top, as well as recent files you've accessed.
- Files - This allows you to browse all your OneDrive files in the typical folder structure.
- Photos - View all the photos stored in your OneDrive.
- Shared - Allows you to view files shared with you, but stored on other accounts.
- Recycle Bin - Manage your deleted OneDrive files
You'll also see the Add new button. Here, you can create a new folder in OneDrive, upload files from your PC, or create a new file, including Word documents, PowerPoint presentations, Excel spreadsheets, OneNote notebooks, Forms surveys, and plain text documents. All of this can be done online without having to install Microsoft Office.
Managing files on the web
In the Files tab, you can manage your files much like you would using the OneDrive integration. You can move, copy, download, or delete files using the three-dot menu next to each item.
You can also select multiple files by clicking the checkmark next to the file name (in list view), or in the top right corner of the file thumbnail (in grid view). You can then take actions on multiple items at a time using the bar at the top.
Your Personal Vault is also accessible on the web. However, features like syncing files to your PC aren't available in the same way. Using the web version of OneDrive, you have to download files to your PC as you would on any other website to make them available in File Explorer. Downloaded files won't sync automatically with OneDrive, either.
OneDrive pricing plans
Like most cloud storage services, OneDrive is available in both free and paid pricing tiers. The free version only includes 5GB of storage nowadays, though long-time users may have some extra storage available, because plans used to be somewhat more generous. If you want more than the base storage, you have three subscription options:
- Microsoft 365 Basic - Grants you 100GB of OneDrive storage. Costs $1.99/month or $19.99/year.
- Microsoft 365 Personal - Includes 1TB of OneDrive storage in addition to Office apps (Word, Excel, PowerPoint, and more). Costs $6.99/month or $69.99/year.
- Microsoft 365 Family - Includes up to 6TB of OneDrive storage (1TB per user), in addition to Office apps for up to six people. Costs $9.99/month or $99.99/year.
If you have Microsoft 365 Personal of Family, you can also pay for extra OneDrive storage on top of the base subscription. The expansion plans are:
- 200GB - $1.99/month for an extra 200GB of storage.
- 400GB - $3.99/month for an extra 400GB of storage.
- 600GB - $5.99/month for an extra 600GB of storage.
- 800GB - $7.99/month for an extra 800GB of storage.
- 1TB - $9.99/month for an extra 1TB of storage.
If you have a Microsoft 365 Family plan, only the primary account holder can buy additional storage.
Best cloud storage services in 2024
There's no shortage of cloud service providers in the computing world, but here are the ones I recommend checking out in 2023.
You can use OneDrive on other devices, too
These are the basics of using OneDrive on your Windows PC, though the web version can be accessed on any platform. But aside from that, you can also download OneDrive for Android or iOS to access your cloud files on the go. In fact, the OneDrive mobile app can also sync photos from your phone automatically, so they're always accessible. There's also a OneDrive client for Mac that provides an integration very similar to how it works in Windows.