
Designing Your First Professional Embedded Web Interface
(How to Customize an Embedded Web Device Dashboard)
This hands-on tutorial teaches you how to deploy and modify a web UI template directly onto a microcontroller-powered embedded device. The tutorial includes ready-to-run source code examples that enable hardware control using a web interface. We will use the readily available ESP32 low-cost microcontroller. However, you can still follow this tutorial if you do not want to use the ESP32, since the examples can be run on platforms such as Windows and Linux using our Mako Server. But you cannot use the hardware specifics when running on Windows or Linux. The ESP32 microcontroller used in this tutorial, along with the ESP32-specific hardware interaction, enables hardware control without requiring C code or C compilation. Instead, we will use the high-level Lua language running directly on the ESP32. See the end of this tutorial for instructions on using Mako Server if you want to run the examples on a host computer first.
You may skip the following introduction if you are familiar with the distinction between an SPA and a server-generated app, as well as their security implications and development costs.
Introduction
Do you know the difference between traditional server-generated web apps and single-page applications (SPAs)? Traditional web apps reload the entire page with each interaction, whereas SPAs dynamically update content without requiring full-page reloads. Keep reading to learn more. For a complete noobs tutorial, see What is an Embedded Web Server.
What exactly is an embedded web interface?
As explained in the tutorial What is an Embedded Web Interface, there's no fundamental difference between a regular web interface and an embedded web interface. Both are built using standard web technologies like HTML, CSS, and JavaScript. However, the key distinction lies in their application and user interaction.
An embedded web interface is typically designed to function more like a standalone application rather than a traditional website. Instead of providing information or facilitating e-commerce, these interfaces serve as control panels for hardware devices. They enable users to monitor, control, and supervise the operations of a specific device, whether it is an IoT sensor, a home automation system, or an industrial machine.
Types of Embedded Web Interfaces
We can break embedded web development into two main categories:
Traditional Server-Side Web Interfaces
In a traditional server-side web interface, each user interaction triggers a request to the server, which then processes the request and sends back a new HTML page to the browser.
Benefits for Embedded Devices:
- Easier to develop and debug, especially on a platform that supports a server-side programming language such as LSP.
- Lower client-side computational requirements, especially for mobile devices.
Drawbacks for Embedded Devices:
- Slightly slower response times due to round-trip server requests and full-page rendering on response.
- Slightly increased load on the embedded device's processor to handle server-side logic.
- More complicated to maintain persistent WebSocket connections when navigating to a new page.
Client-Side Web Interfaces (Single Page Applications or SPAs)
In contrast, a Single Page Application (SPA) loads a single HTML page and dynamically updates content as the user interacts with the app. Leveraging popular frameworks like React or Vue.js, SPAs load all essential code (HTML, CSS, and JavaScript) just once, thereby minimizing the need for repetitive server requests.
Benefits for Embedded Devices:
- Faster response times due to reduced server interaction, especially when channeling all communication over SMQ.
- Offloads computational tasks to the client, reducing device processor load.
Drawbacks for Embedded Devices:
- Extensive and potentially very time-consuming learning curve, especially for web frameworks such as React.
- More complex development and debugging process.
- Higher client-side computational requirements, which may not be suitable when using mobile devices.
- Designing proper page routing and keeping shareable URLs for specific pages is tricky in an SPA, making deep linking and navigation harder to manage.
Server Rendered App Security
Unlike SPAs, where the frontend must manage authentication flows, session tokens, and API requests independently, a server-rendered interface enables you to centralize all access control and data validation in a single, hardened backend. When built with the Xedge framework as used in this tutorial, this backend is not only lightweight but also built from the ground up for secure embedded integration. Xedge includes a softTPM-protected vault for securing TLS certificates, configuration files, and the user database. The dashboard template we will use uses these security features, all implemented within a memory-safe Lua environment that eliminates the risk of buffer overflows or memory corruption.
SPA Security and Outsourcing
Many companies opt to outsource client-side web development due to the steep learning curve found in frameworks like React. However, this separation of concerns often results in fragmented security models and increased maintenance complexity. With Xedge and server-rendered Lua Server Pages, embedded teams can retain complete control over both the UI and the backend, ensuring that every part of the system adheres to the same security model and development workflow. See the tutorial Your First Single Page Application if you prefer to use a SPA. However, if security, simplicity, and maintainability are priorities, the server-side approach is the better starting point.
See the conclusion for a detailed security analysis.
Getting Started
Installation
If you're ready to start the hands-on part of this tutorial and use an actual ESP32 microcontroller, you’ll first need to install Xedge32 on your ESP32 microcontroller. For step-by-step instructions on setting up and using the Xedge32 IDE, be sure to refer to our Getting Started with Xedge32 tutorial.
Server Generated Web Template
Given that this tutorial is tailored for embedded developers, we'll focus on crafting a traditional server-side-generated web interface. Why? As explained above, the learning curve is significantly gentler.
In the following steps, you’ll start with a ready-to-use, customizable web dashboard. The goal in this tutorial is to modify the template to control a servo in real-time. We won’t start the internal engine behind the dashboard, but think of it like a lightweight Content Management System (CMS). If you’re planning to use this template in a real product, be sure to check out the companion tutorial, How to Build an Interactive Dashboard App, which covers the internals in more depth.
The web template and the Xedge32 framework are designed to make it easy to be compliant with new regulations such as the EU Cybersecurity Act. See the Xedge product page for details. Xedge32 is the ESP32 version of the generic Xedge.
When you have the Xedge32 powered ESP32 running, follow these steps:
- Clone the LSP-Examples GitHub repo.
- Navigate to the directory using the computer’s file explorer: LSP-Examples/Light-Dashboard/. In this directory, you will find the default dashboard app in the www subdirectory and the HTMX-enhanced version in the htmx subdirectory. Choose either one and ZIP the content of this subdirectory, excluding the root subdirectory name from the ZIP file (important).
- Navigate to your Xedge32 IDE: http://xedge32.local/rtl/ and click the three dots in the top right corner to open the menu.
- In the menu, click "Firmware Update & App Upload".
- Drag and drop the zip file onto the "Firmware Update & App Upload" page.
- Click Unpack ZIP file.
- Click the Save button.
- The Dashboard app should now start, and you should see some printouts in the Xedge IDE’s console window. Proceed with the next step below to test the Dashboard.
Command line example for step 1 and 2:
The Light Dashboard Template App
Upon navigating to the ESP32's root URL, http://xedge32.local/, you should no longer encounter Xedge's default "Whoops! You forgot to design this page!" 404 error page. Instead, you'll be greeted by the Light Dashboard App, as depicted in Figure 1.
👁 Light Dashboard Template
Figure 1: The light dashboard template app, a ready-to-use web framework.
The Light Dashboard Template app is a pre-configured device management Dashboard app optimized for resource-constrained environments such as microcontrollers. The Dashboard app serves as a foundation for crafting professional device management applications, as it is designed for easy customization. You can add or remove pages, which are automatically reflected in the left-side menu. While it is not essential to understand the inner workings of the Dashboard app, we suggest reviewing the tutorial How to Build an Interactive Dashboard App and the accompanying GitHub readme file. With its more basic server-generated navigation menu, the tutorial Dynamic Navigation Menu can provide clarity if the server-side Lua code mechanism in the Dashboard app appears complex. See the online interactive LSP tutorial for a complete noobs guide. Note that the Dashboard app is not exclusive to Xedge32; it is compatible with any system powered by the Barracuda App Server, including the Mako Server. For initial web development, you might find starting with the Mako Server easier before moving on to an embedded device to incorporate the ESP32 Lua South Bridge API for direct device resource management such as General Purpose Input/Output (GPIO) management.
Adding a Page to the Light Dashboard Template App
Incorporating a new page with a toggle button for LED control can be rewarding. Begin by connecting an LED to your ESP32, following the LED wiring instructions in the tutorial Getting Started with Lua for Device Management. Once your hardware setup is in place, proceed with the following steps:
- Navigate to the Xedge IDE by entering http://xedge32.local/rtl/ in the browser.
- In the left pane tree view, expand the 'www' directory (your dashboard app) and then expand .lua
- Click on menu.json to open the Dashboard app’s page configuration file.
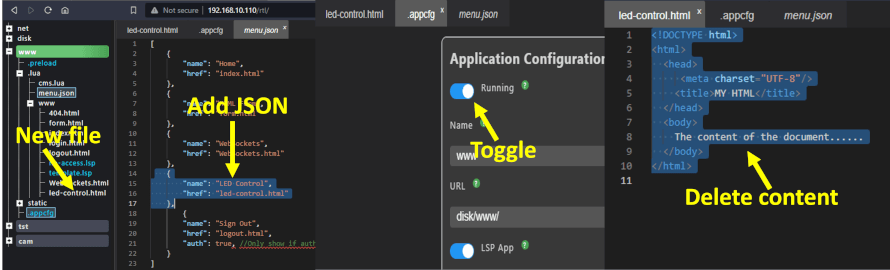
- Add the following JSON to this file (see figure 2): {"name": "LED Control", "href": "led-control.html"},
- Save the JSON file.
- Using the left pane tree view, navigate to the inner www directory, i.e., to www/.lua/www.
- Right-click www and select New File.
- Enter the name led-control.html and click the Enter button.
- Click on the new file led-control.html to open it in the editor, delete all content, and click save.
- Restart the Dashboard app by clicking on .appcfg in the left pane; click the running button twice to restart the app.
Figure 2: screenshots of the steps required for adding a new file to the Dashboard app
After adding the new page led-control.html to the Dashboard app and modifying menu.json, it's important to know that the Dashboard app doesn't automatically refresh to include these changes. To make the new "LED Control" section visible in the Dashboard app's left pane menu, a restart through the Xedge IDE is required (step 10 above).
For a more efficient workflow, open two separate browser windows or tabs: one for the Xedge IDE at http://xedge32.local/rtl/ and another for the Dashboard app at http://xedge32.local/. This setup allows for easy toggling between the two whenever you update led-control.html.
There's no need to restart the Dashboard app after adjustments to led-control.html - any edits are instantaneously accessible. For instance, if you insert the word "Hello" into led-control.html within the Xedge IDE and then save it, simply refreshing the page in the other browser window or tab at http://xedge32.local/ will display your updates. As an initial test, input the word "Hello" into the led-control.html file within the Xedge IDE and save it. Then, refresh the Dashboard app window or tab at http://xedge32.local/led-control.html. You should now see the word "Hello".
Now, remove all content in led-control.html and insert the following LSP code using the Xedge IDE:
<?lsp
if "POST" == request:method() then
 local ledState = request:data"ledstate" and true or false
 trace("Led state:",ledState)
end
?>
<form method="post">
 Light On/Off: <input name="ledstate" type="checkbox">
 <input type="submit">
</form>
Example 1: LSP code handles POST requests to log the LED state set by the user when clicking the submit button
The LSP code first checks if the incoming request is a POST request. If it is, the script retrieves the data for the 'led' field from the request. If the 'led' checkbox is checked when the form is submitted, request:data("led") will return a non-nil value; otherwise, it will return nil; consequently, ledState will be set to true or false. This state is then printed to the trace log for debugging purposes. The Xedge IDE displays the trace log in the bottom pane. We will later add the actual code for turning the LED on and off.
Insert the LSP code from Example 1 into led-control.html as an initial test, but note that there's a caveat here. The current form does not save the state of the checkbox after you click submit. In other words, if you check the box and submit the form, the box will revert to its unchecked state upon reload, even if the LED is actually on. To fully reflect the LED's actual state, additional LSP code, as shown in Example 3, will be necessary to make the checkbox retain its state after form submission.
Adding a LED API suitable for LSP pages
The next step involves integrating the LED GPIO API. While it's technically possible to directly interact with Xedge32's GPIO API from the LSP page, doing so is not recommended. The reason is that when you allocate a GPIO pin for a specific function, like controlling a LED, it's crucial to maintain the GPIO object for the entire lifespan of the application - in this case, the Dashboard app.
LSP pages operate in what's known as an "ephemeral environment," which exists only for the duration of a client request and the server's subsequent response. Therefore, directly interfacing with the GPIO API from an LSP page would not be suitable for long-term object maintenance.
To address this, we should design an API that preserves the GPIO object instance for as long as the Dashboard app runs. This can be achieved by injecting the necessary code into the Dashboard app's .preload script.
-- Initialize GPIO pin for LED control
-- Pin number is 9, and it's set as an output pin
local ledPin = esp32.gpio(9, "OUT")

-- Variable to keep track of the current state of the LED pin
local pinState = false

-- Function, available via the app table, to get or set the state of the LED
-- state: Boolean value to set the LED state; if nil, returns current state
function ledState(state)
 if nil ~= state then -- If state is provided (not nil)
 ledPin:value(not state) -- Set the LED pin to the given state
 pinState = state -- Update the pinState variable
 end
 return pinState -- Return the current state of the LED pin
end
ledState(false) -- Set off

-- Function to run when the Xedge application is terminated
-- This function closes the GPIO pin and logs the termination
function onunload()
 ledPin:close() -- Close the GPIO pin; release the HW resource
 trace("Stopping dashboard") -- Log the termination
end

-- Log that the dashboard application has started
trace("Starting dashboard")
Example 2: GPIO API, available via the 'app' table, suitable for use in an LSP page.
Append the Lua code provided in Example 2 to the end of the .preload file using the Xedge IDE without modifying any existing content. Figure 2 shows the .preload file in the left pane. Once the code has been added, restart the Dashboard app as outlined earlier. Upon successful restart, you should observe the "Starting dashboard" message displayed in the console.
We can finalize the code in Example 1 to control the LED via the browser. While it's possible to toggle the LED state by adding 'app.ledState(ledState)', this alone will not preserve the checkbox state. The refined LSP code below addresses this by retaining the checkbox state between submissions and includes HTML elements that align with the Pure.css framework we use. Functions declared in the .preload file are accessible in LSP pages via the 'app' table.
<?lsp
if "POST" == request:method() then
 local ledState = request:data"ledstate" and true or false
 trace("Led state:",ledState)
 app.ledState(ledState)
end
?>
<div class="header">
 <h1>LED Control</h1>
</div>
<div class="content">
 <form method="post" class="pure-form">
 <fieldset>
 <div class="pure-control-group">
 <label for="ledstate">LED On/Off: </label>
 <input type="checkbox" id="ledstate2" name="ledstate" <?lsp= app.ledState() and "checked" or ""?>/>
 </div>
 <div class="pure-control-group">
 <button type="submit" class="pure-button pure-button-primary">Set LED</button>
 </div>
 </fieldset>
 </form>
</div>
Example 3: a refined version of Example 1, which maintains checkbox state and calls our ledState() function in the .preload script.
After inserting Example 3 into led-control.html and saving the file, you should now be able to control the LED by checking/unchecking the checkbox and clicking submit.
Simplifying the user LED control interaction
Submitting the form automatically when a checkbox changes creates a smoother user experience. It eliminates the two-step process of first checking the box and then clicking a separate "Submit" button, thereby reducing the number of interactions required from the user. This not only speeds up the interaction but also minimizes the cognitive load, making the application feel more responsive and intuitive.
Here's how you can implement this streamlined approach using JavaScript:
<?lsp
if "POST" == request:method() then
 local ledState = request:data("ledstate") and true or false
 trace("Led state:", ledState)
 app.ledState(ledState)
end
?>
<script>
 function submitForm() {
 document.getElementById("ledForm").submit();
 }
</script>

<div class="header">
 <h1>LED Control</h1>
</div>
<div class="content">
 <form id="ledForm" method="post" class="pure-form">
 <fieldset>
 <div class="pure-control-group">
 <label for="ledstate">LED On/Off: </label>
 <input type="checkbox" id="ledstate" name="ledstate" <?lsp=app.ledState() and "checked" or ""?> onchange="submitForm()"/>
 </div>
 </fieldset>
 </form>
</div>
Example 4: eliminating the two-step procedure required by Example 3.
After inserting Example 4 into led-control.html (replacing Example 3) and saving the changes, you enable LED control directly through the checkbox. There's no need for a separate submit button or additional clicks. Note that you do not need to restart the Dashboard app. Simply modify the content in led-control.html, save the file, and refresh the browser page to see the changes take effect.
Servo Control using the Dashboard App’s Slider Example
The URL http://xedge32.local/WebSockets.html provides an SMQ-powered WebSocket example that illustrates real-time event communication from your browser to the target device. In this example, we leverage this capability to manipulate a servo in real-time. To follow along, you'll need a servo, and you should wire it according to Figure 3.
👁 ESP32 Servo Wiring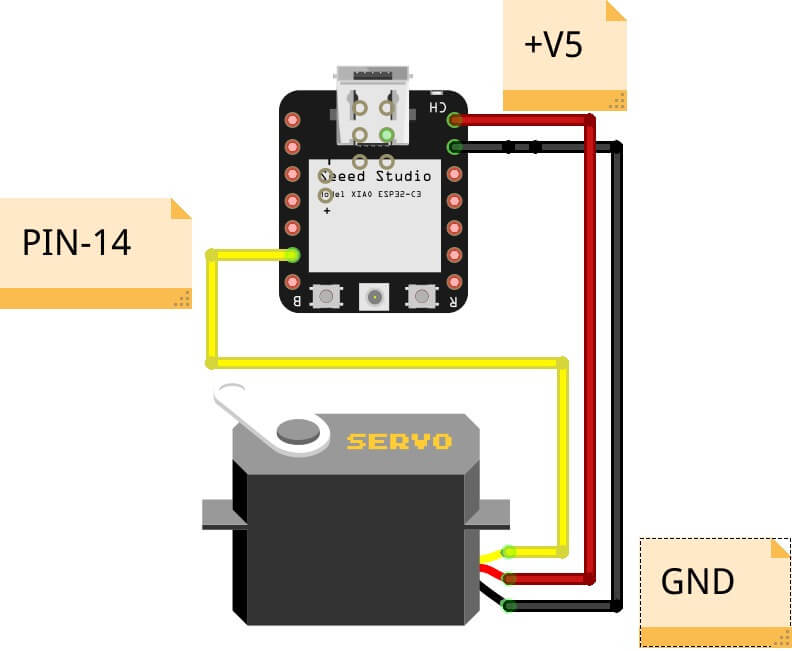
Figure 3: Servo Wiring
Note that when using the XIAO-ESP32-S3 as depitcted above, the GPIO pin used is pin-6
For this upgrade, you'll once again need to open the .preload file using the Xedge IDE. Within this file, locate the existing slider function. Here's how it initially appears:
local function slider(d)
 angle=d.angle
 trace("Slider angle",angle)
end
Example 5: The original 'slider' function
Replace the original slider function with the updated version, including its associated servo control logic, as shown below:
local gpioPin=14 -- The GPIO servo control pin used. It must be changed to the pin you use.
local bits=13 -- pwm resolution = 13 bits
local maxPwm=2^bits - 1 -- any value between 0 and maxPwm
local minPulseWidth = 1000 -- 1 ms
local cycleTime = 20000 -- 20 ms

local function calculatePwmDutyCycle(angle)
 return (maxPwm / cycleTime) * (angle * 1000 / 180 + minPulseWidth)
end

local ok,err=esp32.pwmtimer{
 mode="LOW", -- speed_mode
 bits=bits, -- duty_resolution (bits)
 timer=0, -- timer_num
 freq=50,
}
assert(ok,err)
local duty = 2000 / 20000 * 100
pwm,err=esp32.pwmchannel{
 mode="LOW",
 channel=1,
 timer=0, -- timer_sel
 gpio=gpioPin,
 duty = calculatePwmDutyCycle(180),
 hpoint=0,
}
assert(pwm,err)

local function slider(d)
 angle=d.angle
 trace("Slider angle",angle)
 pwm:duty(calculatePwmDutyCycle(angle))
end
Example 6: The modified 'slider' function with associated servo control logic
Since we are modifying the .preload file, the Dashboard app must be restarted, as previously explained, after saving the file. You should now be able to control the servo by adjusting the slider in the browser. Open two separate browser windows to the URL http://xedge32.local/WebSockets.html, and you will see real-time changes in both windows when the slider is moved in one of them. To further understand the advantages of utilizing the SMQ protocol over raw WebSockets, refer to our tutorial Modern Approach to Device Management.
Example 6's slider function and servo control code have been adapted from our GitHub example file servo.lsp. For a more in-depth explanation of the servo control code mechanics, please see the comments at the top of that Lua source file. You should also consult the Lua PWM API documentation.
Conclusion
This tutorial walked through the fundamentals of building a web-based interface for microcontroller-driven devices, with a focus on real-time GPIO control using Xedge32. From customizable dashboards to hands-on hardware control, like driving a servo, you've seen how the pieces come together.
Xedge32 strikes a balance between simplicity and power. It removes much of the boilerplate typically involved in embedded web development, letting you focus on functionality rather than infrastructure. Paired with Mako Server for local (host) development, the workflow allows for fast iteration using Lua Server Pages (LSP), then seamless deployment to microcontroller hardware.
Whether you're experimenting on your own or building production-grade systems, the approach shown here gives you a solid foundation for crafting responsive, browser-based interfaces for your embedded projects.
Xedge32 and the Dashboard Template App include several security features designed to enhance the security of your final design and to help you avoid the issues mentioned below.
Embedded Web Server Security Incident Examples:
CISA published a list of serious hardware and software vulnerabilities found in devices from several large device companies, many of which stem from common yet avoidable mistakes, including buffer overflows, insecure web servers, open debug ports, inadequate TLS certificate validation, and weak update mechanisms.
What Went Wrong?
Looking at the CISA report:
- LG and Network Thermostat had exploitable web interfaces due to poorly secured embedded web servers (and their web apps).
- Medtronic and Mitsubishi vulnerabilities involved buffer overflows and memory mismanagement, typically caused by manual C/C++ code handling.
- Honeywell's issue involved multiple critical flaws, including the use of uninitialized variables, buffer operation restrictions, improper data sanitization, integer underflow, and the deployment of incorrect handlers.
Security is a complex topic, but Xedge32, based on Xedge, which is again built on the Barracuda Application Server, has been hardened through years of industrial deployment. Beyond the features, Xedge enforces a development model that steers engineers toward best practices. Its Lua-based architecture encourages clean separation between logic and system code, reducing attack surface and making secure, maintainable designs the default. See the Xedge product page for the security details.
An interesting observation is that firmware-based products using a single monolithic binary are often far more secure than Linux-based systems, which allow attackers to load and execute new processes after deployment dynamically. This distinction is explored in detail in the whitepaper Securing IoT Edge Nodes. You may also want to review Barracuda App Server vs. CGI, which highlights several real-world vulnerabilities stemming from traditional embedded Linux web server designs. New vulnerability disclosures targeting embedded web servers appear almost daily. One of the most severe we've encountered is the Barth EV Station vulnerability, which may be remembered as one of the worst in the history of embedded devices.
Expand Your Horizons:
This tutorial was just the beginning. To continue learning Xedge32, check out our full range of Xedge32 tutorials and take your skills to the next level.
Looking for more than just ESP32 tutorials? Check out our full collection of Embedded Web Server Tutorials - covering a wide range of platforms, tools, and real-world use cases.
Posted in Xedge32