 |
VOOZH | about |
|
VOOZH | about |
This Unit 2 Class 10th Computer Application Notes covers everything a Class 10 student needs to know about HTML. Based on the latest NCERT guidelines, these Class 10th CS Notes provide a comprehensive overview of key HTML concepts, including tags, attributes, and structure, and include important questions designed to help you score well in both your class tests and final Class 10th board exams.
Table of Content
HTML is the language of the web, used by billions of websites to create the pages you see every day. HTML stands for HyperText Markup Language. It is the standard language used to create and design web pages on the internet. It was introduced by Tim Berners-Lee in 1991 at CERN as a simple markup language. Since then, it has evolved through versions from HTML 2.0 to HTML5 (the latest 2024 version).
HTML is a combination of Hypertext and Markup language. Hypertext defines the link between the web pages and Markup language defines the text document within the tag. In this article, you will learn how to use HTML to create and style web pages. You will start with HTML fundamentals, such as basic HTML tags and their attributes, classes, layout, and responsiveness.
<!DOCTYPE html>
<html>
 <head>
 <title>My First Web Page</title>
 </head>
 <body>
 <h1>Hello, World!</h1>
 <p>This is my first web page using HTML.</p>
 </body>
</html>
<!DOCTYPE html>: Declares that this is an HTML5 document.<html>: The root element of the HTML document.<head>: Contains metadata and the title of the page.<title>: Sets the text that appears in the browser’s title bar or tab.<body>: Contains the content of the web page.<h1>: A heading element (largest text size).<p>: A paragraph element..html extension. For example, you could name it index.html.File > Save As..., choose All Files in the “Save as type” dropdown, and type index.html as the file name. Make sure you select UTF-8 encoding if available.index.html file into the browser window, or use the browser’s Open File option:Ctrl+O (Windows) or Cmd+O (Mac), then navigate to and select your index.html file.File > Open File... from the menu and select your HTML file.<img>), links (<a>), and lists (<ul>, <li>) to see how they appear on your page.By following these steps, you can start designing your own web pages using HTML, experimenting with different elements and styles to create your unique website.
Here's a simple breakdown of the essential HTML tags: <html>, <head>, <title>, and <body>, along with their roles and examples:
<html> Tag<!DOCTYPE html>
<html>
<!-- All other HTML elements go here -->
</html>
<head> Tag<head>
<meta charset="UTF-8">
<meta name="viewport" content="width=device-width, initial-scale=1.0">
<title>My Web Page</title>
<link rel="stylesheet" href="styles.css">
</head>
<title> Tag<title>My Awesome Web Page</title><body> Tag<body>
<h1>Welcome to My Website</h1>
<p>This is a paragraph of text on my web page.</p>
<a href="https://www.example.com/">Visit Example</a>
</body>
Here’s how these tags work together in a basic HTML document:
<!DOCTYPE html>
<html>
 <head>
 <meta charset="UTF-8">
 <meta name="viewport" content="width=device-width, initial-scale=1.0">
 <title>My First Web Page</title>
 </head>
 <body>
 <h1>Hello, World!</h1>
 <p>This is my first HTML page. Welcome!</p>
 <a href="https://www.example.com/">Click here to visit Example</a>
 </body>
</html>
<!DOCTYPE html>: Declares the document type and HTML version.<html>: The root element wrapping all HTML content.<head>: Contains metadata like the title and character set.<title>: Sets the page title shown in the browser tab.<body>: Contains the visible content of the page.This structure forms the foundation of any HTML document, helping you create and organize web content effectively.
Here’s an overview of HTML attributes like text, background, bgcolor, link, vlink, and alink, along with their use cases:
text Attribute<body text="#000000"> <!-- Black text color -->
<h1>Hello World!</h1>
</body>
background Attribute<body background="background-image.jpg">
<h1>Welcome!</h1>
</body>
bgcolor Attributetext and background, it is now outdated in favor of CSS.<body bgcolor="#f0f0f0"> <!-- Light gray background -->
<h1>Hello World!</h1>
</body>
link Attribute<body> tag.<body link="#0000ff"> <!-- Blue color for unvisited links -->
<a href="https://www.example.com/">Visit Example</a>
</body>
vlink Attribute<body> tag.<body vlink="#800080"> <!-- Purple color for visited links -->
<a href="https://www.example.com/">Visit Example</a>
</body>
alink Attribute<body> tag.<body alink="#ff0000"> <!-- Red color for active links -->
<a href="https://www.example.com/">Visit Example</a>
</body>
These attributes are now considered outdated and should be replaced with CSS for styling:
p {
 color: #000000; /* Black text */
}
body {
 background-image: url('background-image.jpg');
}
body {
 background-color: #f0f0f0; /* Light gray background */
}
a:link {
 color: #0000ff; /* Blue for unvisited links */
}
a:visited {
 color: #800080; /* Purple for visited links */
}
a:active {
 color: #ff0000; /* Red for active links */
}
Using CSS instead of these deprecated HTML attributes provides greater flexibility and control over styling and ensures your code adheres to modern standards.
Here’s a guide on how to use the <br> tag (line break), <hr> tag (horizontal rule), inserting comments, and heading tags (<h1> to <h6>) in HTML:
<br> Tag (Line Break)<p>This is the first line.<br>This is the second line.</p><hr> Tag (Horizontal Rule)<h2>Section 1</h2>
<p>This is some content for section 1.</p>
<hr>
<h2>Section 2</h2>
<p>This is some content for section 2.</p>
<!-- This is a comment --><p>This is a paragraph.</p>
<!-- The following section contains a horizontal rule -->
<hr>
<p>Another paragraph after the horizontal rule.</p>
<h1> to <h6> Tags (Headings)<h1> being the highest (or most important) and <h6> the lowest. These tags help organize content and improve readability. They also play a role in SEO by indicating the structure of the content.<h1>Main Heading</h1>
<h2>Subheading Level 1</h2>
<h3>Subheading Level 2</h3>
<h4>Subheading Level 3</h4>
<h5>Subheading Level 4</h5>
<h6>Subheading Level 5</h6>
<h1> is the largest and most prominent, while <h6> is the smallest.Here’s how these elements might be used in a simple HTML document:
<!DOCTYPE html>
<html>
 <head>
 <title>Example Page</title>
 </head>
 <body>
 <h1>Welcome to My Web Page</h1>
 <p>This is an introduction paragraph.</p>
 <br>
 <p>Here’s another paragraph with a line break above it.</p>
 <hr>
 <h2>Section Heading</h2>
 <p>This section starts with a heading and a horizontal rule.</p>
 <!-- This comment explains the next section -->
 <h3>Subsection Heading</h3>
 <p>Details about the subsection.</p>
 </body>
</html>
This example shows how to combine line breaks, horizontal rules, comments, and headings to structure and format an HTML page effectively.
Here's a detailed guide on HTML tags for formatting text and creating lists:
<p> Tag (Paragraph)<p> element to separate it from other content.<p>This is a paragraph. It is used to display blocks of text with some space around it.</p><b> Tag (Bold)<b> tag is used for stylistic purposes, and it doesn’t imply any semantic meaning. For emphasizing text with semantic meaning, use <strong>.<p>This is <b>bold</b> text.</p><i> Tag (Italics)<b>, the <i> tag is for styling purposes without adding semantic meaning. Use <em> for emphasized text.<p>This is <i>italic</i> text.</p><u> Tag (Underline)<ins> for inserted text.<p>This is <u>underlined</u> text.</p><ul> Tag (Unordered List)<ul>
<li>Item 1</li>
<li>Item 2</li>
<li>Item 3</li>
</ul>
<ol> Tag (Ordered List)<ol>
<li>First item</li>
<li>Second item</li>
<li>Third item</li>
</ol>
<li> Tag (List Item)<ul> (unordered list) and <ol> (ordered list).<ul>
<li>Apple</li>
<li>Banana</li>
<li>Cherry</li>
</ul>
Here’s how these tags might be used in a single HTML document:
<!DOCTYPE html>
<html>
<head>
<title>Text Formatting Example</title>
</head>
<body>
<p>This paragraph contains some <b>bold</b> text, <i>italic</i> text, and <u>underlined</u> text.</p>
<h2>Unordered List:</h2>
<ul>
<li>First item</li>
<li>Second item</li>
<li>Third item</li>
</ul>
<h2>Ordered List:</h2>
<ol>
 <li>First item</li>
 <li>Second item</li>
 <li>Third item</li>
</ol>
</body>
</html>
This example demonstrates how to format text with bold, italics, and underline, and how to create both unordered and ordered lists. Each list item is placed within the <li> tags, and lists are wrapped in either <ul> or <ol> tags depending on whether you want bullets or numbers.
Here’s a guide on HTML description lists and the attributes for ordered and unordered lists:
<dl>, <dt>, and <dd><dl> Tag (Description List)<dl>
<!-- Description List goes here -->
</dl>
<dt> Tag (Description Term)<dt>HTML</dt><dd> Tag (Description Detail)<dt> tag.<dd>Hypertext Markup Language, the standard language for creating web pages.</dd>start, typestart Attribute<ol start="5">
<li>Item 1</li>
<li>Item 2</li>
</ol>
type Attribute1 (default): Numeric (1, 2, 3, ...)A: Uppercase letters (A, B, C, ...)a: Lowercase letters (a, b, c, ...)I: Uppercase Roman numerals (I, II, III, ...)i: Lowercase Roman numerals (i, ii, iii, ...)<ol type="A">
<li>Item 1</li>
<li>Item 2</li>
</ol>
typetype Attributedisc (default): Filled circlecircle: Hollow circlesquare: Solid square<ul type="square">
<li>Item 1</li>
<li>Item 2</li>
</ul>
Here’s an example of a complete HTML document using description lists and various list attributes:
<!DOCTYPE html>
<html>
 <head>
 <title>Lists Example</title>
 </head>
 <body>
 <h2>Description List:</h2>
 <dl>
 <dt>HTML</dt>
 <dd>Hypertext Markup Language, the standard language for creating web pages.</dd>
 <dt>CSS</dt>
 <dd>Cascading Style Sheets, used for styling HTML elements.</dd>
 </dl>

 <h2>Ordered List with Attributes:</h2>
 <ol start="3" type="I">
 <li>Item A</li>
 <li>Item B</li>
 </ol>

 <h2>Unordered List with Attribute:</h2>
 <ul type="circle">
 <li>Item 1</li>
 <li>Item 2</li>
 </ul>
 </body>
</html>
This example shows how to use description lists to provide definitions, and how to apply attributes to ordered and unordered lists to control their appearance and starting points.
The <font> tag in HTML was used to style text with specific fonts, sizes, and colors. However, it's considered obsolete in modern HTML and has been replaced by CSS for styling purposes. Here’s a brief overview of the <font> tag and its attributes:
<font> Tag<font> tag was used to define the font, size, and color of text. It allowed for inline styling within HTML documents, but it’s no longer recommended for use in modern web design.<font> Tagface Attribute<font face="Arial, sans-serif">This is text in Arial font.</font>size Attribute+1 or -2 to adjust the font size relative to the default size.<font size="4">This text is size 4.</font>color Attribute<font color="#ff0000">This text is red.</font>Instead of using the <font> tag, CSS provides more powerful and flexible styling options. Here’s how you can achieve the same effects using CSS:
<p style="font-family: Arial, sans-serif;">This is text in Arial font.</p><p style="font-size: 16px;">This text is 16 pixels in size.</p><p style="color: #ff0000;">This text is red.</p>Here’s an example using CSS to replace the old <font> tag attributes:
<!DOCTYPE html>
<html>
 <head>
 <title>Font Styling Example</title>
 </head>
 <body>
 <p style="font-family: Arial, sans-serif; font-size: 18px; color: #333333;">
 This is styled with modern CSS: Arial font, 18px size, and dark gray color.
 </p>
 </body>
</html>
While the <font> tag was once used for text styling, it's now outdated. Using CSS is the recommended approach for controlling font properties, as it offers more flexibility and is consistent with modern web design practices.
<img> TagThe <img> tag is used to display images on a web page. It is a self-closing tag, meaning it does not need a closing tag.
src: Specifies the path to the image file. It can be a relative path or a URL.width: Defines the width of the image. Can be in pixels or percentage.height: Defines the height of the image. Can be in pixels or percentage.alt: Provides alternative text for the image if it cannot be displayed. This is important for accessibility and SEO.<img src="https://www.example.com//image.jpg" width="300" height="200" alt="Description of the image">src="https://www.example.com//image.jpg": The URL of the image.width="300": The image width is set to 300 pixels.height="200": The image height is set to 200 pixels.alt="Description of the image": Provides a description for users who cannot see the image.<sup> TagThe <sup> tag is used to display text as superscript, which means the text appears slightly above the baseline and is usually smaller.
<p>E = mc<sup>2</sup></p><sub> TagThe <sub> tag is used to display text as subscript, meaning the text appears slightly below the baseline and is usually smaller.
<p>H<sub>2</sub>O</p>Here’s a sample HTML document incorporating images, superscript, and subscript:
<!DOCTYPE html>
<html>
 <head>
 <title>HTML Formatting Example</title>
 </head>
 <body>
 <h1>Image and Text Formatting</h1>

 <h2>Inserting an Image:</h2>
 <img src="https://www.example.com//image.jpg" width="300" height="200" alt="A beautiful scenery">

 <h2>Using Superscript:</h2>
 <p>The famous equation is E = mc<sup>2</sup>, where c is the speed of light.</p>

 <h2>Using Subscript:</h2>
 <p>Water is represented as H<sub>2</sub>O in chemical formulas.</p>
 </body>
</html>
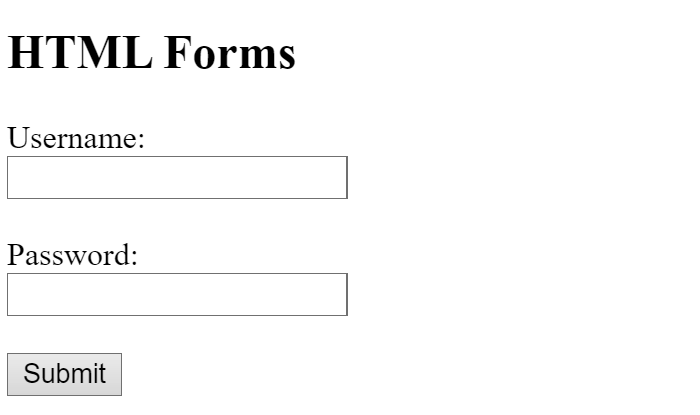
<img> tag with src, width, height, and alt attributes to insert and control images.<sup> tag for superscript text, and the <sub> tag for subscript text to format text effectively for scientific or mathematical notation.HTML forms are essential for collecting user input on web pages. HTML Formsutilize the <form> element as a powerful tool to collect user input through a variety of interactive controls. These controls range from text fields, numeric inputs, email fields, password fields, to checkboxes, radio buttons, and submit buttons. In essence, an HTML Form serves as a versatile container for numerous input elements, thereby enhancing user interaction.
Syntax:
<form>
 <!--form elements-->
</form>
Example: This HTML forms collects the user personal information such as username and password with the button to submit the form.
<input type="text">name: Identifies the input.placeholder: Provides a hint about the expected value.value: Sets a default value.<label for="username">Username:</label>
<input type="text" id="username" name="username" placeholder="Enter your username">
<input type="radio">name: Groups radio buttons to ensure only one can be selected at a time.value: Represents the value sent when the form is submitted.checked: Specifies if the radio button is selected by default.<p>Select your gender:</p>
<input type="radio" id="male" name="gender" value="male">
<label for="male">Male</label><br>
<input type="radio" id="female" name="gender" value="female">
<label for="female">Female</label>
<input type="checkbox">name: Identifies the checkbox.value: Represents the value sent when the checkbox is checked.checked: Specifies if the checkbox is selected by default.<p>Select your interests:</p>
<input type="checkbox" id="coding" name="interests" value="coding">
<label for="coding">Coding</label><br>
<input type="checkbox" id="gaming" name="interests" value="gaming">
<label for="gaming">Gaming</label>
<input type="password">name: Identifies the password field.placeholder: Provides a hint about what to enter.<label for="password">Password:</label>
<input type="password" id="password" name="password" placeholder="Enter your password">
<select> combined with <option>name: Identifies the dropdown list.<option>: Represents each option in the list.selected: Sets a default selected option.<label for="country">Choose your country:</label>
<select id="country" name="country">
<option value="usa">United States</option>
<option value="canada">Canada</option>
<option value="uk">United Kingdom</option>
</select>
<input type="text"> combined with a <datalist>list: Links the input to a <datalist>.<label for="city">City:</label>
<input type="text" id="city" name="city" list="cities">
<datalist id="cities">
<option value="New York">
<option value="Los Angeles">
<option value="Chicago">
</datalist>
Here’s a simple HTML form that includes textboxes, radio buttons, checkboxes, a password field, a dropdown list, and a combo box:
<!DOCTYPE html>
<html>
<head>
<title>HTML Form Example</title>
</head>
<body>
<h1>Form Example</h1>
<form>
<!-- Textbox -->
<label for="username">Username:</label>
<input type="text" id="username" name="username" placeholder="Enter your username"><br><br>
<!-- Radio Buttons -->
<p>Select your gender:</p>
<input type="radio" id="male" name="gender" value="male">
<label for="male">Male</label><br>
<input type="radio" id="female" name="gender" value="female">
<label for="female">Female</label><br><br>
<!-- Checkboxes -->
<p>Select your interests:</p>
<input type="checkbox" id="coding" name="interests" value="coding">
<label for="coding">Coding</label><br>
<input type="checkbox" id="gaming" name="interests" value="gaming">
<label for="gaming">Gaming</label><br><br>
<!-- Password -->
<label for="password">Password:</label>
<input type="password" id="password" name="password" placeholder="Enter your password"><br><br>
<!-- Dropdown List -->
<label for="country">Choose your country:</label>
<select id="country" name="country">
 <option value="usa">United States</option>
 <option value="canada">Canada</option>
 <option value="uk">United Kingdom</option>
</select><br><br>
<!-- Combo Box -->
<label for="city">City:</label>
<input type="text" id="city" name="city" list="cities">
<datalist id="cities">
 <option value="New York">
 <option value="Los Angeles">
 <option value="Chicago">
</datalist><br><br>
<input type="submit" value="Submit">
</form>
</body>
</html>
Embedding audio and video in an HTML page is straightforward with the <audio> and <video> tags. Here’s a guide on how to use these tags to include multimedia content:
The <audio> tag is used to embed audio files in an HTML document. You can specify multiple audio formats to ensure compatibility across different browsers.
src: Specifies the path to the audio file.controls: Adds playback controls (play, pause, volume) to the audio player.autoplay: Automatically starts playing the audio when the page loads (use with caution as it can be intrusive).loop: Repeats the audio indefinitely.preload: Specifies if and how the audio file should be loaded when the page loads (auto, metadata, none).<h2>Listen to This Audio:</h2>
<audio src="audio/sample.mp3" controls>
Your browser does not support the audio element.
</audio>
<audio> tag, the text "Your browser does not support the audio element" is displayed.The <video> tag is used to embed video files. Like <audio>, you can include multiple video formats to ensure compatibility.
src: Specifies the path to the video file.controls: Adds playback controls (play, pause, volume, fullscreen) to the video player.autoplay: Automatically starts playing the video when the page loads (use with caution).loop: Repeats the video indefinitely.muted: Starts the video with the sound off.width and height: Defines the dimensions of the video player.<h2>Watch This Video:</h2>
<video src="video/sample.mp4" width="640" height="360" controls>
Your browser does not support the video tag.
</video>
<video> tag, the text "Your browser does not support the video tag" is displayed.For better compatibility, you can include multiple <source> tags within <audio> or <video>. This allows browsers to choose the format they support.
<h2>Listen to This Audio:</h2>
<audio controls>
 <source src="audio/sample.mp3" type="audio/mpeg">
 <source src="audio/sample.ogg" type="audio/ogg">
 Your browser does not support the audio element.
</audio>

<h2>Watch This Video:</h2>
<video width="640" height="360" controls>
 <source src="video/sample.mp4" type="video/mp4">
 <source src="video/sample.webm" type="video/webm">
 Your browser does not support the video tag.
</video>
Here’s a sample HTML document that embeds both audio and video with multiple source formats:
<!DOCTYPE html>
<html>
 <head>
 <title>Multimedia Example</title>
 </head>
 <body>
 <h1>Embed Audio and Video</h1>

 <!-- Audio -->
 <h2>Listen to This Audio:</h2>
 <audio controls>
 <source src="audio/sample.mp3" type="audio/mpeg">
 <source src="audio/sample.ogg" type="audio/ogg">
 Your browser does not support the audio element.
 </audio>

 <!-- Video -->
 <h2>Watch This Video:</h2>
 <video width="640" height="360" controls>
 <source src="video/sample.mp4" type="video/mp4">
 <source src="video/sample.webm" type="video/webm">
 Your browser does not support the video tag.
 </video>
 </body>
</html>
<audio> tag with src and controls attributes to embed audio files.<video> tag with src, controls, and optional attributes like width, height, autoplay, and loop to embed video files.<source> tags to ensure compatibility with different browsers.Creating a table in HTML involves using several tags to define the table structure and its contents. Here’s a guide on how to use the <table>, <tr>, <th>, <td>, rowspan, and colspan attributes to create and customize a table.
<table>: Defines the table.<tr>: Defines a row in the table.<th>: Defines a header cell, which is bold and centered by default.<td>: Defines a standard data cell.rowspan and colspan Attributesrowspan: Merges multiple rows into one cell.colspan: Merges multiple columns into one cell.Here’s an example of an HTML table with header cells, data cells, and merged rows and columns:
<!DOCTYPE html>
<html>
<head>
 <title>HTML Table Example</title>
</head>
<body>
 <h1>My HTML Table</h1>
 <table border="1">
 <!-- Table Header -->
 <tr>
 <th>Header 1</th>
 <th>Header 2</th>
 <th>Header 3</th>
 </tr>

 <!-- Table Row 1 -->
 <tr>
 <td>Row 1, Cell 1</td>
 <td colspan="2">Row 1, Cell 2 (spans 2 columns)</td>
 </tr>

 <!-- Table Row 2 -->
 <tr>
 <td rowspan="2">Row 2 and 3, Cell 1 (spans 2 rows)</td>
 <td>Row 2, Cell 2</td>
 <td>Row 2, Cell 3</td>
 </tr>

 <!-- Table Row 3 -->
 <tr>
 <td>Row 3, Cell 2</td>
 <td>Row 3, Cell 3</td>
 </tr>

 <!-- Table Row 4 -->
 <tr>
 <td>Row 4, Cell 1</td>
 <td>Row 4, Cell 2</td>
 <td>Row 4, Cell 3</td>
 </tr>
 </table>
</body>
</html>
<th> elements are used for headers. In this example, three header cells are defined in the first row.<td> with colspan="2", merging two columns into one cell.rowspan="2", merging it with the cell directly below it in Row 3.Links are a fundamental part of the web, allowing users to navigate between pages and access various resources. Here’s a breakdown of the significance of linking, the <a> (anchor) element, and its attributes:
Links, or hyperlinks, are essential for several reasons:
Example: Clicking on a link to a tutorial page while reading an article about web design.
<a> Tag)The <a> element, also known as the anchor tag, is used to create hyperlinks. Here’s how you can use it:
<a> Element:href: Specifies the URL or address the link points to.<a href="https://www.example.com/">Visit Example</a>mailto: Opens the default email client to send an email to the specified email address.<a href="mailto:info@example.com">Email Us</a>target: Specifies where to open the linked document._self: Opens the link in the same frame or tab (default behavior)._blank: Opens the link in a new tab or window._parent: Opens the link in the parent frame (if the page is within an iframe)._top: Opens the link in the full body of the window, replacing any frames.<a href="https://www.example.com/" target="_blank">Open Example in New Tab</a>Here’s a simple HTML example that demonstrates how to use links:
<!DOCTYPE html>
<html>
<head>
 <title>HTML Links Example</title>
</head>
<body>
 <h1>Welcome to My Website</h1>

 <!-- External Link -->
 <p>Check out <a href="https://www.example.com/" target="_blank">Example Website</a> for more information.</p>

 <!-- Email Link -->
 <p>If you have questions, <a href="mailto:info@example.com">email us</a>.</p>

 <!-- Internal Link -->
 <p>Go back to the <a href="#top">top of this page</a>.</p>

 <!-- Anchor Link (Internal) -->
 <h2 id="top">Top of the Page</h2>
 <p>Content at the top of the page.</p>
</body>
</html>
<a> tag to create links.href: Specifies the link’s destination.mailto: Opens the email client.target: Defines where the link will open (same tab, new tab, etc.).Understanding these basics allows you to create effective and user-friendly links in your web pages.
Cascading Style Sheets (CSS) are used to style and layout web pages. They control the look and feel of HTML elements, making web pages not only functional but also visually appealing. CSS, or Cascading Style Sheets, is a language used to style and enhance websites. It controls how HTML elements such as text, images, and buttons—are displayed on a webpage.
With CSS, you can adjust font sizes and colors, add backgrounds, and manage the layout, transforming a basic webpage into a visually appealing and user-friendly experience. CSS also simplifies layout management across multiple web pages by using external stylesheets stored in CSS files.
Here’s a basic introduction to key CSS properties and how they can be applied:
CSS is a language used to describe the presentation of a document written in HTML or XML. It allows you to:
In this example, we will use all of them with different properties.
color: Sets the color of text.color: #333; (Dark grey text)background-color: Sets the background color of an element.background-color: #ffcc00; (Yellow background)border-style: Defines the style of the border (solid, dashed, dotted, etc.).border-style: solid; (Solid border)margin: Sets the space outside an element's border.margin: 20px; (20px space around the element)height: Defines the height of an element.height: 100px; (100 pixels high)width: Defines the width of an element.width: 200px; (200 pixels wide)outline: Adds an outline around an element, outside of its border.outline: 2px solid red; (2px solid red outline)font-family: Specifies the font type.font-family: 'Times New Roman', serif; (Times New Roman font)font-style: Sets the style of the font (normal, italic, oblique).font-style: italic; (Italic text)font-size: Sets the size of the font.font-size: 18px; (18 pixels font size)text-align: Aligns the text inside an element (left, right, center, justify).text-align: center; (Centered text)float: Allows an element to float to the left or right of its container, enabling text to wrap around it.float: left; (Floats the element to the left)Here’s a practical example to see how these properties are used in context:
<!DOCTYPE html>
<html>
<head>
 <title>CSS Properties Example</title>
 <style>
 .container {
 width: 100%;
 background-color: #f9f9f9;
 padding: 20px;
 }
 .box {
 width: 150px;
 height: 150px;
 background-color: #3498db;
 border: 3px solid #2980b9;
 margin: 10px;
 padding: 10px;
 color: white;
 font-family: 'Arial', sans-serif;
 font-size: 18px;
 font-style: italic;
 text-align: center;
 float: left;
 }
 .box:last-child {
 background-color: #e74c3c;
 border-style: dashed;
 outline: 4px solid #c0392b;
 }
 </style>
</head>
<body>
 <div class="container">
 <div class="box">Box 1</div>
 <div class="box">Box 2</div>
 </div>
</body>
</html>
<style> tags or external stylesheets to format and design web pages effectively.This overview should help you understand and apply CSS properties to design and layout web pages.
In conclusion, these Class 10th CS Notes for Unit 2 - HTML will help you master key web development concepts and excel in your exams. With a solid understanding of this unit, you'll be well-prepared to score high marks.
After completing Unit 2, don't forget to explore our Unit 3 notes to further strengthen your knowledge and continue your success.