 |
VOOZH | about |
|
VOOZH | about |
Machine learning models may be created, deployed, and managed on Google Cloud using the Vertex AI service. Vertex AI may be used to supply models with live or batch predictions and train models using a variety of techniques, including AutoML or custom training. This post will demonstrate how to use Python code and a custom container to train and deploy a custom model using Vertex AI.
Vertex AI offers both AutoML and Custom training as choices for building models.
Here we talk about custom training cause the article is subjected to training and deploying your own (custom) model with Vertex AI.
Any machine learning model that you develop yourself using an ML framework, such as TensorFlow, PyTorch, or scikit-learn, is referred to as a bespoke model. Complex problems that need more flexibility and control than AutoML can be resolved with a bespoke model. For instance, you may utilize a bespoke model to carry out reinforcement learning, natural language production, or picture segmentation.
A custom container is a package that contains your code, dependencies, and environment for running your custom model. You can use a custom container to train your model on Vertex AI using the resources and scale of Google Cloud. You can also use a custom container to deploy your model to an endpoint and get predictions from it.
The steps to train and deploy your model with Vertex AI are as follows:
Prepare your code and data. Write your code in Python using any ML framework and save it as a script or a module or train your model locally and upload it into your Google Cloud bucket directly. For example, you can train a Tensorflow model on the MNIST dataset.
You need to follow the below-mentioned steps to train your model in Google Cloud Platform (GCP) with Vertex AI.
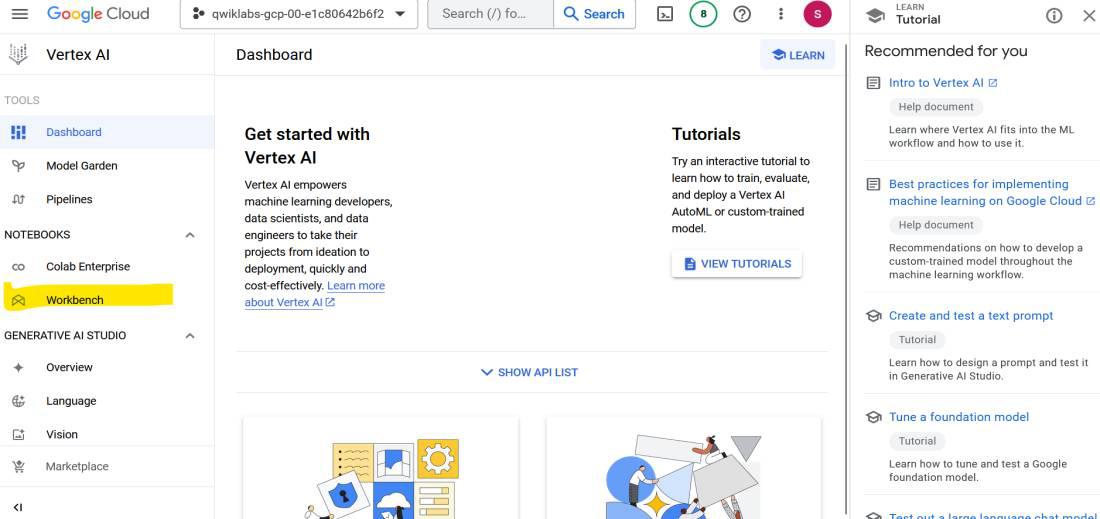
In your Cloud Console, navigate to Vertex AI > Workbench.
Click on user-managed notebook
After the above selection click on Create a new button to create a Jupiter notebook instance to train our model in GCP.
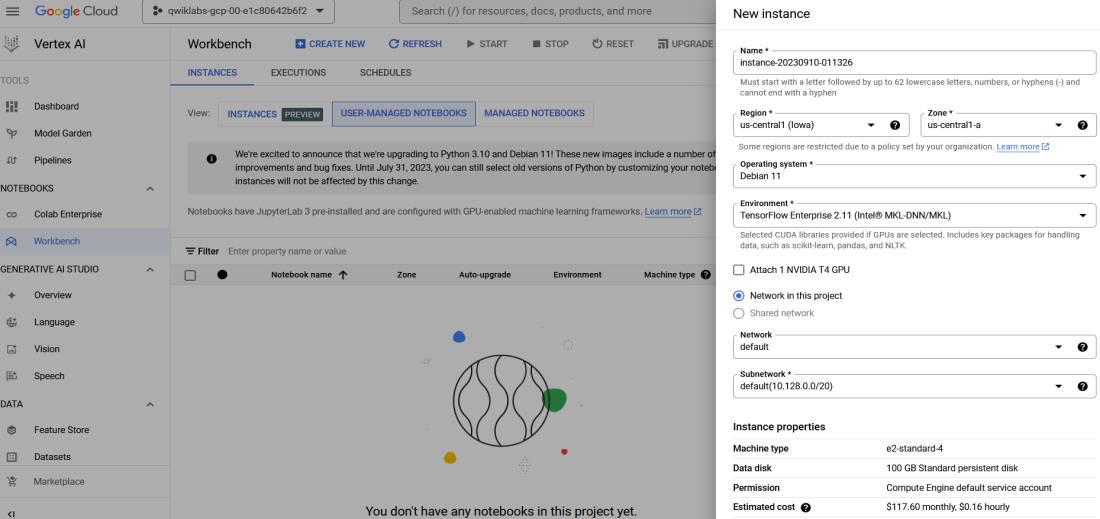
To create a new notebook instance fill in the details like instance name, region, zone, operating system, etc. or keep it as default and then scroll down to the create button and click on it.
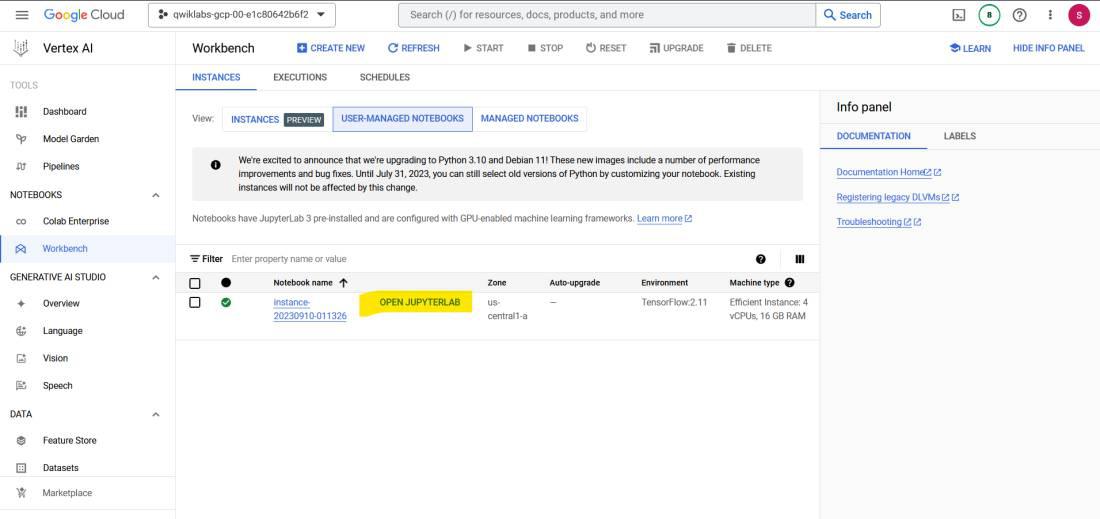
Wait for some time. Once the instance is created successfully, click the open Jupyterlab button.
👁 JupyterLab instance - Geeksforgeeks
When the page is loaded you can see a Jupyter lab interface same as your local system, To create a new notebook click on the python3 named icon in the notebook section.
👁 open-python-notebook - Geeksforgeeks
Run your code in Jupyter Notebook and train your model and save it into your bucket. You can refer to the below code if you having issues saving your trained model into a bucket directly from your notebook:
👁 Project details - Geeksforgeeks |
|---|
Import the model training results from the previous task to Vertex AI Model Registry.
Next from the right-sided menu list select model registry and click on import.
👁 Model registry - Geeksforgeeks
Now you need to fill in details like the below of your model that you have trained/imported in your cloud bucket: Fill in the details as per your model requirement.
Name:
Region:
Model Framework Version: 2.8 or anything your train model is compatible with
Accelerator Type:
Explainability Options:
For a model to do its predictions online, it has to be first deployed to an endpoint. It is done so because a model deployment is associated with various physical resources to make low latency online predictions.
Now, use your uploaded model to create an endpoint in which you can serve prediction queries.
In the Vertex AI page, create an Endpoint, again same as the above step from the right-sided list Select online prediction to create an endpoint:
👁 Endpoint creation - Geeksforgeeks
In the endpoint page click new or create, It will ask you for details like the below, Fill in the details as per your model registry and model compatibility:
Endpoint name:
Region:
Traffic split: 100% or as per your chioce
Machine type: e2-standard-2 or if model need more computation you can adjust it as per your requirement
Explainability Options:
You can get online predictions or batch predictions from your endpoint using the Google Cloud console, the Vertex AI API, or the Vertex SDK for Python.
Below are the same codes to request a query to your endpoint:
👁 Sample code for query endpoint - Geeksforgeeks |
|---|
here is the snap of prediction that I have done during lab:
Prediction(predictions=[[0.041172, 0.090883866, 0.0780695751, 0.0854726508, 0.087764129, 0.0627719685,
0.0871932805, 0.0680638105, 0.0746915787,
0.0760163069, 0.0922532901, 0.0704012588, 0.0852462649]],
deployed_model_id='3555358809343918080', model_version_id='1',
model_resource_name='projects/53099701180/locations/us-central1/models/401139225208029184',
explanations=None)
In this article, we learned how to train and deploy a custom model with Vertex AI using Python code and a custom container. We also learned about the concepts of custom models, custom containers, training jobs, models, endpoints, and predictions. With Vertex AI, you can train and deploy your own models at scale using any ML framework and get the benefits of Google Cloud’s infrastructure and services.