 |
VOOZH | about |
|
VOOZH | about |
AWS Step Function allows you to automate and coordinate multiple AWS Services to build powerful workflows. It helps you to breakdown complex processes into smaller, manageable steps, simplifying the management of operations like microservices, orchestration, error handling, and more.
In this tutorial, we will go through a step-by-step process to implement a basic workflow for processing articles in geeksforgeeks. We will use AWS Lambda function to automate updating article status in a content management system, also show you how to build and manage each step of the workflow.
By the end of this tutorial, you'll not only understand how to create a Step Function workflow, but also how to use AWS services to create seamless automation for real-world applications.
AWS Step Function is a serverless orchestration service that helps developers use AWS service to build distributed applications, automate processes, orchestrate microservices, and create data and machine learning (ML) pipelines.
For example, if you're building a process that needs to send an email after as user signs up, Step Functions can help you connect different tasks like sending the email, checking the user's information or logging the action in a database - all in one automated workflow.
A state machine controls the workflow or flow of execution of tasks. A state machine is responsible for how tasks are executed and how different variables are managed during the process. State Machine are of two types: Standard and Express. Standard state machines are generally used for long running tasks while Express state machines are better for high workload tasks.
A State is any action or step taken in a step machine that involves a variable. A state can be of different type depending on the type of function it performs such as task state(performs a task), choice state(choosing between variables) etc.
In a state machine, each individual step or action is called a task. Tasks are often used to tell AWS services to do something.
When a state machine starts running (is triggered), it creates an execution. This execution manages the entire process of the state machine or workflow.
When Something goes wrong (an error occurred) inside the state machine, you need special instructions to deal with it. This process of identifying and handling errors is called error handling. Similar to state machine, rules for error handling can be define by writing and editing a JSON file.
Let's see how to build serverless workflows using the step function. We will build a simple workflow for GFG articles.
The state machine will contain a prototype design that will change the article status depending on the previous status.
Select "Create your Own": Click on "Create Your Own" option to begin designing your workflow.
On Prototype design page follow below steps to create prototype for our workflow.
1. Add Lambda Invoke: From left navigation pane, drag and drop Lambda Invoke state between start and end states.
2. Name the Lambda Invoke State: In left pane give name to this state as "GeeksForGeeks Article Description". This state will take article description as a input and pass it to next state.
3. Add a Choice State: Now similarly drag and drop Choice state from flow in left pane. There will be two rules namely Rule 1 and default. from left pane under rules section click on add new choice rule. This will add another rule.
4. Now for rule 1 and rule 2 add AWS lambda states as next state and name them as "Add To Review" and "Move To Publish" respectively.
5. Modify default rule: Click on default rule and under next state specify as Add To Review. Finally, the flow should look like below.
6. Add Another Lambda State: Now add one more lambda state under Add To Review and name it as "Show Article". Now modify first two states where next step will be "Show Article". Finally, the state machine will look like below.
Now in choices click on Rule 1 and in left pane under conditions click on edit icon. Specify condition as below which will check if the article status is equal to pending or not. Click save condition after completion.
Do not close this tab go to another tab for next step.
Now let's create lambda functions to invoke and add them to states.
export const handler = async (event) => {
 const {
 status,
 name
 } = event;

 const articleDescription = {
 name : name,
 status : status
 };
 return articleDescription;
};
export const handler = async (event) => {
 const {
 status,
 name
 } = event;

 const updatedDescription = {
 name : name,
 status : "Publish"
 };
 return updatedDescription;
};
export const handler = async (event) => {
 const {
 status,
 name
 } = event;

 const updatedDescription = {
 name : name,
 status : "Review"
 };
 return updatedDescription;
};
export const handler = async (event) => {
 const {
 status,
 name
 } = event;

 const Description = {
 name : name,
 status : "Review"
 };
 return Description;
};
Once all functions are created add the respective function to each state. Go to previous tab and click on first state. In left pane under API parameter select respective lambda function from function name dropdown.
This will complete our state machine. On verification click on create.
On state machine overview page click on start execution. Add input for our execution as below.
As we can see the flow of execution and the output where the status of article is changed to "Review" from "Pending"
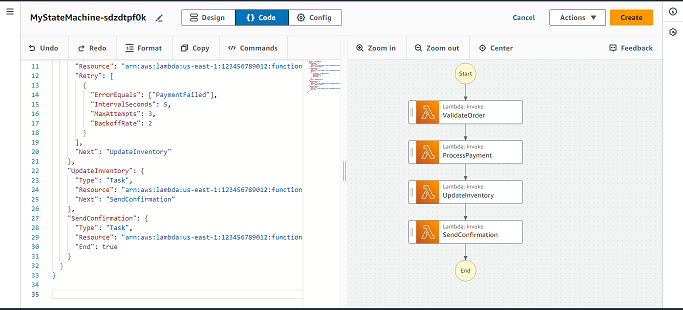
Example 1: Creating a workflow for a order processing application.
Consider an application that handles processing of orders. This can be done in several steps where the application needs to validate, process, update and send confirmation on the orders. Using AWS step functions, the workflow will look like this:
A JSON file can be used to define the state machine and all these variables:
{
 "StartAt": "ValidateOrder",
 "States": {
 "ValidateOrder": {
 "Type": "Task",
 "Resource": "arn:aws:lambda:us-east-1:123456789012:function:ValidateOrderFunction",
 "Next": "ProcessPayment"
 },
 "ProcessPayment": {
 "Type": "Task",
 "Resource": "arn:aws:lambda:us-east-1:123456789012:function:ProcessPaymentFunction",
 "Retry": [
 {
 "ErrorEquals": ["PaymentFailed"],
 "IntervalSeconds": 5,
 "MaxAttempts": 3,
 "BackoffRate": 2
 }
 ],
 "Next": "UpdateInventory"
 },
 "UpdateInventory": {
 "Type": "Task",
 "Resource": "arn:aws:lambda:us-east-1:123456789012:function:UpdateInventoryFunction",
 "Next": "SendConfirmation"
 },
 "SendConfirmation": {
 "Type": "Task",
 "Resource": "arn:aws:lambda:us-east-1:123456789012:function:SendConfirmationFunction",
 "End": true
 }
 }
}
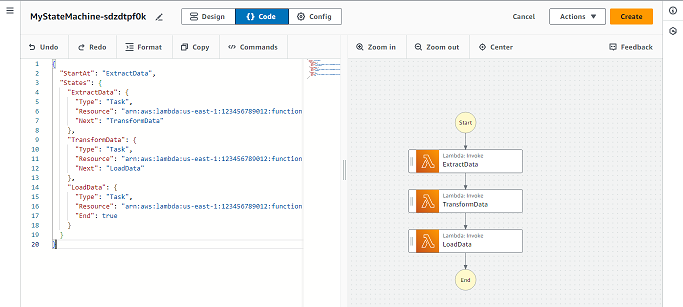
Example 2: Creating a workflow for a data processing pipeline.
Consider a data processing pipeline that is used for data extraction, transformation o f data and loading of data into a database. AWS step functions can be used to create a workflow with variables such as:
A JSON file in Amazon State Languages will look something like this:
{
 "StartAt": "ExtractData",
 "States": {
 "ExtractData": {
 "Type": "Task",
 "Resource": "arn:aws:lambda:us-east-1:123456789012:function:ExtractDataFunction",
 "Next": "TransformData"
 },
 "TransformData": {
 "Type": "Task",
 "Resource": "arn:aws:lambda:us-east-1:123456789012:function:TransformDataFunction",
 "Next": "LoadData"
 },
 "LoadData": {
 "Type": "Task",
 "Resource": "arn:aws:lambda:us-east-1:123456789012:function:LoadDataFunction",
 "End": true
 }
 }
}
AWS Step Function is a great tool for automation workflows in the cloud. It makes it easy to connect different AWS services, manage the execution of tasks, and handle errors automatically. Whether you're working on a simple task or a complex workflow, Step Function helps you manage your processes without worrying about servers or infrastructure.
By using AWS Step Functions, you can streamline your tasks, improve reliability, and build powerful workflows that save time and reduce manual intervention.
What is the difference between AWS step functions and AWS lambda?
AWS step functions is a service to manage tasks and applications while AWS lambda is used to run code. Step functions can call lambda functions inside the workflow.
Can AWS step functions be integrated with other AWS services?
Yes, it is possible to integrate other AWS services such as S3 bucket, Lambda etc.
Is visualization of workflow possible with AWS step functions?
Yes, AWS step functions are an excellent way to manage and visualize workflow in an application. The visual editor available in AWS step functions provides a hassle free way to visualize the workflow.
How can errors be handle in AWS step functions?
Errors can be handled by providing a rules on failures such as repeat on failure, halt on failure and fallback states etc.
Is AWS step functions suitable for long running tasks or short running tasks?
AWS step functions are suitable for both long running and short running applications. We can define time states and wait states to manage long running workflow.
.jpg)
.jpg)
.png)
.png)
.png)
.jpg)
.jpg)
.png)
.png)
.png)
.png)
.png)
.png)
.png)
.png)