 |
VOOZH | about |
|
VOOZH | about |
Terraform is an IAAC tool used to automate programmatic infrastructure provisioning. Here in this guide, I will discuss the steps involved in setting up AWS CLI on a server and using Terraform to create a custom VPC using subnet, internet gateway, and routing tables. The VPC comprises a public subnet and a private subnet. Further, we shall create a public server and a private (database) server.
Log in to your AWS account, navigate to the EC2 console, and launch an instance. Name the instance as "terraform-server", select Amazon Linux AMI, your security key, and leave the rest to default. Launch the instance.
Connect to your server using SSH or AWS CLI.
Refer to the commands mentioned in the official documentation.
For the Amazon Linux instance which we have used above, the commands for installation are:
sudo yum install -y yum-utils
sudo yum-config-manager --add-repo https://rpm.releases.hashicorp.com/AmazonLinux/hashicorp.repo
sudo yum -y install terraform
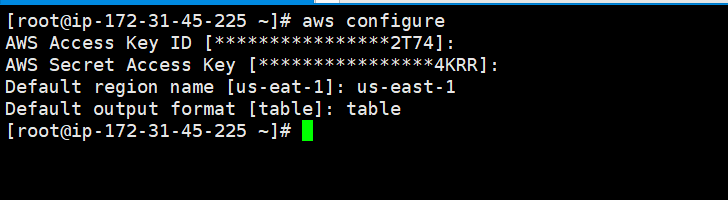
In order to configure AWS CLI on your server, enter the command
aws configure
This will prompt you to enter your access key, secret key, region, and output format. Create an IAM user with desired permissions and generate the access key and secret key. We can use the region as "us-east-1" and output format as "table" for this demonstration.
Create a file called main.tf using the command given below, where our terraform script would be written.
vi main.tf
Specify all the necessary requirements in your script. You can refer the sample script given below:
provider "aws" {
 region = "us-east-1"
}
# VPC
resource "aws_vpc" "main" {
 cidr_block = "10.0.0.0/16"

tags = {
 Name = "main-vpc"
 }
}


# Internet Gateway
resource "aws_internet_gateway" "gw" {
 vpc_id = aws_vpc.main.id
 tags = {
 Name = "main-gw"
 }
}


# Public Subnet
resource "aws_subnet" "public" {
 vpc_id = aws_vpc.main.id
 cidr_block = "10.0.1.0/24"
 map_public_ip_on_launch = true
 tags = {
 Name = "public-subnet"
 }
}

# Private Subnet
resource "aws_subnet" "private" {
 vpc_id = aws_vpc.main.id
 cidr_block = "10.0.2.0/24"
 tags = {
 Name = "private-subnet"
 }
}
# Route Table
resource "aws_route_table" "public" {
 vpc_id = aws_vpc.main.id


 route {
 cidr_block = "0.0.0.0/0"
 gateway_id = aws_internet_gateway.gw.id
 }
 tags = {
 Name = "public-rt"
 }
}
# Associate Route Table with Public Subnet
resource "aws_route_table_association" "a" {
 subnet_id = aws_subnet.public.id
 route_table_id = aws_route_table.public.id
}
# Security Group for Public Subnet Server
resource "aws_security_group" "public_sg" {
 vpc_id = aws_vpc.main.id


 ingress {
 from_port = 22
 to_port = 22
 protocol = "tcp"
 cidr_blocks = ["0.0.0.0/0"] # Open to the world
 }

 ingress {
 from_port = 80
 to_port = 80
 protocol = "tcp"
 cidr_blocks = ["0.0.0.0/0"]
 }
 egress {
 from_port = 0
 to_port = 0
 protocol = "-1"
 cidr_blocks = ["0.0.0.0/0"]
 }

 tags = {
 Name = "public-sg"
 }
}
# Security Group for Private Subnet Server
resource "aws_security_group" "private_sg" {
 vpc_id = aws_vpc.main.id


 ingress {
 from_port = 3306
 to_port = 3306
 protocol = "tcp"
 cidr_blocks = ["10.0.1.0/24"] # Public subnet
 }


 ingress {
 from_port = -1
 to_port = -1
 protocol = "icmp"
 cidr_blocks = ["10.0.1.0/24"] # Public subnet
 }


 egress {
 from_port = 0
 to_port = 0
 protocol = "-1"
 cidr_blocks = ["0.0.0.0/0"]
 }


 tags = {
 Name = "private-sg"
 }
}
# Public Subnet Server
resource "aws_instance" "public_server" {
 ami = "ami-0195204d5dce06d99" #Write a valid AMI id here
 instance_type = "t2.micro"
 subnet_id = aws_subnet.public.id
 vpc_security_group_ids = [aws_security_group.public_sg.id]
 associate_public_ip_address = true
 key_name = "your_key_pair"


 tags = {
 Name = "public-server"
 }
}


# Private Subnet DB Server
resource "aws_instance" "private_server" {
 ami = "ami-0195204d5dce06d99" #Write a valid AMI id here
 instance_type = "t2.micro"
 subnet_id = aws_subnet.private.id
 vpc_security_group_ids = [aws_security_group.private_sg.id]
 key_name = "your_key_pair"

 tags = {
 Name = "private-db-server"
 }
}
A VPC is created with a CIDR block of 10.0.0.0/16.
An Internet Gateway is attached to the VPC.
A public subnet (10.0.1.0/24) and a private subnet (10.0.2.0/24) are created.
Route Table:
A route table is created and associated with the public subnet, allowing internet traffic.
Security Groups:
A security group for the public subnet server allows SSH (port 22) and HTTP (port 80) traffic.
A security group for the private subnet server allows MySQL (port 3306) traffic from the public subnet and ICMP (ping) traffic from the public subnet.
EC2 Instances:
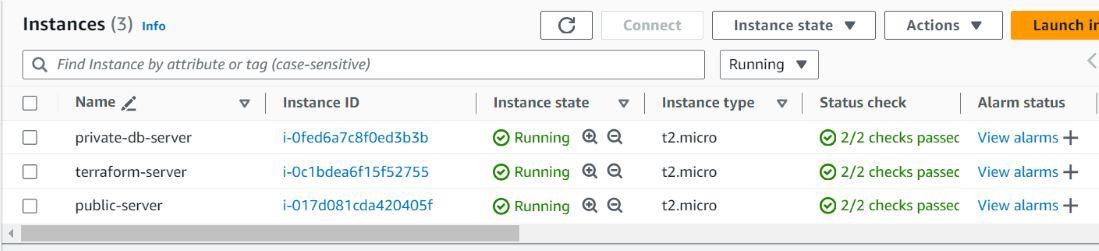
An EC2 instance is created in the public subnet.
An EC2 instance is created in the private subnet.
(Replace the AMI IDs with valid ones suitable for your region and desired operating system.)
Save the file and run the script using the following commands:
terraform init
terraform apply
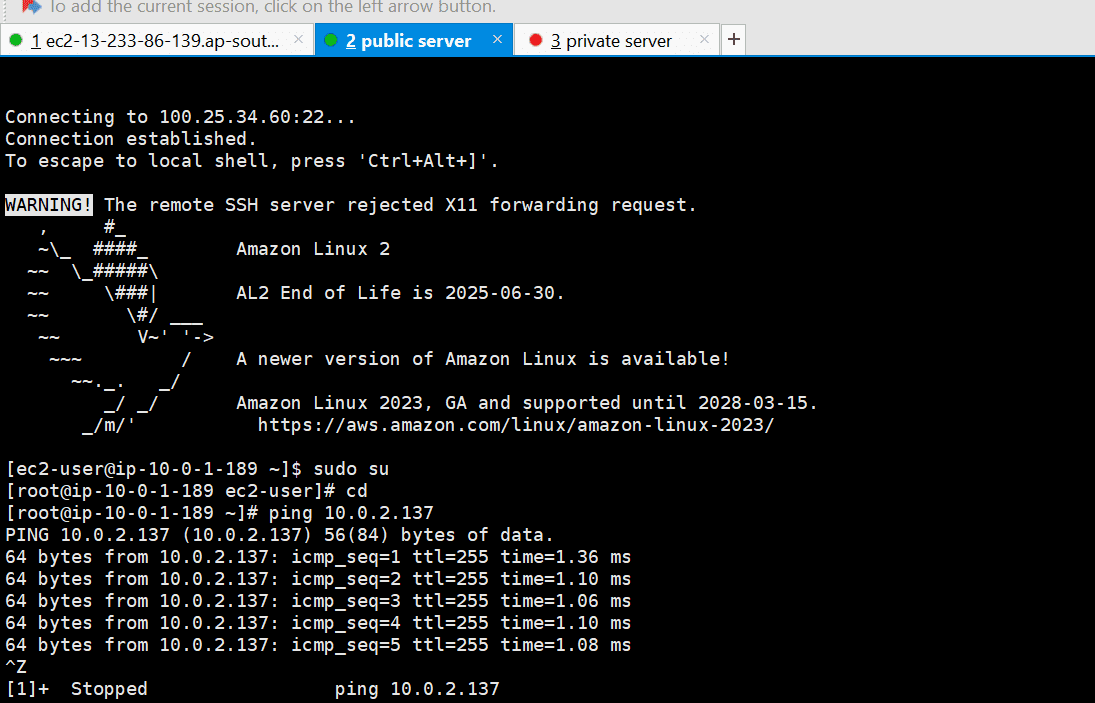
This setup ensures that the database server in the private subnet can receive pings and database connections from the server in the public subnet.
Check the EC2 console and connect to the public server using SSH/AWS CLI. Try to send a ping request to your private database server.
Now that we have successfully completed our project, use the following command to destroy all the resources we have created.
terraform destroy