 |
VOOZH | about |
|
VOOZH | about |
Pre-requisite: AWS
AWS or Amazon Web Services, Inc. is a sub-division of Amazon that offers on-demand cloud computing platforms and APIs for individuals, companies, and governments. CloudFormation is one of the services provided by Amazon Web Services, that helps the client model and set up their own AWS resources to save their time on managing those resources and they get to have more time focusing on their applications that run in AWS instead.
Basically, CloudFormation is a method that helps provision AWS infrastructure through code. It enables the user to quickly and consistently provide a group of related AWS and external resource models. Additionally, AWS CloudFormation offers a way to manage the resources throughout their lifespan. Here in this article, we’ll discuss a primary method to build a VPC through the CloudFormation of Amazon Web Services.
Cloudformation is a tool that helps the user to create and manage AWS resources easily. It can be used to manage all AWS resources using a text file. Cloudformation allows the user to create and model the infrastructure and applications without having to perform actions manually. through this, it is easy to manage infrastructure in a text file, or template. Cloudformation template is a formatted text file in JSON or YAML language that describes the AWS infrastructure.
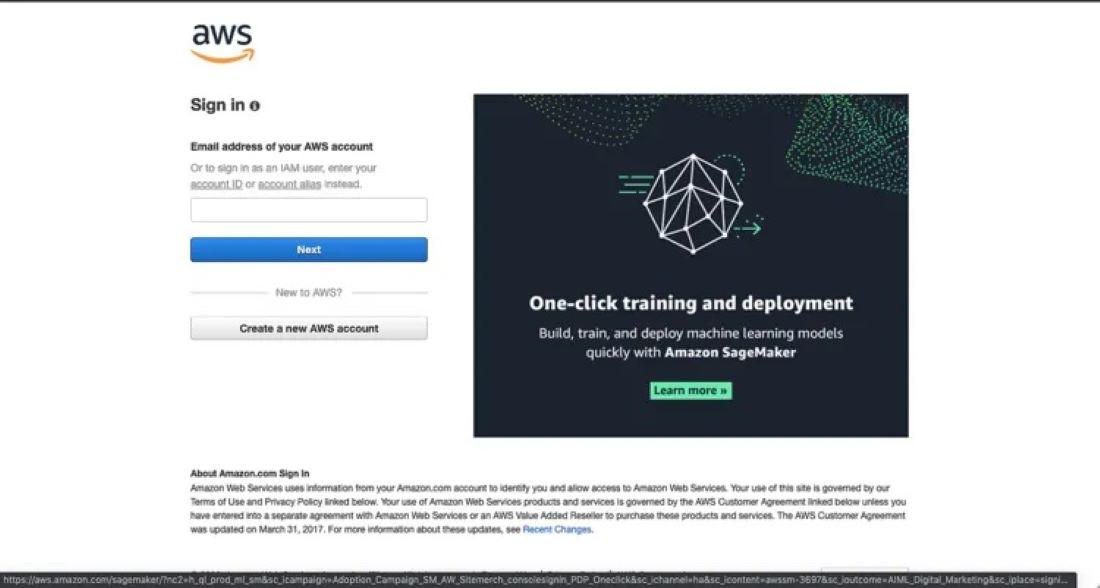
Step 1: To start, the first step requires logging in to the AWS account. For this purpose, we can use the link given here to go to AWS Login Page. As soon as we click on the link, we will be shown a web page as we can see in the image below:
Step 2: Here fill out all the required details to log in. once we are done with the logging process, a main console window will show up as we can see in the image below:
Step 3: here, before proceeding further, we require a template that we will use to create a VPC. For this, we can use an exemplary template as given ahead. Just needs to Copy the following code and save it on a local machine.
Description: This template creates a VCC with
two Public and two Private subnets, spread
 across two availability zones. It builds
 an internet gateway with a default
 route on the public subnets.

 Parameters:
 EnvironmentName:
 Description: An environment name that precedes resource names.
 Type: String

 VpcCIDR:
 Description: Please enter the IP range for this VPC
 Type: String
 Default: 10.8.0.0/16

 PublicSubnet1CIDR:
 Description: Please enter the IP range for
 the public subnet in the first Availability Zone
 Type: String
 Default: 10.8.10.0/24

 PublicSubnet2CIDR:
 Description: Please enter the IP range for
 the public subnet in the second Availability Zone
 Type: String
 Default: 10.8.11.0/24

 PrivateSubnet1CIDR:
 Description: Please enter the IP range for
 the private subnet in the first Availability Zone
 Type: String
 Default: 10.8.21.0/24

 PrivateSubnet2CIDR:
 Description: Please enter the IP range for
 the private subnet in the second Availability Zone
 Type: String
 Default: 10.8.21.0/24

 Resources:
 VPC:
 Type: AWS::EC2::VPC
 Properties:
 CidrBlock: !Ref VpcCIDR
 EnableDnsSupport: true
 EnableDnsHostnames: true
 Tags:
 - Key:Name
 Value: !Ref EnvironmentName

 InternetGateway:
 Type: AWS::EC2::InternetGateway
 Properties:
 Tags:
 - Key: Name
 Value: !Ref EnvironmentName

 InternetGatewayAttachment:
 Type: AWS::EC2::VPCGatewayAttachement
 Properties:
 InternetGatewayId: !Ref InternetGateway
 VpcId: !Ref VPC

 PublicSubnet1:
 Type: AWS::EC2::Subnet
 Properties:
 VpcId: !Ref VPC
 AvailibilityZone: !Select [ 0, !GetAZs '' ]
 CidrBlock: !Ref PublicSubnet1CIDR
 MapPublicIpOnLaunch: true
 Tags:
 - Key: Name
 Value: !Sub ${EnvironmentName} Public Subnet (AZ1)

 PublicSubnet2:
 Type: AwS::EC2::Subnet
 Properties:
 VpcId: !Ref VPC
 AvailabilityZone: !Select [ 1, !GetAZs '' ]
 CidrBlock: !Ref PublicSubnet2CIDR
 MapPublicIpOnLaunch: True
 Tags:
 - Key: Name
 Value: !Sub ${EnvironmentName} Public Subnet (AZ2)

 PrivatSubnet1:
 Type: AWS::EC2::Subnet
 Properties:
 VpcId: !Ref VPC
 AvailabilityZone: !Select [ 0, !GetAZs '' ]
 CidrBlock: !Ref PrivateSubnet1CIDR
 MapPublicIpOnLaunch: false
 Tags:
 - Key: Name
 Value: !Sub ${EnvironmentName} Private Subnet (AZ1)

 PrivateSubnet2:
 Type: AWS::EC2::Subnet
 Properties:
 VpcId: !Ref VPC
 AvailabilityZone: !Select [ 1, !GetAZs '' ]
 CidrBlock: !Ref PrivateSubnet2CIDR
 MapPublicIpOnLaunch: false
 Tags:
 - Key: Name
 Value: !Sub ${EnvironmentName} Private Subnet (AZ2)

 PublicRouteTable:
 Type: AWS::EC2::RouteTable
 Properties:
 VpcId: !Ref VPC
 Tags:
 - Key: Name
 Value: !Sub ${EnvironmentName} Public Routes

 DefaultPublicRoute:
 Type: AWS::EC2::Route
 DependsOn: InternetGatewayAttachment
 Properties:
 RouteTableId: !Ref PublicRouteTable
 DestinationCidrBlock: 0.0.0.0/0
 GetewayId: !Ref InternetGateway

 PublicSubnet1RouteTabletAssociation:
 Type: AWS::EC2::SubnetRouteTableAssociation
 Properties:
 RouteTableId: !Ref PublicRouteTable
 SubnetId: !Ref PublicSubnet1

 PublicSubnet2RouteTableAssociation:
 Type: AWS::EC2:: SubnetRouteTableAssociation
 Properties:
 RouteTable: !Ref PublicRouteTable
 SubnetId: !Ref PublicSubnet2


 PrivateRouteTable1:
 Type: AWS::EC2::RouteTable
 Properties:
 VpcId: !Ref VPC
 Tags:
 - Key: Name
 Value: !Sub ${EnvironmentName} Private Routes (AZ1)

 PrivateSubnet1RouteTableAssociation:
 Type: AWS::EC2::SubnetRouteTableAssocoiation
 Properties:
 RouteTableId: !Ref PrivateRouteTable1
 SubnetId: !Ref PrivateSubnet1

 PrivateRouteTable2:
 Type: AWS::EC2::RouteTable
 Properties:
 VpcId: !Ref VPC
 Tags:
 - Key: Name
 Value: !Sub ${EnvironmentName} Private Routes (AZ2)

 PrivateSubnet2RouteTableAssociation:
 Type: AWS::EC2::SubnetRouteTableAssociation
 Propreties:
 RouteTableId: !Ref PrivateRouteTable2
 SubnetId: !Ref PrivateSubnet2

 NoIngressSecurityGroup:
 Type: AWS::EC2::SecurityGroup
 Properties:
 GroupName: "no-ingress-sg"
 GroupDescription: "Security group with no ingress rule"
 VpcId: !Ref VPC

 Outputs:
 VPC:
 Description: A reference to the created VPC
 Value: !Ref VPC

 PublicSubnets:
 Description: A list of the public subnets
 Value: !join [ ",", [ !Ref PublicSubnet1, !Ref PublicSubnet2 ]]

 PrivateSubnets:
 Description: A list of the private subnets
 Value: !join [ ",", [ !Ref PrivateSubnet1, !Ref PrivateSubnet2 ]]

 PublicSubnet1:
 Description: A reference to the public subnet in the 1st Availability Zone
 Value: !Ref PublicSubnet1

 PublicSubnet2:
 Description: A reference to the public subnet in the 2nd Availability Zone
 Value: !Ref PublicSubnet2

 PrivateSubnets:
 Description: A reference to the private subnet in the 1st Availability Zone
 Value: !Ref PrivateSubnet1

 PrivateSubnets:
 Description: A reference to the private subnet in the 2nd Availability Zone
 Value: !Ref PrivateSubnet2

 NoIngressSecrityGroup:
 Description: Security group with no ingress rule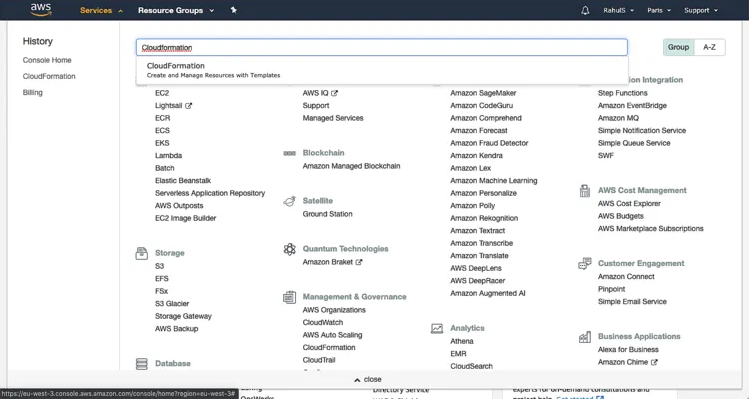
Value: !Ref NoIngressSecurityGroupStep 1: To create a CloudFormation Stack, first, click on the “Services” option in the top left of the screen, and then, search for the “CloudFormation” option and click on it. As we can see in the image below:
Step 2: On the dashboard, click on the “Create stack” button and select the first option, "With new resources (standard)". As in the image below:
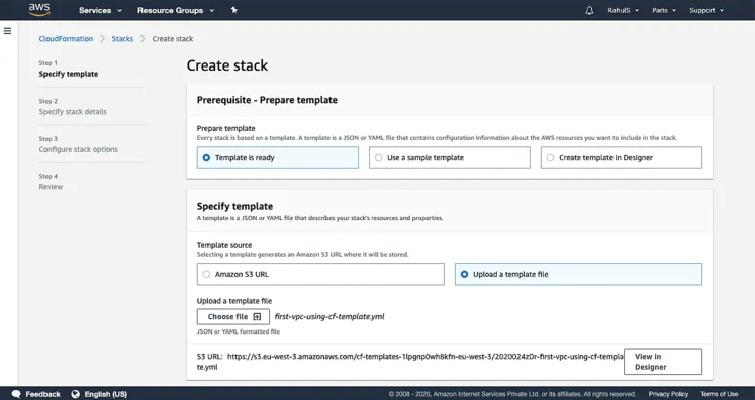
Step 3: A template file is required for the stack, which can be either a local file or an object file in an S3 bucket. here, we will be using a local template. First, select the local template file by clicking on the "Template is ready" button, next "Upload a template file", then click on "Choose file" to continue
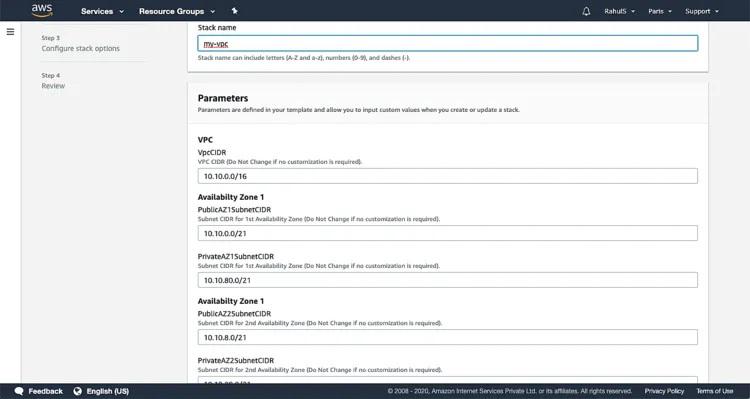
Step 4: here create a name for the stack. We can make some other changes as required. However, here we will keep all other parameters as it is for now.
next, as given in the options, we can create Tags according to our work requirements.
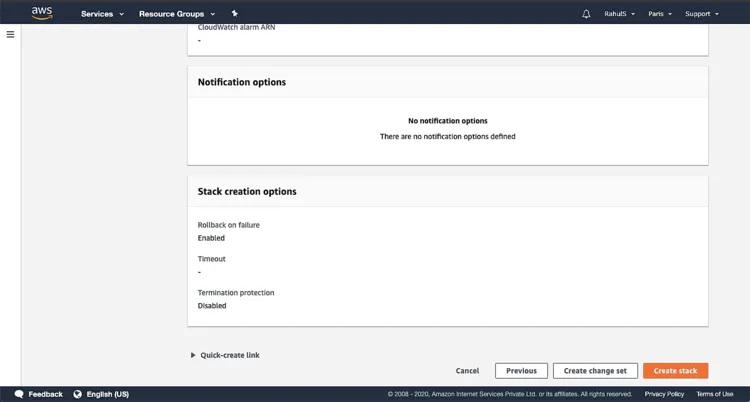
Step 5: Now, scroll down the page and click on the “Create stack” button, as shown in the image:
Wait for a while, as it might take a few moments.
Under the "Events" tab, we can see the current status or event data.
Step 6: We can now visit VPC and look for the newly created VPC there. Click "Services" at the top and then use the left search bar to find VPC to access it.
Here, the number of VPCs, Subnets, Route Tables, Internet Gateways, and National Gateways that were created is displayed in the main dashboard.
A VPC can be deleted by just deleting the Stack, once it's no more needed.