VOOZH about

URL: https://www.geeksforgeeks.org/devops/connecting-an-aws-ec2-instance-of-a-private-subnet-using-bastion-host/

⇱ Connecting an AWS EC2 Instance of a Private Subnet using Bastion Host - GeeksforGeeks


  • Courses
  • Tutorials
  • Interview Prep

Connecting an AWS EC2 Instance of a Private Subnet using Bastion Host

Last Updated : 28 May, 2026

Connecting to an instance inside a private subnet is an important part of secure AWS networking. This is commonly done using a Bastion Host placed inside a public subnet, which acts as a secure entry point to private instances.

Before moving to the implementation section, let us first understand some important AWS networking terms.

Key Terminologies

  • EC2 Instance: A virtual server in AWS used to run operating system such as Linux and Windows.
  • AMI(Amazon Machine Image): A template that contains the operating system required to launch an EC2 instance.
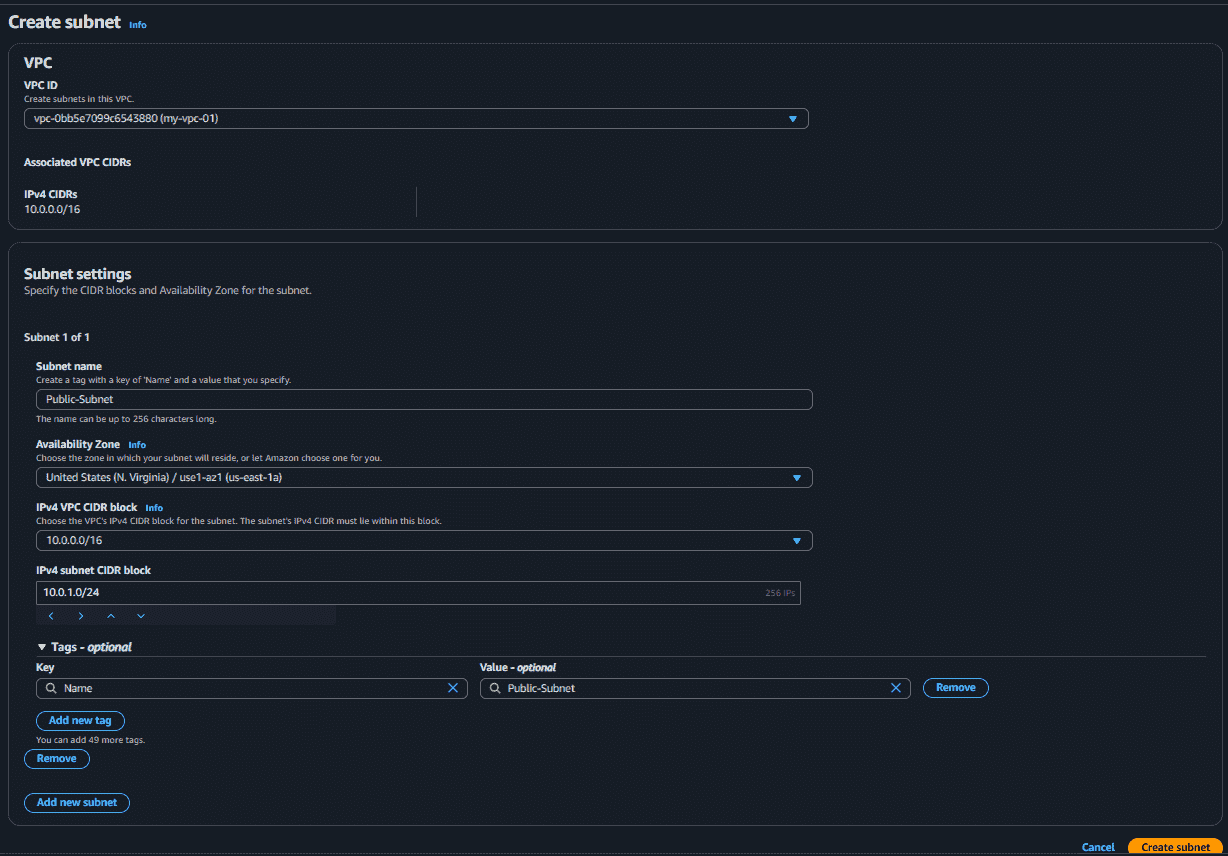
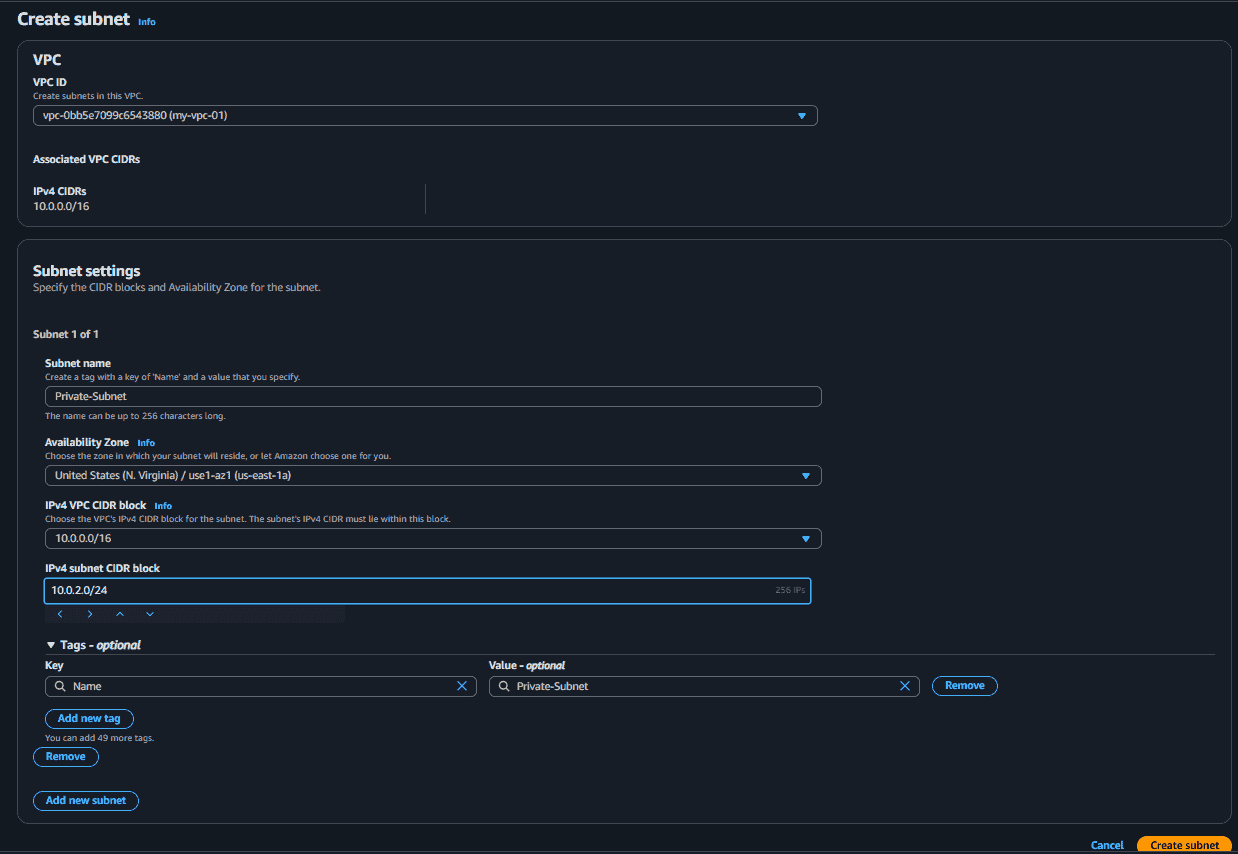
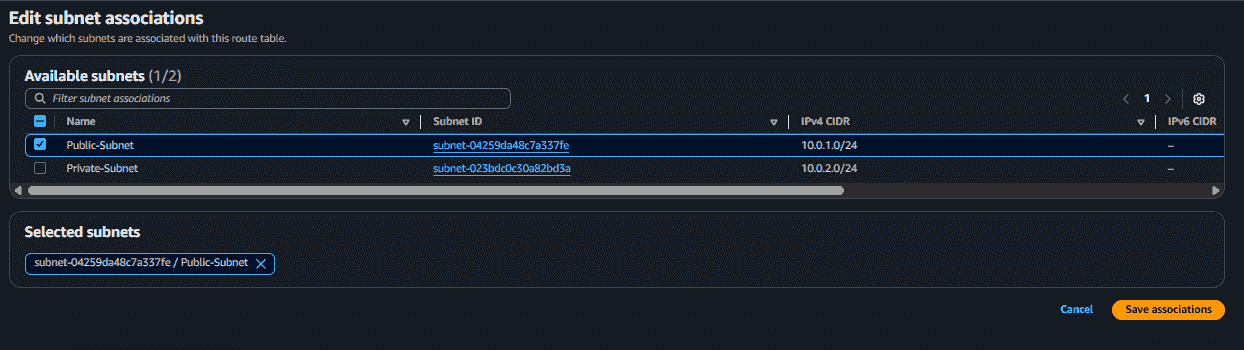
  • Subnet: A smaller section of a network inside a VPC used to organize AWS resources.
  • Availability Zones: Separate locations inside an AWS region designed for high availability and fault isolation.
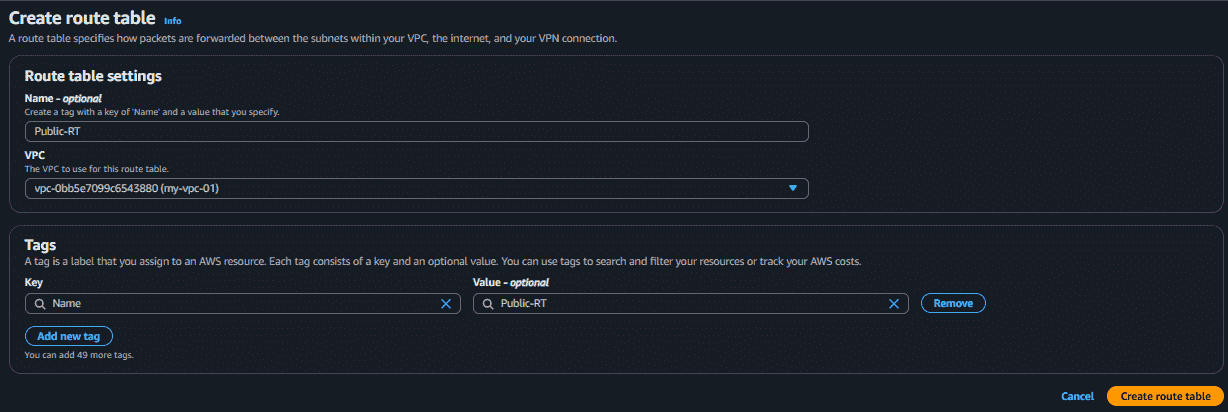
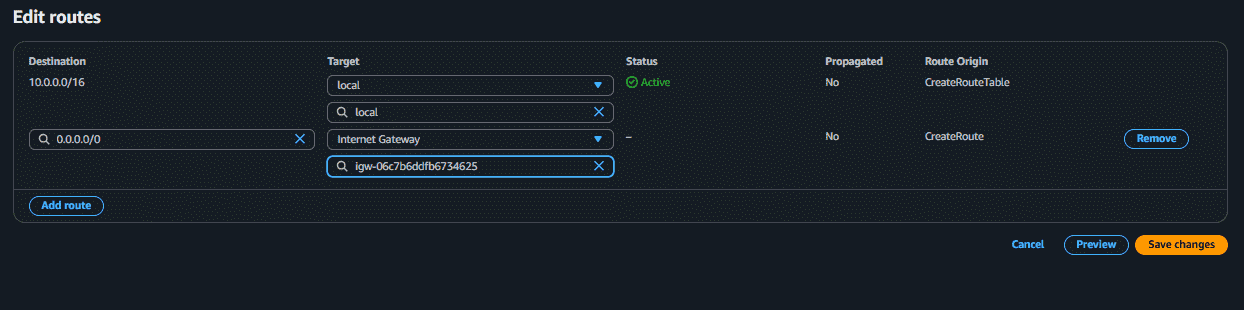
  • Public Subnet: A subnet connected to an Internet Gateway that allows internet access.
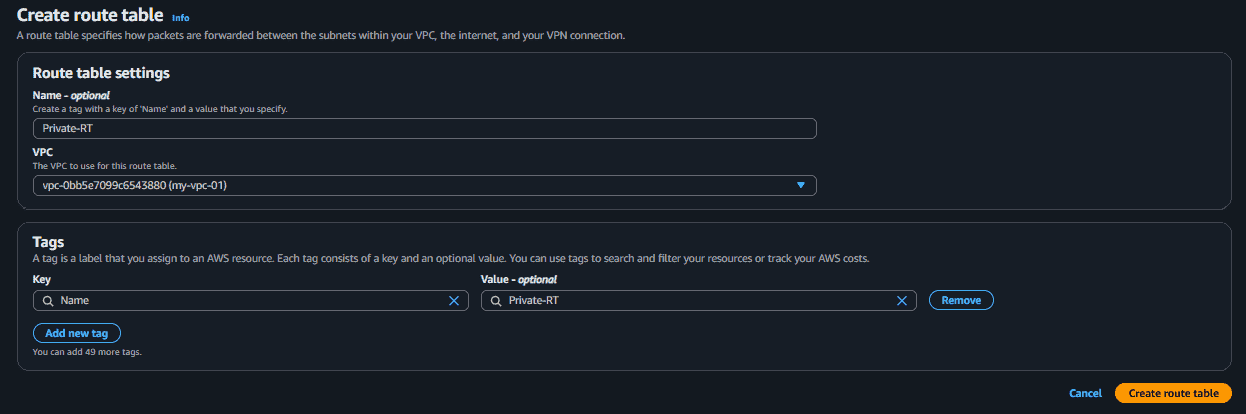
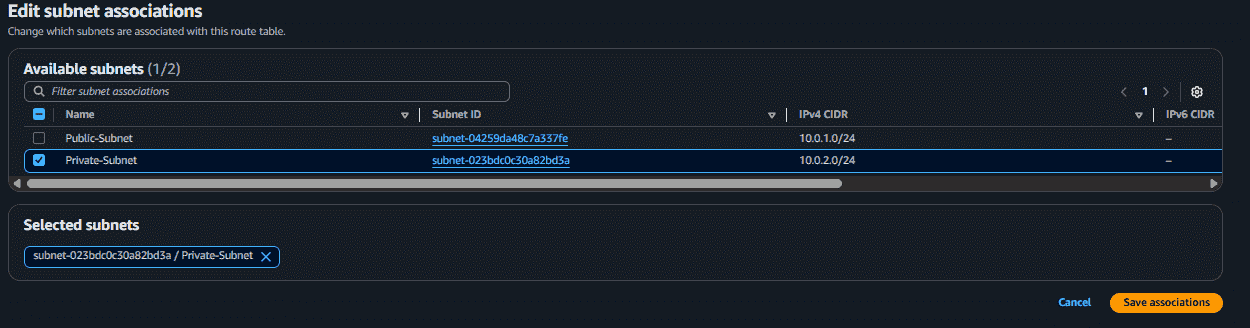
  • Private Subnet: A subnet without direct internet access, mainly used for internal resources.
  • Route Table: A set of rules that controls how network traffic moves inside a VPC.
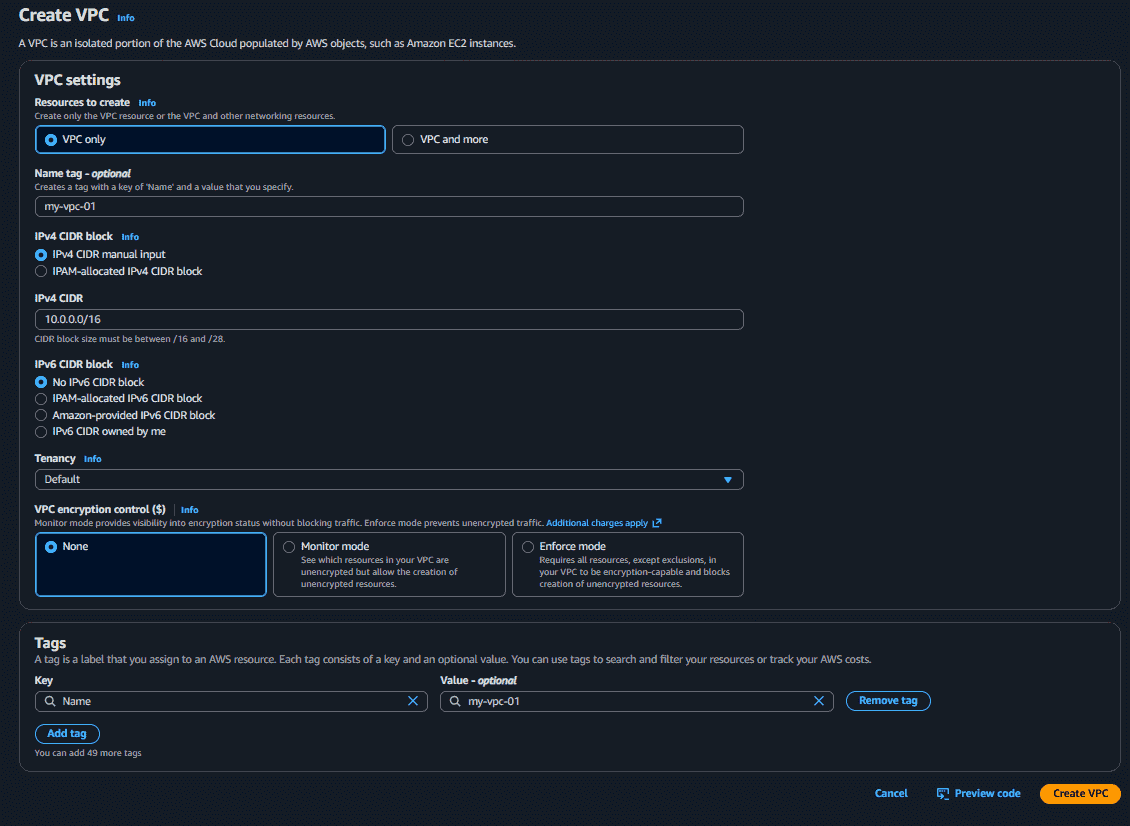
  • VPC (Virtual Private Cloud): A private virtual network in AWS where resources such as EC2 instances and databases are deployed.
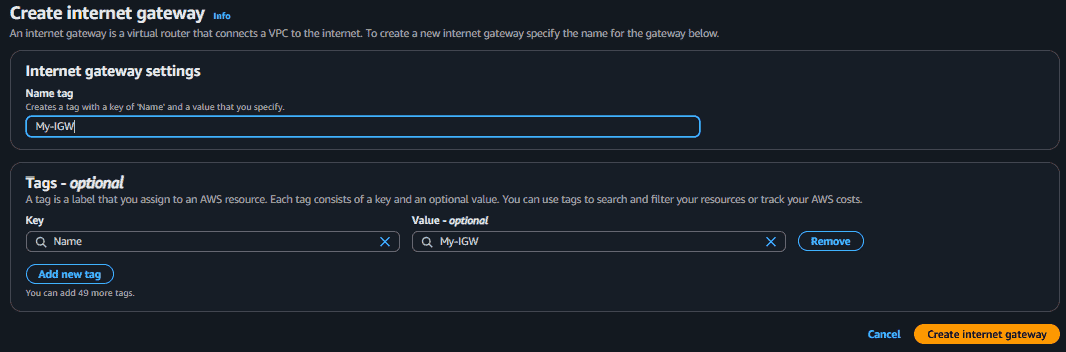
  • Internet Gateway: A component that allows communication between a VPC and the internet.
  • Security Groups: Virtual firewalls that control inbound and outbound traffic for EC2 instances.
  • Key Pair: A combination of public and private keys used to securely connect to EC2 instances.
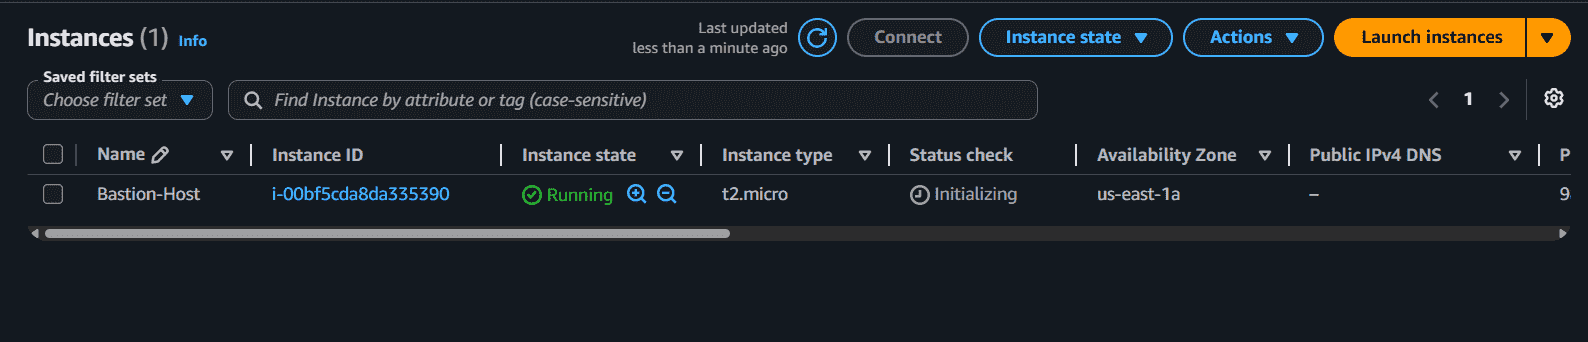
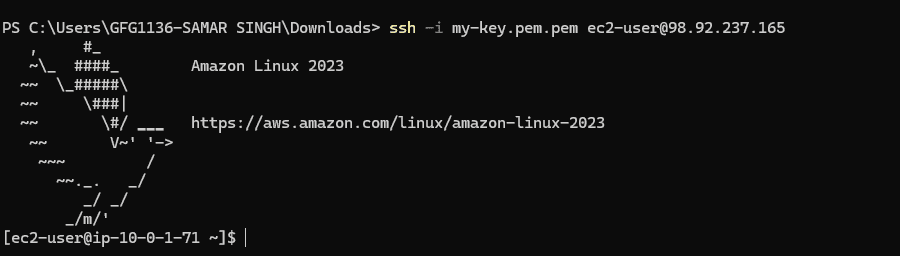
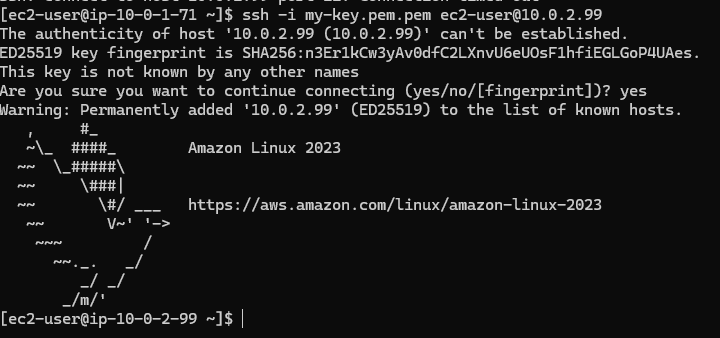
  • Bastion Host: An EC2 instance placed in a public subnet that is used to securely access instances in a private subnet.

After understanding these key concepts, we can now move towards the implementation part of connecting a private instance using a Bastion Host.

Implementation

Step 1: Create a VPC

  • Open VPC Dashboard
  • Create VPC
  • Choose name "My-VPC"
  • Choose IPv4 CIDR "10.0.0.0/16"
  • Choose Tenancy "Default"
  • Click "Create VPC"
👁 Screenshot-2026-05-20-143248

Step 2: Create Public Subnet

  • Open Subnet Dashboard
  • Create Subnet
  • Choose VPC "My-VPC"
  • Choose name "Public-Subnet"
  • Choose AZ "ap-south-1a"
  • Choose CIDR "10.0.1.0/24"
  • Click "Create Subnet"
👁 Screenshot-2026-05-20-143428

Step 3: Create Private Subnet

  • Open Subnet Dashboard
  • Create Subnet
  • Choose VPC "My-VPC"
  • Choose name "Private-Subnet"
  • Choose AZ "ap-south-1a"
  • Choose CIDR "10.0.2.0/24"
  • Click "Create Subnet"
👁 Screenshot-2026-05-20-143535

Step 4: Create Internet Gateway

  • Open Internet Gateway Dashboard
  • Click "Create Internet Gateway"
  • Choose name "My-IGW"
  • Click "Create Internet Gateway"
👁 Screenshot-2026-05-20-143918

Step 5: Attach Internet Gateway to Virtual Private Cloud

  • Select "My-IGW"
  • Click "Actions"
  • Click "Attach to VPC"
  • Choose "My-VPC"

Step 6: Create Public Route Table

  • Open VPC Dashboard
  • Click "Route Tables"
  • Click "Create Route Table"
  • Choose name "Public-RT"
  • Choose VPC "My-VPC"
  • Click " Create Route table"
👁 Screenshot-2026-05-20-144103

Step 7: Add Internet Route

  • Select "Public-RT"
  • Go To "Routes"
  • Edit "Route"
  • Add Destination "0.0.0.0/0"
  • Choose "IGW" as Internet Gateway
👁 Screenshot-2026-05-20-144207

Step 8: Associate Public Subnet

  • Go to Subnet Associate
  • Scroll down to "Subnet without explicit associations"
  • Click "Edit subnet associations"
  • Associate "Public-Subnet"
  • Click "Save Associate"
👁 Screenshot-2026-05-20-144511

Step 9: Create Private Route Table

  • Create another route table
  • Choose name "Private-RT"
  • Choose VPC "My-VPC"
  • Do Not add Internet Gateway Route
👁 Screenshot-2026-05-20-144618

Step 10: Associate Private Subnet

  • Same steps that we follow for Public Route Table
  • Here we choose "Private-Subnet"
👁 Screenshot-2026-05-20-144659

Step 11: Launch Bastion HOST EC2

  • Go to EC2 Dashboard
  • Click "launch Instance"
  • Name "Bastion-Host"
  • Choose AMI "Amazon Linux 2023"
  • Choose instance type "t2.micro"
  • Create Key Pair
  • Key pair type "RSA"
  • Choose ".pem" as private key file format
  • Download the pem file
  • In Network Setting
  • Choose VPC "My-VPC"
  • Choose "Public-Subnet"
  • Choose Auto Assign Public IP "Enable"
  • Choose "Create Security Group"
  • Type "ssh" Port "22"
  • Click "Launch Instance"
👁 Screenshot-2026-05-20-150023

Step 12: Launch Private EC2

  • Go to EC2 Dashboard
  • Click "launch Instance"
  • Name "Private-EC2"
  • Choose AMI "Amazon Linux 2023"
  • Choose instance type "t2.micro"
  • Choose Existing Key Pair
  • In Network Setting
  • Choose VPC "My-VPC"
  • Choose "Private-Subnet"
  • Choose Auto Assign Public IP "Disable"
  • Choose "Select existing security group"
  • Select the "launch-wizard-1"
  • Allow SSH ONLY from launch-wizard-1"
  • Click "Launch Instance"

Step 13: Connect to Bastion-Host

  • Open Terminal on your system
  • Move to the directory where you store the .pem file
  • Run "chmod 400 my-key.pem"
  • Run "ssh -i my-key.pem ec2-user@public-ip of your Bastion-Host"
👁 Screenshot-2026-05-20-152406

Step 14: Copy key to Bastion host

  • From Local Machine Run "scp -i my-key.pem my-key.pem ec2-user@public-ip of your Bastion-Host:/home/ec2-user/"
👁 Screenshot-2026-05-20-152659

Step 15: SSH Into Private EC2

  • Inside Bastion-Host run "chmod 400 my-key.pem"
  • Run "ssh -i my-key.pem ec2-user@PRIVATE-IP of the Private-EC2"
👁 Screenshot-2026-05-20-153335
Comment