 |
VOOZH | about |
|
VOOZH | about |
Containerization has solved the "it works on my machine" problem, but real-world applications rarely live in isolation. They involve frontends, backends, databases, caches, and message queues. Managing these manually with individual docker run commands is a nightmare of script maintenance and networking headaches.
Docker Compose is the orchestrator for local development and single-host deployments. It allows you to define your entire infrastructure services, networks, and volumes as code in a single YAML file.
This guide goes beyond the basics. We will build a custom application from scratch using Dockerfiles, creating a custom image, and then orchestrating it with a database using advanced Compose features like Healthchecks, Depends on, and the modern Watch Mode.
Docker Compose YAML is one of the configuration file formats through which Docker Compose defines and manages multi-container Docker applications. Put simply, it is a human-readable file that uses YAML to declare services, networks, and volumes of the app, a docker-compose.yml file allows you to define a multiple-container setup, declare the dependencies between services, and perform orchestration of container execution in an easy, efficient way.
A docker-compose.yml file is the blueprint for your application. It is generally divided into three primary sections that interact to form your stack:
Create a folder named my-compose-app and set up this structure
my-compose-app/
├── app.py
├── requirements.txt
├── Dockerfile
└── docker-compose.yml
app.py A simple Flask app that connects to Redis to count the number of visits. Note the hostname used in the code.
import time
import redis
from flask import Flask

app = Flask(__name__)
# Docker DNS automatically resolves the service name 'redis-db' to the container's IP
cache = redis.Redis(host='redis-db', port=6379)

def get_hit_count():
 retries = 5
 while True:
 try:
 return cache.incr('hits')
 except redis.exceptions.ConnectionError as exc:
 if retries == 0:
 raise exc
 retries -= 1
 time.sleep(0.5)

@app.route('/')
def hello():
 count = get_hit_count()
 return 'Hello! This site has been visited {} times.\n'.format(count)
requirements.txt
flask
redis
We need to tell Docker how to build our Python application image.
# Use a lightweight Python base image👁 image
FROM python:3.9-alpine
# Set working directory inside the container
WORKDIR /code
# Set environment variables (Best Practice: keeps Python from buffering stdout)
ENV PYTHONUNBUFFERED=1
# Install dependencies
COPY requirements.txt .
RUN pip install -r requirements.txt
# Copy the rest of the code
COPY . .
# Default command to run the app
CMD ["flask", "run", "--host=0.0.0.0"]
docker-compose.ymlThis is where the magic happens. We will construct a Compose file that builds our custom image and connects it to a pre-built Redis image using best practices.
docker-compose.yml
version: "3.8"

services:
 # --- Service 1: Our Custom Web App ---
 web-app:
 build:
 context: . # Build the Dockerfile in the current directory
 ports:
 - "5000:5000" # Host Port : Container Port
 volumes:
 - .:/code # BIND MOUNT: Syncs local folder to container (Live Reloading)
 environment:
 - FLASK_ENV=development
 networks:
 - backend-network
 depends_on:
 redis-db:
 condition: service_healthy # Vital: Wait until Redis is actually ready

 # --- Service 2: The Database ---
 redis-db:
 image: "redis:alpine"
 networks:
 - backend-network
 volumes:
 - redis-data:/data # NAMED VOLUME: Persists DB data even if container dies
 healthcheck: # Define how to check if this service is healthy
 test: ["CMD", "redis-cli", "ping"]
 interval: 10s
 timeout: 5s
 retries: 5

# --- Top Level Definitions ---
volumes:
 redis-data: # Creates a managed volume on the host

networks:
 backend-network: # Creates a custom bridge network
 driver: bridge
Let's dissect the advanced configurations used above to understand why they are necessary.
image: redis:alpine : Tells Compose to pull a pre-built image from Docker Hub.build: context: . : Tells Compose to look in the current directory, find a Dockerfile, build an image dynamically, and then run it. This is essential for CI/CD pipelines and local development where you are iterating on code.This is often confused by beginners.
.:/code): Used in the web-app. It maps your local physical hard drive to the container. If you edit app.py in your text editor, the changes appear immediately inside the container.redis-data:/data): Used in redis-db. Docker manages this storage location (usually in /var/lib/docker/volumes). This ensures your database data survives even if you delete the container.depends_on and healthcheck TrapA common error is assuming depends_on waits for the database to be ready. By default, it only waits for the container to start.
healthcheck to the database (pinging it to ensure it's alive) and used condition: service_healthy in the web app. This forces the Web App to wait until the Redis ping returns "PONG".Now, let's run the infrastructure.
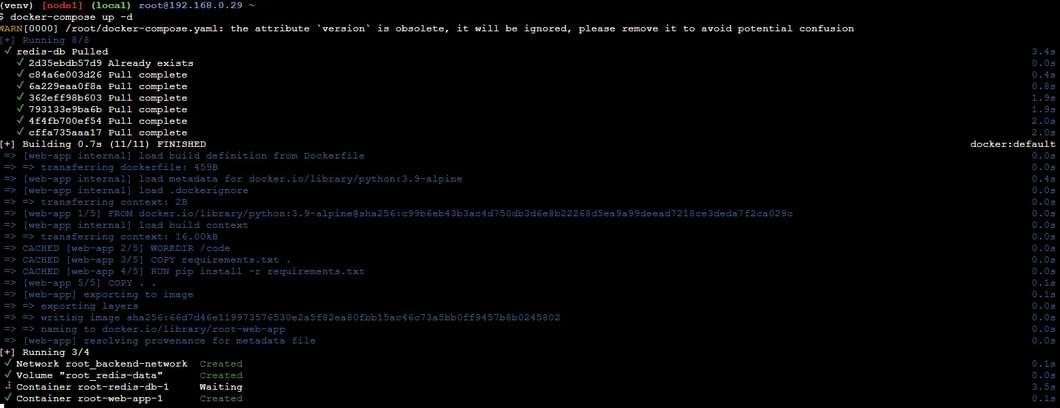
1. Start the stack (Detached mode)
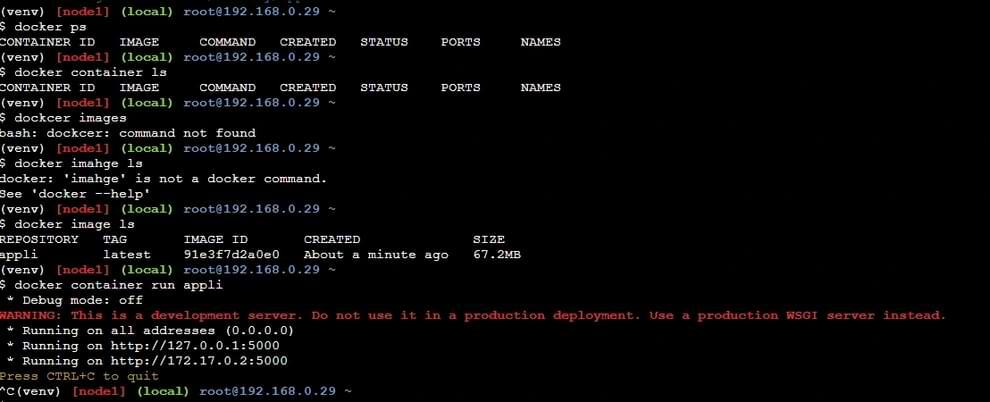
docker-compose up -dThis builds the Python image, pulls Redis, creates the network, and starts containers in the correct order (Redis first, then Web).
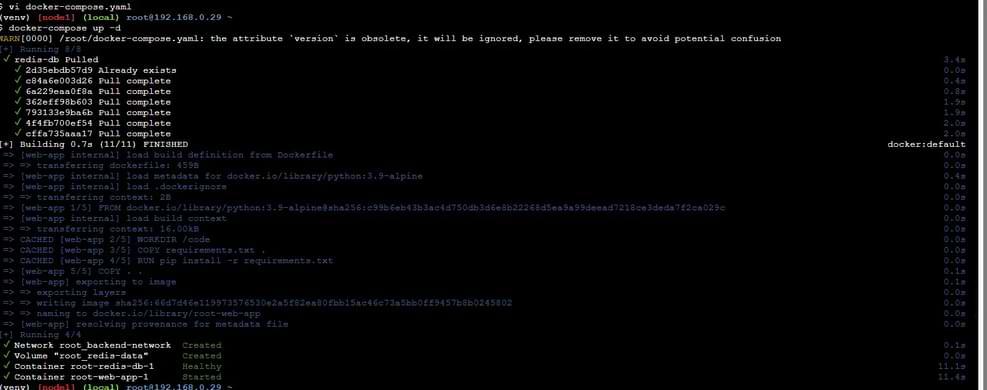
2. Verify processes
docker-compose psLook for the STATUS. You should see (healthy) next to redis-db.
3. Test the App Open a browser and go to http://localhost:5000. Refresh the page multiple times. You will see the counter increment.
4. Tear Down To stop containers and remove networks (but keep the data volumes):
docker-compose downWhile bind mounts are the classic way to sync code, Docker Compose recently introduced a dedicated Watch Mode. This provides a smoother experience, especially when working with compiled languages or when you need to trigger specific rebuild actions.
To use this, update your web-app service in the YAML file:
services:
 web-app:
 build: .
 # The 'develop' section replaces the need for manual volume mapping for code
 develop:
 watch:
 - action: sync
 path: ./
 target: /code
 ignore:
 - node_modules/
 - action: rebuild
 path: ./requirements.txt
action: sync: Automatically copies changes from your host to the container (great for code).action: rebuild: If you change requirements.txt, Docker automatically rebuilds the image to install the new packages without you needing to run build commands manually.You can run this mode with:
docker compose watch.env): Never hardcode passwords. Create a .env file in the same directory:Docker Compose automatically reads this file. You can reference it in YAML as ${POSTGRES_PASSWORD}.POSTGRES_PASSWORD=mysecretpasswordx-common-config: &common
image: my-app
environment:
- DEBUG=1
services:
worker-1:
<<: *common
worker-2:
<<: *common
debugging tool or a migration script you only want sometimes.services:
adminer:
image: adminer
profiles: ["tools"]
Run it with: docker-compose --profile tools up