 |
VOOZH | about |
|
VOOZH | about |
Docker is a containerization platform that lets you build, run, and manage applications in an isolated environment. In a container, software, libraries, and configuration files are bundled together and isolated from one another. Golang is an open-source, procedural, and statically typed programming language. In this article, we'll discuss how to develop and deploy a Golang application using Docker.
As part of this tutorial, we will create a simple Golang application that acts as a REST API.
Step 1: Run the following commands to create a new Golang project.
$ mkdir docker-go

$ cd docker-go

$ go mod init dockergo
Step 2: Paste the following into a new file main.go
$ touch main.go
Step 3: You can start the application by running
$ go run main.go
Project Structure: This is how the project structure should look at this point.
Dockerfile for development: Create a Dockerfile for the development phase of our react project. Let's name it Dockerfile.dev.
$ touch Dockerfile.dev
Step 4: In the newly created file, paste the following commands
# Latest golang image on apline linux
FROM golang:1.17-alpine

# Work directory
WORKDIR /docker-go

# Installing dependencies
COPY go.mod go.sum ./
RUN go mod download

# Copying all the files
COPY . .

# Starting our application
CMD ["go", "run", "main.go"]

# Exposing server port
EXPOSE 5000
Step 5: Now create a docker image by using the docker build command
$ docker build -f Dockerfile.dev -t [name:tag] .
Here,
Once the build process has been completed, you will receive the id and tag of your new image.
Step 6: Create a docker container by running
$ docker run -d -it –-rm -p [host_port]:[container_port] --name [container_name] [image_id/image_tag]
Here,
Step 7: Verify whether the container has been created successfully by running
$ docker container ps
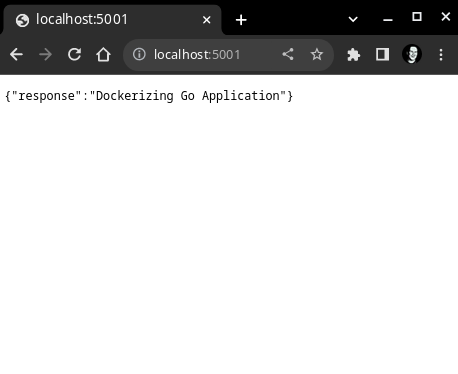
Step 8: Navigate to http://localhost:5001/ to verify the build process.
Dockerfile for production: By looking at the docker images, you will see that our simple go application takes up half a GB of space. So, we will reduce the size of our image for production deployments.
$ docker images
Step 9: The next step is to create a Dockerfile for production mode.
$ touch Dockerfile
# Latest golang image on apline linux
FROM golang:1.17 as builder

# Env variables
ENV GOOS linux
ENV CGO_ENABLED 0

# Work directory
WORKDIR /docker-go

# Installing dependencies
COPY go.mod go.sum ./
RUN go mod download

# Copying all the files
COPY . .

# Building the application
RUN go build -o docker-go

# Fetching the latest nginx image
FROM alpine:3.16 as production

# Certificates
RUN apk add --no-cache ca-certificates

# Copying built assets from builder
COPY --from=builder docker-go .

# Starting our application
CMD ./docker-go

# Exposing server port
EXPOSE 5000
Step 10: Build an image and create a container using the updated Dockerfile.
$ docker build -t [name:tag] .
$ docker run -d -it -–rm -p [host_port]:[container_port] –name [container_name] [image_id/image_tag]
Step 11: The application's size has now been reduced to just 13MB.
$ docker images
Step 12: Browse to http://localhost:5002/ to view the dockerized golang application.
Project Structure: This is how the project structure should look at this point.
Note: Please refer to the Dockerfile used in this tutorial if you have difficulties following the above steps.