A Kubernetes Service is a stable networking abstraction that exposes a group of Pods as a single network endpoint. Pods in Kubernetes are ephemeral ; they can restart, crash, or move across nodes. Pod IP addresses are not permanent, which makes direct communication unreliable, applications in a cluster need a stable way to communicate with each other. Kubernetes Services solve this problem by providing:
External Entry Point: Opens a specific port (range 30000–32767) on every Worker Node's IP address, allowing external traffic to reach the cluster without an Ingress controller.
Kube-proxy Coordination: Like ClusterIP, kube-proxy handles the heavy lifting by routing incoming traffic from the node's port to the appropriate backend Pods.
Uniform Access: The service is accessible via the IP of any node in the cluster, regardless of whether the target Pod is actually running on that specific node.
Cloud Integration: Automatically provisions a native load balancer (e.g., AWS ELB, GCP LB) provided by the cloud infrastructure to manage external traffic.
Hierarchical Setup: Built on top of the other types; it automatically creates a NodePort and a ClusterIP to bridge the gap between the external world and the internal Pods.
Single Entry Point: Provides a public IP address or DNS name that serves as the unique gateway for users, abstracting away the individual Node IPs.
Managed Routing: The cloud provider's balancer monitors node health and distributes incoming traffic across the cluster's NodePorts before reaching the Pods.
Bare-Metal Limitation: Without a cloud-provider plugin (like in minikube or kubeadm), the service will stay in a "Pending" state unless an external tool like MetalLB is installed.
type: LoadBalancer → Exposes the service externally using a cloud provider’s load balancer.
port: 80 → Port exposed by the Service.
targetPort: 8080 → Port on which the container inside the Pod is running.
selector: app: javawebapp → Routes traffic to Pods with this label.
4. ExternalName
An ExternalName is a type of service in kubernetes that maps the service to a DNS name outside the cluster. It redirects the requests to the specified DNS name.
clusterIP: None → Creates a Headless Service (no load balancing, no virtual IP).
Traffic is routed directly to individual Pod IPs.
Useful for StatefulSets, databases, and applications needing direct Pod-to-Pod communication.
Each Pod gets its own DNS record instead of a single Service IP.
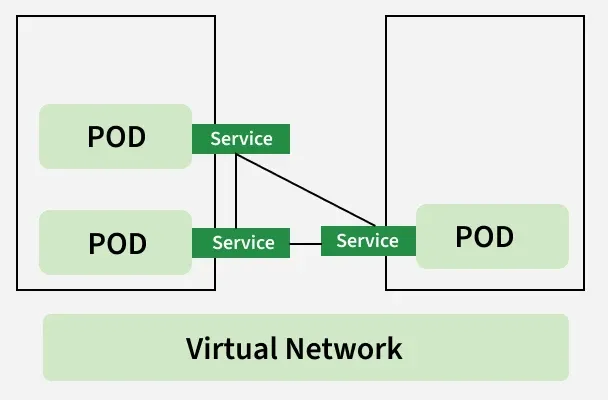
Kubernetes Service Working
A Kubernetes Service selects Pods using labels and selectors, creating a stable endpoint for a dynamic set of Pods.
It provides a stable ClusterIP and DNS name, so applications communicate with the Service instead of changing Pod IPs.
kube-proxy routes traffic to healthy Pods using iptables/IPVS rules, enabling automatic load balancing and high availability.
As Pods scale or restart, the Service automatically updates its endpoints, ensuring reliable and seamless communication inside the cluster.
Defining a Kubernetes Service
In the kubernetes cluster, there are no of objects which are having there own use cases and individual advantages. Same way service is part of objects which are present in kubernetes. To create an object or operate an object you can use the kubectl tool.
In the above we are exposing the Tomcat application deployed in the kubernetes cluster with labels of Tomcat: deployment app port: 80 is the port exposed internally in the cluster and port 8080 is the port of the Tomcat application.
Port Definitions
Kubernetes Services define three important port fields:
Port: Port exposed by the Service.
targetport: port inside the container
nodeport: External port on Node. (NodePort type only).
Using Named Ports
Instead of using numeric targetPort, you can use a named container port.
For example, we can see that instead of using the "targetPortnumber" you can use the name of the container as mentioned below. The target port is the port number that the service or pod is forwarding requests to.
Services Without Selectors
This type of service will be exposed to all the pods in the kubernetes cluster. If the service is having selectors then that service will be exposed to only certain pods in the kubernetes cluster. We can use this special case of pods for different situations as the following:
You can map the service to the required object by using the network address and port with the help of the Endpoint slice object manually.
EndpointSlices
Scalability: Replaces the monolithic "Endpoints" object by breaking Pod IP lists into multiple smaller chunks, preventing performance bottlenecks in large clusters.
100-Endpoint Limit: Each slice is capped at 100 endpoints; once full, Kubernetes automatically generates a new slice to accommodate additional Pods.
Reduced Network Traffic: When a single Pod changes, Kubernetes only updates and syncs the specific affected slice rather than re-transmitting the entire list of every Pod IP to every node.
Efficient Control Plane: Minimizes the CPU and memory load on the API server and kube-proxy by handling manageable data segments instead of massive, bloated objects.
Enhanced Metadata: Supports extra information beyond just IPs, such as topology (location) and dual-stack (IPv4/IPv6) addresses, for smarter traffic routing.
Custom EndpointSlices
The custom name can be given to endpoint slices when you create a new endpoint slice. By using the following EndpointSlices you can create custom Endpoint Slices.
This manually connects a Service to an external IP.
Application Protocol
The application protocol is the field where you can mention the type of protocol that a specific service is listening to. The protocol can be anything that depends upon our requirements here are the some of application protocols.
HTTP/HTTPS routing is handled by Ingress (Layer 7).
Service type does NOT change based on protocol.
Multi-Port Services
Multi-port Service allows you to expose different protocols to the same service or different applications on the same service. You can configure multiple ports using the object in kubernetes called to service.
By using the yaml which is mentioned above you can expose multiple ports but the IP address and DNS name will be the only one with that you can use various services.
Choosing Your Own IP Address
Kubernetes will assign the IP address from within the service-cluster-ip-range CIDR range or you can choose your own customized IP address.
You can reuse the DNS or IP address already in the kubernetes cluster. For reusing, you need to request while creating the service itself.
Once you applied the above specification after that you can access the Tomcat application from the internet by using the IP address you mentioned in the yaml file our case it will be 10.10.10.10. You can also try the above yaml file to create your own customized IP address.
Choosing Your Own Port
While exposing the pod to the internet we will use service objects in the Kubernetes cluster.
We will use mainly the nodePort service in Kubernetes while exposing the pod in Kubernetes.
You can mention your own port in the yaml in the section which is called nodePort: <PortNumber>.
On this port, the users can access the service from the internet and the service will listen on the port which you have mentioned.
Example
apiVersion: v1
kind: Service
metadata:
 name: tomcat-service
spec:
 type: NodePort
 selector:
 app: Webapp
 ports:
 - port: 80
 targetPort: 8080
# Control Plane in kubernetes will allocates an default
IPaddress which is in the range of various between 30000-32767.
 nodePort: 300023
Service type
Access A Kubernetes Service: A Step-By-Step Guide
We can access the kubernetes service using the services such as ClusterIP, NodePort ot LoadBalancer IP along with defining the port number.
Clients within the cluster uses the service name and port. And the clients who are outside the cluster uses the cluster's external IP or DNS name.
The following are the step by step guide for accessing the kubernetes service.
Create A Pod:
Firstly create a yaml file for defining a pod application with a file name my-pod.yaml
The following is the pod yaml file code that is used here:
After once the file has created, then apply the definitions for creating the pod resources using the following command:
kubectl apply -f my-pod.yaml
Accessing Service Using NodePort
Step 1: Create A Service With NodePort
For accessing the pod application externally from the cluster, we have to expose the service using NodePort. For that we creating service yaml file with name my-service.yaml .The file code looks as follows:
Apply the service yaml file definitions using the following command:
kubectl apply -f my-service.yaml
Step 2: Access The Service
Now, get the NodePort that is assigned to the service:
kubectl get svc my-service
Access the service using any node's IP and the NodePort as shown in below:
curl http://<node-IP>:<NodePort>
Accessing Application Using Service Type ClusterIP
Step 1: Create A Service Using ClusterIP
For creating a ClusterIP kind service to communicate with the application within the cluster, create a yaml file with name "my-clusterIP-service.yaml" as shown in the below:
Once, the my-clusterIP-service.yaml file is defined, then apply the definition to create the service as per requirement with ClusterIP type using the following command to apply.
kubectl apply -f my-service.yaml
Step 2: Access the Service Using ClusterIP
ClusterIP is the default Service type and is accessible only inside the cluster. Access the service within the cluster using the service name will looks as follows:
curl http://my-service:80
Accessing Service Using Load Balancer
Step 1: Create A Service With Load Balancer
For creating a load balancer service, create a yaml file with name "my-loadbalancer-service.yaml" as shown in the below:
After once created the my-loadbalancer-service.yaml file then apply the definition changes with the following command:
kubectl apply -f my-loadbalancer-service.yaml
Step 2: Access The Load Balancer
Fristly in this get the external IP address of the Load balancer with the following command:
kubectl get svc my-loadbalancer-service
Access the application using the service using the LoadBalancer's External IP:
curl http://<LoadBalancer-External-IP>:80
Accessing Service Using External IP
Step 1: Create A Service External IP
For creating a External IP service, create a yaml file with name "external-service.yaml" as shown in the below assuming that the IP is already available:
After once created the external-service.yaml file then apply the definition changes with the following command:
kubectl apply -f external-service.yaml
Step 2: Access The Service using External IP
Access the service using the External IP as shown in the following:
curl http://<External-IP>:80
Accessing Service using Headless Service
Step 1: Create A Service of Headless Type
For creating a Headless service, create a yaml file with name "my-headless-service.yaml" as shown in the below assuming that the IP is already available:
Apply the defined yaml configuration file with the following command:
kubectl apply -f deployment.yaml
Step 2: Create A Kubernetes Service
Create a yaml file for defining the service to the created deployment and making the application be exposed. The service configured yaml file is given as follows:
Apply the service resource configuration containing yaml file using the following command:
kubectl apply -f service.yaml
Step 3: Access Your Application
Findout the NodePort that is exposed to the created service for the application with the following command:
kubectl get svc my-app-service
Now access your application using any node's IP and the NodePort.
curl http://<node-IP>:<NodePort>
Step 4: Optional: Use Ingress
If you want to provide the more advanced routing and external access control to the cluster. Consider on using the ingress resource along with the your service.
Kubernetes Service Vs pod
The following are the differences between Kubernetes Service and Kubernetes Pod:
Kubernetes Service
Kubernetes Pod
It abstracts and exposes a set of pods as a network service
It acts as smallest deployable unit with consisting of one or more containers.
It is persistent and provides the stable endpoints
It is ephemeral, the containers can be restarted individually.
It provides a single stable IP address
In each pod kubernetes provides it own IP address.
It facilitates with laod balancing across the multiple pods
It facilitates with scaling the pods at container level with a pod.
When you first create a service kubernetes will automatically create DNS records for the service. The application finds the service in kubernetes with the help of DNS discovery which will point to the IP address of the service.
All the cluster services will be stored in the cluster-wide domain which is svc. cluster. local. The format of the DNS record is as follows.
<service-name>.<namespace>.svc.cluster.local
DNS in Kubernetes assigns the domain and sub-domain name to the pods and for service. By which other objects or resources in the Kubernetes cluster can discover services by the domain names.
Environmental Variables
Environmental variables will be helpful for the DNS discovery to discover the service in the Kubernetes cluster. You need to mention the environmental variables in the service yaml file as follows then only DNS discovery will discover the service which is available in the Kubernetes cluster;
