 |
VOOZH | about |
|
VOOZH | about |
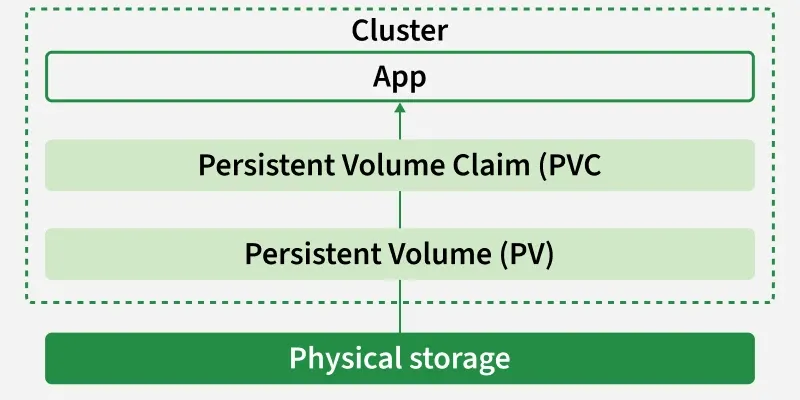
Kubernetes Volumes provide a persistent storage abstraction that decouples data from the individual container's lifecycle.
These Kubernetes Storage plugins lay the foundation for the easy management and internal operations of storage solutions in containers. It does the configurational settings on containers that are orchestrated by Kubernetes. These plugins increase the platform's adaptability and guarantee a customized solution for a range of storage requirements.
The following 2 popular kubernetes storage plugins:
A PersistentVolume (PV) is a cluster-level storage resource that provides persistent data storage independent of Pod lifecycles. It is treated as a cluster resource, similar to nodes, and works like a volume plugin whose lifecycle is not tied to any specific Pod.
PVs can be:
Without PVs, developers would need to attach multiple files or volumes directly to Pods for storage, which:
PVs solve this problem by offering a dedicated, persistent storage layer that remains intact even if Pods crash, fail, or restart. They can represent a variety of storage backends such as NFS, iSCSI, or cloud storage (AWS EBS, GCP Persistent Disk, Azure Disk, etc.).
The PV API object stores the implementation details of the storage, abstracting away the complexity from developers and ensuring consistent, reliable storage across the cluster.
A PersistentVolumeClaim (PVC) is a request made by a user or application to access persistent storage in a Kubernetes cluster.
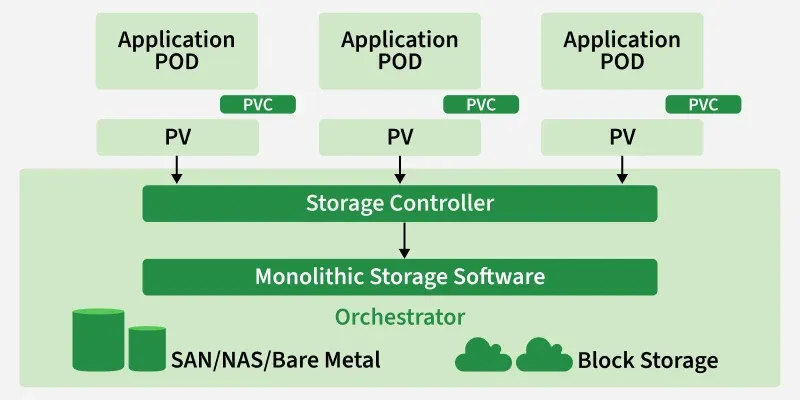
Since Pods cannot directly manage or provision storage, PVCs act as a bridge between Pods and PersistentVolumes (PVs), ensuring applications get the storage they need without dealing with the underlying implementation details. PVCs can specify:
Storage size requirements, such as 5Gi or 10Gi. Access modes, including:
If dynamic provisioning is enabled through a StorageClass, PVCs can automatically create new PVs without administrator involvement. This makes storage portable and reusable across different backends such as NFS, AWS EBS, or GCP Persistent Disk.
When a Pod uses a PVC, it automatically connects to the bound PV. This ensures that data remains safe and persistent even if the Pod is restarted or reschedule.
The relationship between PersistentVolumes (PV) and PersistentVolumeClaims (PVC) ensures that storage is provisioned and consumed in a seamless way. The workflow can be understood as follows:
Whenever developer deploying an Application using Kubernetes to make the data in this application Persistent , he raise the request for the persistent Volume it known as PVC. IT Administrators looks over the specifications of the PVC requests and provides Persistent Volumes (PV) as per required needs.
Based on the PVC specification , the Persistent Volume is created and allocated to it , here we are going to the manual way instead of precreated storage classes for better understanding of workflow. Try on writing a yaml code for persistent volume as follow:
apiVersion: v1
kind: PersistentVolume
metadata:
 name: mypv
spec:
 capacity:
 storage: 2Gi
 accessModes:
 - ReadWriteOnce
 persistentVolumeReclaimPolicy: Retain
 hostPath:
 path: "/mnt/data"
In this file, we providing reclaim policy as Retain, to make the data permant even after the deletion of the pod application.
Save the above specified yaml file with "my_pv.yml" and then run it with the following command:
kubectl apply -f my_pv.yml
The following screenshots show the implementation of above step3 commands
After once completing the step 3 to check the status of the PV try on running the following command:
kubectl get pv
To know more about the details of the PV that you created try on running the following command with its specific name of PV
kubectl describe pv mypv
The following screenshots show the implementation of above step4 commands
Here we are creating PVC with name as mypvc using Yaml syntax file with specification of storage resource of 5Gib, having accessmodes Read and Write only Once. Save the file code with name such as my_pvc.yml
apiVersion: v1
kind: PersistentVolumeClaim
metadata:
 name: mypvc
spec:
 accessModes:
 - ReadWriteOnce
 resources:
 requests:
 storage: 2Gi
Run this yaml file with kubectl create command or kubectl apply command as follows
kubectl create -f my_pvc.yml
The following picture show the practical usage of the above commands
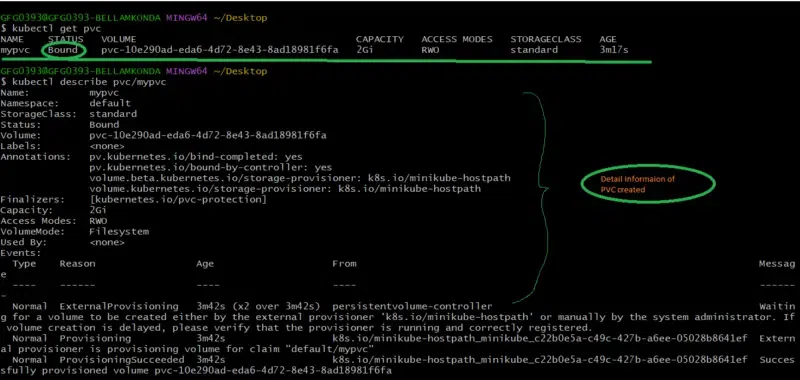
👁 pvc1After executing the above step 1 to check the status of PVC creation try on running the following command:
kubectl get pvc
To know more about the PVC try on seeing the description on running the following command
kubectl describe pvc/mypvc
The following screenshots show the implementation of above step2 commands
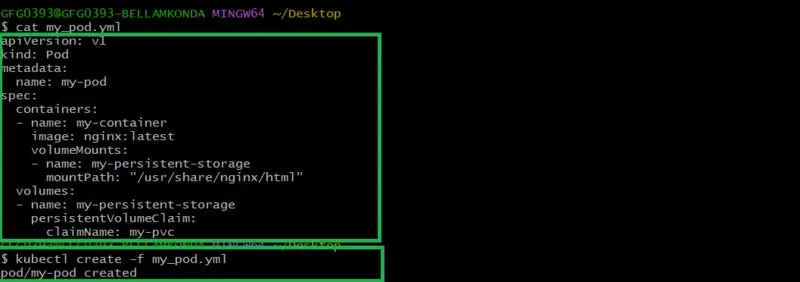
Now create a pod yaml file as referring the following yaml code for using the above created PV and PVC with Pod application with image nginx latest version.
apiVersion: v1
kind: Pod
metadata:
 name: my-pod
spec:
 containers:
 - name: my-container
 image: nginx:latest
 volumeMounts:
 - name: my-persistent-storage
 mountPath: "/usr/share/nginx/html"
 volumes:
 - name: my-persistent-storage
 persistentVolumeClaim:
 claimName: my-pvc
Save this pod yaml file with name my_pod.yml and then run it with the command kubectl create as follow:
kubectl create -f my_pod.yml
The following screenshots show the implementation of above step 5 commands
to check the creation of the pod check with the following command:
kubectl get podsTo know more about the detailing of that pod, run with the following command
kubectl describe pods/mypodThe following screenshots show the implementation of above step6 commands
1. Always use StorageClass in cloud environments
2. Define clear retention (Reclaim) policies