VOOZH about

URL: https://www.geeksforgeeks.org/devops/push-docker-images-to-artifact-registry-in-gcp/

⇱ Push Docker Images to Artifact Registry in GCP - GeeksforGeeks


  • Courses
  • Tutorials
  • Interview Prep

Push Docker Images to Artifact Registry in GCP

Last Updated : 22 Aug, 2024

Google Artifact Registry is a fully managed service that aims to provide you with services that allow us to secure storage and management of docker container images and other artifacts. It provides a centralized location for storing and managing the artifacts. In this article, I will provide you an overview of the Artifact Registry and its features and benefits.

Overview of Artifact Registry and its Features

An Artifact Registry is a centralized repository that allows us to store docker container images as well as other artifacts which include language packages and binaries. Its key features include:

  • Secure storage and management of container images and other artifacts.
  • Supports multiple formats such as Docker, Helm, and Maven.
  • It allows integration with Google Cloud services such as Google Kubernetes Engine and Cloud Build.
  • Role-based access control and permission management.
  • Automatically detects vulnerability.

Benefits of using Artifact Registry for Container Images

  • Centralized Management: Artifact registry provides us a single platform for managing container images which makes it easier to manage and track container images
  • Enhanced Security: It provides secure storage and management of container images with various features like encryption, access control,an and vulnerability detection.
  • Faster Development: It is integrated with Google Cloud services such as Google Kubernetes Engine and Cloud Build which allows us for faster development.
  • Improved Collaboration: It provides us a a repository for container images which makes it easier for team collaboration by sharing images across different environments,.
  • Version Control and Auditing: It allows us to track changes of our container images and maintain an environmentshistory of updates and deployment.

Comparison with other Image Storage Solutions in GCP

Artifact Registry

Google Container Registry (GCR)

Google Cloud Storage

Format Support

Multiple formats (Docker,Helm, Maven,etc)

Only Docker

Multiple formats (Docker, Helm, built-inMaven, etc) but not for optimized containers.

Vulnerability Scanning

Automatically detects

Manually scans

No built-in feature

Access Control

Fine-grained access control

Role-based access control

Bucket-level access control

Integration

Google Cloud services (GKE, Cloud Build, etc)

Google Cloud services (GKE, Cloud Build, etc.)

Google Cloud services (GKE, Cloud Build, etc.) but not for optimized containers.

Security

Encryption, access controls, and vulnerability detection

Encryption and access controls

Encryption and access controls

Management

Centralized management

Decentralized management

Decentralized management

Step-by-Step Process to Pushing a Docker Image to Artifact Registry in GCP

Preparing your environment for Artifact Registry

Step 1: Install Docker

Step 2: Install Google Cloud SDK

Creating a Repository

Step 1: Login into your Google Cloud Account.

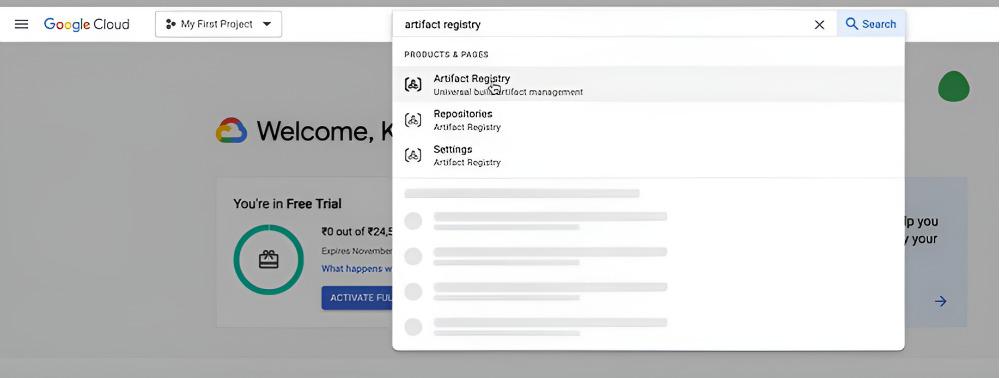
Step 2: Search for Artifact Registry and Click on it.

👁 art1

Step 3: Click on Create Repository.

  • Name: <Write any name>
  • Format: Docker
  • Mode: Standard
  • Location type: Region
  • Region: us-central1
  • Encryption: Google-managed encryption key

Our Repository has been created.

Tagging and pushing container images to Artifact Registry

Building a Docker Image Locally

Step 1: Make sure your Docker is up and running and Open the Docker file's Terminal window.

Step 2: Run the following command

docker build -f Dockerfile
docker tag my-image:latest LOCATION-docker.pkg.dev/PROJECT-ID/repo-created/my-image:latest

Step 3: Configure authentication for Artifact Registry

gcloud auth configure-docker LOCATION-docker.pkg.dev

Step 4: Push the Image to Artifact Registry

docker push LOCATION-docker.pkg.dev/PROJECT-ID/my-repo/my-image:latest

Automating Docker Image Build and Push to Artifact Registry

Step 1: Search for Cloud Source Repositories and Click on it.

Step 2: Click on Go to Cloud Repositories

👁 art2
👁 art3
👁 file
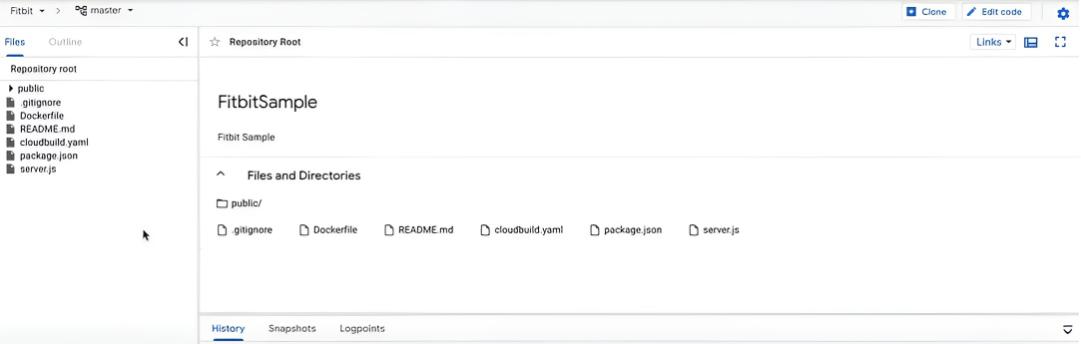
  • The source code created will be in the repository you've created above. We have a Dockerfile and the steps to build and push the image should be already present in cloudbuild.yaml .

Step 3: Click on the Settings icon on the top-right corner and Click on Cloud build Trigger

👁 file

Step 4: Click on Create Trigger

  • Name: <Write any name>
  • Region: global(Global)
  • Event: Push to a branch
  • Source: 1st gen
  • Repository: (Select the Cloud Source Repository you've created above)
  • Branch: *master$

In the Configuration

  • Type: Cloud Build configuration file (yaml or json)
  • Location: Repository

Click on Create

Step 5: Click on Run > Run Trigger

  • The Docker Image will be getting pushed in the Artifact Registry.
  • Search Artifact Registry and review if the image is created.
  • Any changes made and saved in the source code will automatically get updated in the cloud source repository.
👁 art6

Pushing the Image to the GCP Artifact Registry using Docker Push Command

Step 1: Open VS code and make a folder

Step 2: Create a Dockerfile.

FROM node:alpine3.14

WORKDIR /opt/web-app/app
COPY *.json ./
RUN npm i
EXPOSE 8080
COPY app.js ./
CMD ["node", "app.js"]

Step 3: Create an app.js file to write the code for NodeJS application.


Step 4: Create a Json file to keep the dependencies.


Step 5: Run the following Bash commands.

  • Add the Json packages
nvm use 17
npm add
  • Make sure you have gcloud installed and check the gcloud version.
gcloud --version
  • To check the gcloud project list
gcloud project list
  • We also have to run the gcloud auth command as we have to push Docker Images, Run this command just before pushing the image.
gcloud auth configure-docker

Step 6: Building the Docker Image

  • For a successful build make sure you are in the dockerfile directory.
docker build -t node_app -f Dockerfile .
  • To check information about the Image and copy the Image ID.
docker images | grep -i "node_app"
👁 arp2


Step 7: Pushing the Docker Image

  • The above step will get you the source image id and to get the project id run the command below
gcloud config get-value project
  • To push the image run the command written below. Example: docker tag 81fdcf708abb eu.gcr.io/personal-2022-338317/node_app:v1
docker tag [SOURCE_IMAGE_ID] [REGION]gcr.io/[PROJECT-ID]/[IMAGE]
docker push [REGION].gcr.io/[PROJECT-ID]/[IMAGE-NAME]:[TAG]
👁 arp1

Step 7: To verify, Open the Google Cloud Platform and Refresh the Container Registry Page.

Verifying and Managing Pushed Images

Verifying

Method 1: Using the Command Line

  • Run the following command to get the list of images in the repository.
gcloud artifacts repositories list-images <repository-name>
  • Run the following command to get the details of an image in the repository.
gcloud artifacts repositories describe-image <repository-name> <image-name>

Method 2- Using the Artifact Registry Console

  1. Search Artifact Registry Console and Click on it.
  2. Click on the repository that contains the image that i need to verify.
  3. Click on the image which i need to verify.
  4. Check the image details like their name , tag and their size.
  5. Click on "Tags" to view the list of tags associated with the image.

Managing

Method 1- Using the Command Line

  • Run the following command to delete a tag.
gcloud artifacts repositories delete-tag <repository-name> <image-name> <tag-name>
  • Run the following command to delete an image.
gcloud artifacts repositories delete-image <repository-name> <image-name>

Method 2- Using the Artifact Registry Console

  1. Search Artifact Registry Console and Click on it.
  2. Click on the repository that contains the image that i need to manage.
  3. Click on the image which i need to manage.
  4. Click on "Tags" to view the list of tags associated with the image.
  5. Click on "Delete" to delete a tag or an image.
Comment
Article Tags: