VOOZH about

URL: https://www.geeksforgeeks.org/java/servlet-crud/

⇱ Servlet - CRUD - GeeksforGeeks


  • Courses
  • Tutorials
  • Interview Prep

Servlet - CRUD

Last Updated : 4 Oct, 2025

CRUD stands for Create, Read, Update, and Delete, the basic operations used to manage data in any application. Using Java Servlets with JDBC, we can connect to a database and perform these operations through a web interface.

Key Components of CRUD

  • Create new users in the system.
  • Read and view user details from the database.
  • Update existing user information.
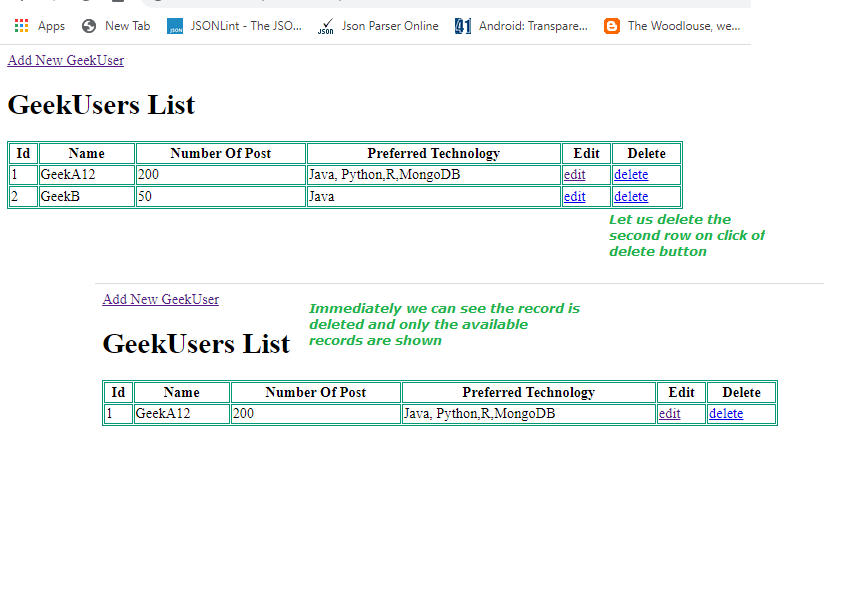
  • Delete users when needed.
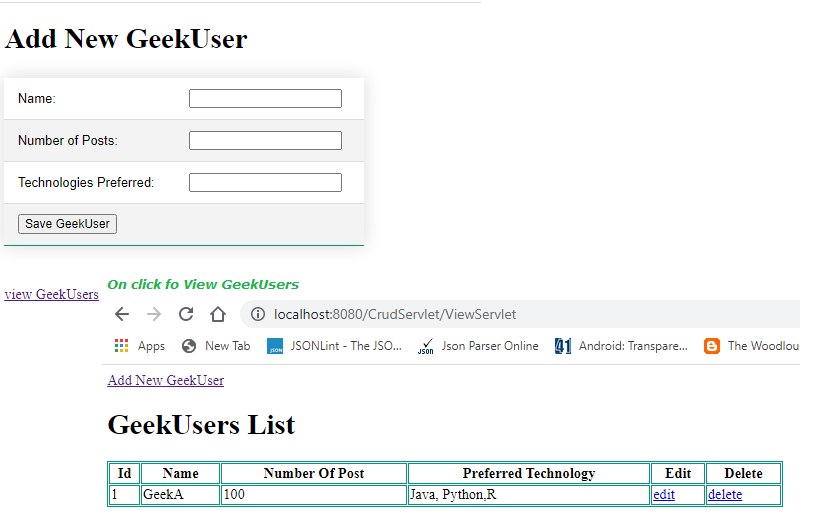
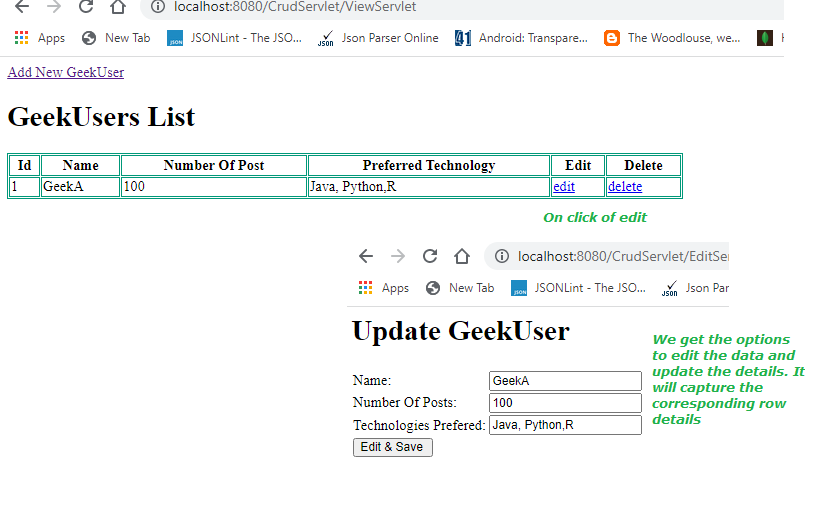
  • Build a complete Servlet-based CRUD application with a frontend HTML form.

Prerequisites

Step-by-Step Servlet CRUD Operation

Step 1. Table Creation in MySQL

We will use a MySQL database named geeksforgeeks and create a table geekusers:

1.1 Create the database

CREATE DATABASE geeksforgeeks;

1.2 Use the database

USE geeksforgeeks;

1.3 Create the table inside the selected database

CREATE TABLE geekusers (

geekUserId INT AUTO_INCREMENT PRIMARY KEY,

geekUserName VARCHAR(25) NOT NULL,

numberOfPosts INT DEFAULT 0,

technologiesPreferred VARCHAR(45)

);

Step 2: HTML Frontend (index.html)

We start with an HTML form to add new GeekUsers. CSS is used for table styling and JavaScript can be added for form validation.

Explanation:

  • Create a form for user input: The HTML form collects user details such as Name, Number of Posts, and Technologies Preferred.
  • Send data to the backend: The form uses action="SaveServlet" and method="post" to submit data to the servlet for processing.
  • Enhance user experience with styling: CSS is used to style the table and form, making it visually appealing and easy to read.
  • Navigation for viewing records: A link is provided (ViewServlet) so users can view all existing GeekUsers after adding new ones.

On running the HTML file, we can see the output as

πŸ‘ On invoking index.html

Step 3: Create the Model Class (GeekUsers.java)

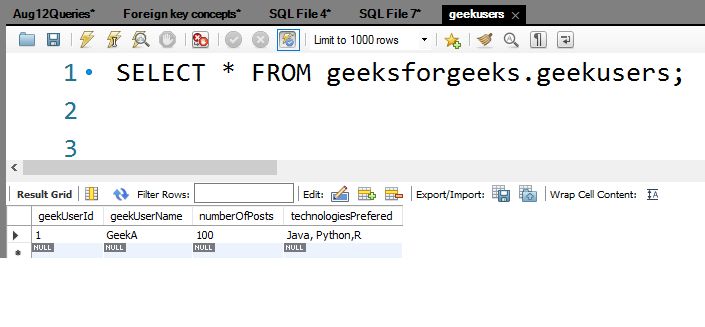
Let us see the backend code for it. First, let us see about the "Model" Java file. Here it is GeekUsers.java. It will contain some attributes similar to the columns of the MySQL table named "geekusers".

Explanation:

  • Define class attributes: Each attribute in GeekUsers corresponds to a column in the MySQL geekusers table.
  • Encapsulate fields: Attributes are private to ensure data integrity, and public getters and setters provide controlled access.
  • Object representation: Each GeekUsers object represents a single row in the database, allowing easy data manipulation in Java.
  • Data transfer: This class is used to transfer data between the frontend form, DAO, and servlets.

Step 4: Create DAO Class (GeekUsersDao.java)

The Data Access Object (DAO) provides methods for connecting to the database and performing CRUD operations.

Explanation:

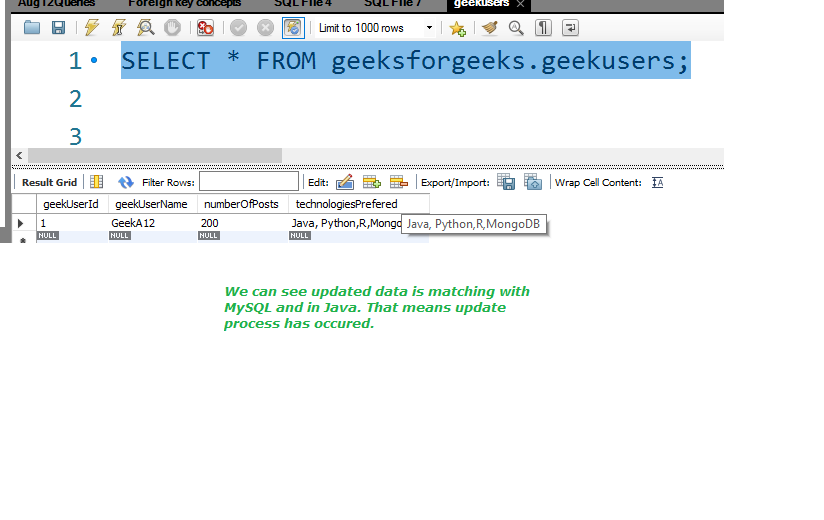
  • Establish database connection: getConnection() sets up a connection to the MySQL database using JDBC.
  • CRUD methods: Includes save(), getAllGeekUsers(), getGeekUsersById(), update(), and delete() to perform database operations.
  • Use of PreparedStatement: Prevents SQL injection and safely executes SQL queries with parameters.
  • Data handling: DAO methods return objects, lists, or update status so servlets can handle results appropriately.

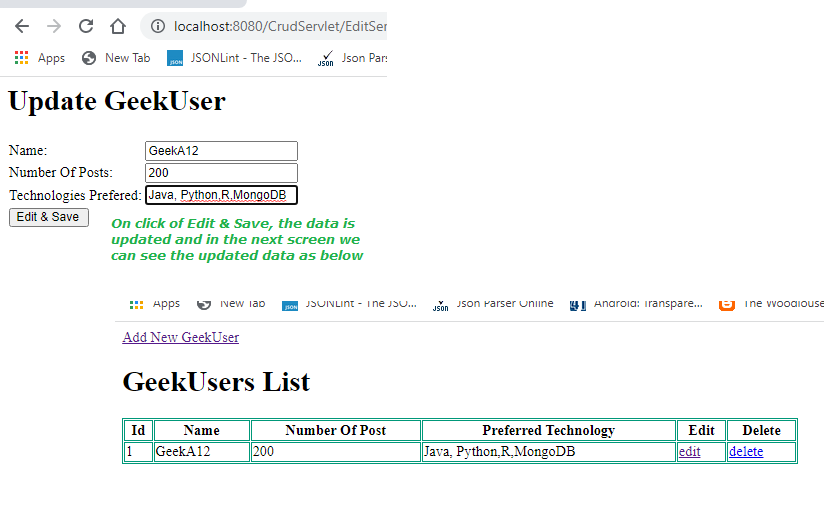
Step 5: Create Servlets

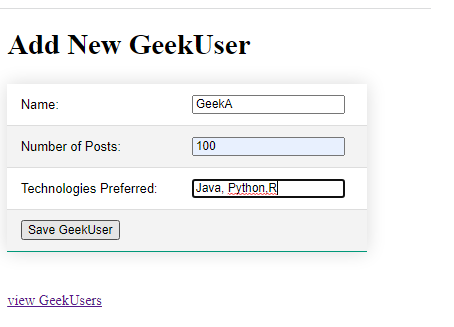
Let us see the servlet code now. From index.html, the input values are sent to "/SaveServlet".  'SaveServlet' is the servlet name that is looked up and 'POST' is the method that got called 

5.1 Create Operation

  • Handles the form submission from index.html and saves a new GeekUser to the database.
  • Redirects to ViewServlet on success or shows an error message if saving fails.

SaveGeekUserServlet.java

Explanation:

  • Receive form data: Captures user input from index.html using request.getParameter().
  • Create a GeekUsers object: Sets the form values into a new GeekUsers instance.
  • Save to database: Calls GeekUsersDao.save() to insert the new record into MySQL.
  • Provide feedback: Shows a success message on the page or an error if saving fails.
πŸ‘ out
output

We can able to see a record got inserted in MySQL also

πŸ‘ out

5.2 Read Operation

  • Fetches all GeekUser records from the database and displays them in an HTML table.
  • Provides Edit and Delete links for each record to perform update or delete operations.

ViewGeekUserServlet.java (Read Operation)

Explanation:

  • Fetch all records: Calls GeekUsersDao.getAllGeekUsers() to retrieve all users from the database.
  • Display in HTML table: Dynamically generates a table showing each user’s details.
  • Provide Edit/Delete links: Each row includes links to modify or delete the specific record.
  • Navigation for adding new users: Includes a link back to index.html for adding more GeekUsers.

In order to view the saved record, we can use the "View GeekUsers" link

πŸ‘ out

5.3 Update Form

  • Retrieves a single GeekUser by ID and displays its details in an editable HTML form.
  • Allows the user to modify fields and submit the updated data for saving.

EditGeekUserServlet.java

We have the option to edit the data as well as delete the data. Let  us see them 

πŸ‘ out

5.4 Update Operation

  • Receives the updated data from the edit form and updates the record in the database.
  • Redirects back to ViewServlet to show the updated list of GeekUsers.

EditGeekUserServlet2.java

Relevant Servlet code to do the above operation is "EditGeekUserServlet2.java"

Explanation:

  • Receive updated data: Reads form data sent from the edit form.
  • Update object: Sets the updated values into a GeekUsers object.
  • Save changes to database: Calls GeekUsersDao.update() to update the record in MySQL.
  • Redirect to view page: Shows the updated list of users via ViewServlet.

Now, if we update (change) the data, corresponding details will be updated and reflected in the screen as well as in MySQL

πŸ‘ out

Let us query the MySQL part also

πŸ‘ out

5.5 Delete Operation

  • Deletes a GeekUser record from the database based on the given ID.
  • After deletion, redirects to ViewServlet to display the updated list.

DeleteGeekUserServlet.java

Explanation:

  • Receive user ID: Gets the ID of the record to be deleted from the request parameter.
  • Delete from database: Calls GeekUsersDao.delete(id) to remove the record.
  • Redirect to view page: Automatically redirects to ViewServlet to display the remaining users.
  • User sees updated table: Confirms the deletion visually by removing the row from the table.

Let us see the delete part now. Assume that we have 2 records, on click of delete of 2nd record, row 2 is deleted

πŸ‘ out

Visual representation of CRUD flow

Comment
Article Tags:
Article Tags: