 |
VOOZH | about |
|
VOOZH | about |
File handling in Spring Boot refers to the process of uploading, storing, retrieving, and downloading files through REST APIs in a web application. Spring Boot provides built-in support for file upload using MultipartFile and simplifies file operations through its integration with the Spring Web module.
Now, let us implement a Spring Boot application to demonstrate file upload and download functionality step by step.
Generate a project using Spring Initializr and fill in the details:
Click Generate to download the starter project.
Add the following configuration in application.properties to enable multipart file uploads.
spring.servlet.multipart.enabled=true
spring.servlet.multipart.max-file-size=10MB
spring.servlet.multipart.max-request-size=10MB
Create the main class to run the Spring Boot application.
Create a FileController class to handle file upload, download, and listing operations.
Run the main class.
The Spring Boot application will start on:
http://localhost:8080
1. Upload File API
URL
POST http://localhost:8080/upload
In order to upload a file we need to hit http://localhost:8080/upload in Postman with form data as shown below:
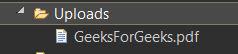
On Successful upload of the file, we can see the file in the Uploads folder as below:
👁 File Uploaded in Uploads Folder2. Get list of Files API
We need to hit http://localhost:8080/getFiles in postman to get a list of filenames that have been uploaded.
URL
GET http://localhost:8080/getFiles
3. Download File API
URL
GET http://localhost:8080/download/{filename}
In order to download a file we need to hit http://localhost:8080/download/{filename} in postman as shown below.
👁 Download API in PostmanThe file can be downloaded in Postman using Save Response → Save to a File, or directly from the browser using the download URL. If the file does not exist, the API returns "File Not Found" with HTTP 404.
👁 File Not Found Output in Postman