 |
VOOZH | about |
|
VOOZH | about |
Organizing text into two columns in Google Docs can significantly improve the structure and readability of your documents, making it perfect for articles, newsletters, or academic papers. This is great for things like newsletters or flyers. Google Docs is a tool that many people use for writing because it's easy and free.
Creating two columns in Google Docs is quick to do, and it will make your document look more professional. You can easily write in the columns by exploring the excellent features of Formatting and Tables. In this article, we will learn a simple way to set up two columns in your Google Docs.
👁 How to Make Two Columns in Google Docs
Table of Content
Columns in Google Docs allow you to divide your document into vertical sections, making it easier to present information in a visually appealing way. This format is commonly used in newspapers, magazines, and academic papers to improve readability and flow.
Creating two columns in Google Docs can make your document look organized and neat. Follow these simple steps to set it up on your desktop.
Open Google Docs on your Desktop and select a document you want to write in Columns.
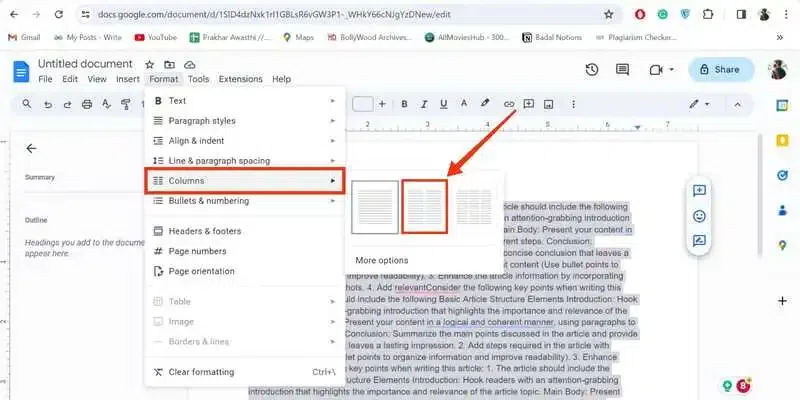
After opening your document click on the "Format" Menu located on the Toolbar to use the Format menu actions.
Now from the Format menu select the "Columns" button to format the columns so that you can write in the Columns.
After clicking on the Columns option you will be asked to select the Column Number, just select the column number you want to write and the format in your document.
Learn how to create multiple columns in Google Docs using tables, which offers more customization options for your content.
Open your Google Document in which you want to write in Columns and click on the Insert Menu located on the top side of the interface.
From the table that appeared after clicking on the "Insert" menu select the "Table" option to insert the table to your document.
Now specify the number of rows and columns from the table templates, you can simply select the size by dragging the mouse on the template.
When you will click on the Table option from the menu the table will be inserted and now you can start writing in the columns of the table. You can customize the Columns by yourself and can enter your data.
After entering your data into the table you can now customize your table, to do so right-click on the table and select "Table Properties" from the menu that appeared.
Now from the table properties, you can customize your columns, rows, table colors, cell colors, and so on.
Quickly format specific text into two columns to improve the readability of sections within your document.
Locate the text in which you want to use two columns.
After selecting the text click on the Format tab >> Columns and choose the column number you want to apply to the text.
You have successfully applied two columns to the text.
Customize your columns in Google Docs to adjust spacing, lines, and overall appearance for a more tailored document.
Open Google Docs and click on the Format tab located on the toolbar.
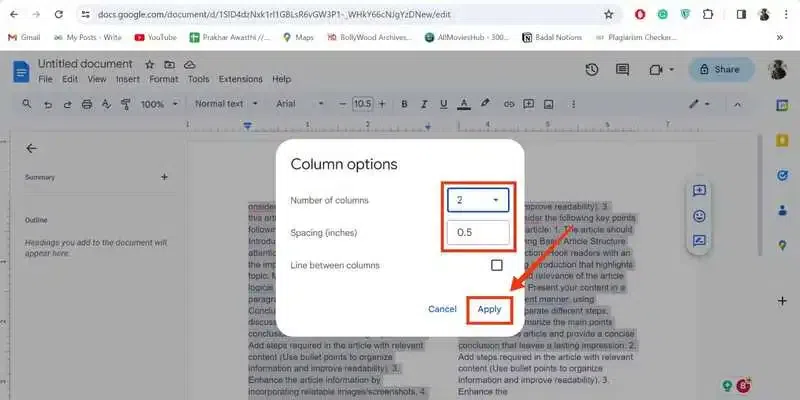
When you click on the Format tab a menu will appear select the Columns option from the menu and click on the "More options" to customize columns.
Now you can customize the columns by editing the number of columns and spacing between them.
Find out how to navigate between columns in Google Docs to type seamlessly in your formatted sections.
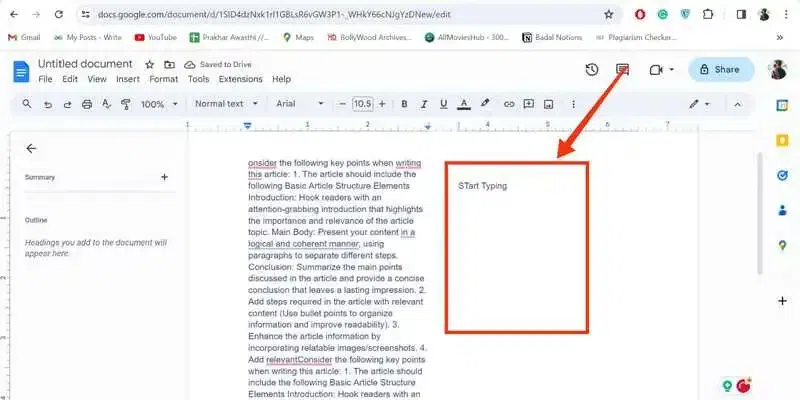
Locate the text after applying the two columns to the text.
To move to the second column hover your cursor to the top of the second column and start typing.
After the steps of how to make two columns in Google docs on mobile, follow the steps given below to write in columns in Google Docs.
Open Google Docs on your mobile and select a document in which you want to write in columns.
After opening your document in Google Docs click on the (+) icon on the top side of the interface to open the insert menu.
Select "Table" from the menu appears after clicking on the Insert Icon.
After clicking on the you will be asked to specify the number of rows and columns to be entered, just enter give the number of rows and columns and click on the "Insert Table" button to insert the table.
Now, when your table is entered in the document, you can enter your data in the tables as table columns. After entering your data into the table, you can also customize your table by the available options at the bottom.
In the case you want to know make two columns in google docs on phone Go to Insert >> Table, specify rows and columns and edit the columns as column 1 and 2.
Also Read:
To create two columns for part of a page in Google Docs, highlight the desired section and navigate to "Format" > "Columns", then choose the two-column layout. All you have to do is open your Google Docs document click on the Format menu located on the toolbar select the "Columns" option and then your columns will be formatted in the document.
On the other hand, if you want to use the tables click on the "Insert" menu and select the Tables from the menu, then specify the number of rows and columns to be entered into the document. After entering your table into the document you can start writing in the columns of the table and you can also customize your table by using the "Table Properties".
.webp)
.webp)
.webp)
.webp)
.webp)
.webp)
.webp)
.webp)
.webp)
.webp)
.webp)
.webp)
.webp)
.webp)
.webp)
.webp)
.webp)
.webp)