
TLS 1.3 is the latest version of the Transport Layer Security (TLS) protocol and it is based on the existing 1.2 specifications with proper IETF standard: RFC 8446. It provides stronger security and higher performance improvements over its predecessors.
In this article, we will show you a step-by-step guide to obtain a valid TLS certificate and enable the latest TLS 1.3 version protocol on your domain hosted on Apache or Nginx web servers.
Requirements:
- Apache version 2.4.37 or greater.
- Nginx version 1.13.0 or greater.
- OpenSSL version 1.1.1 or greater.
- A valid domain name with correctly configured DNS records.
- A valid TLS certificate.
Install TLS Certificate from Let’s Encrypt
To obtain a free SSL Certificate from Let’s Encrypt, you need to install Acme.sh client and also few needed packages on Linux system as shown.
# apt install -y socat git [On Debian/Ubuntu]
# dnf install -y socat git [On RHEL/CentOS/Fedora]
# mkdir /etc/letsencrypt
# git clone https://github.com/Neilpang/acme.sh.git
# cd acme.sh
# ./acme.sh --install --home /etc/letsencrypt --accountemail [email protected]
# cd ~
# /etc/letsencrypt/acme.sh --issue --standalone --home /etc/letsencrypt -d example.com --ocsp-must-staple --keylength 2048
# /etc/letsencrypt/acme.sh --issue --standalone --home /etc/letsencrypt -d example.com --ocsp-must-staple --keylength ec-256
NOTE: Replace example.com in the above command with your real domain name.
Once you have SSL certificate installed, you can proceed further to enable TLS 1.3 on your domain as explained below.
Enable TLS 1.3 on Nginx
As I mentioned in the requirements above, that TLS 1.3 is supported starting from Nginx 1.13 version. If you are running the older Nginx version, you need to first upgrade to the latest version.
# apt install nginx
# yum install nginx
Check the Nginx version and the OpenSSL version against which Nginx was compiled (make sure that the nginx version is at least 1.14 and openssl version 1.1.1).
# nginx -V
Sample Output
nginx version: nginx/1.14.1
built by gcc 8.2.1 20180905 (Red Hat 8.2.1-3) (GCC)
built with OpenSSL 1.1.1 FIPS 11 Sep 2018
TLS SNI support enabled
....
Now start, enable and verify the nginx installation.
# systemctl start nginx.service
# systemctl enable nginx.service
# systemctl status nginx.service
Now open the nginx vhost configuration /etc/nginx/conf.d/example.com.conf file using your favorite editor.
# vi /etc/nginx/conf.d/example.com.conf
and locate ssl_protocols directive and append TLSv1.3 at the end of the line as shown below
server {
 listen 443 ssl http2;
 listen [::]:443 ssl http2;

 server_name example.com;

 # RSA
 ssl_certificate /etc/letsencrypt/example.com/fullchain.cer;
 ssl_certificate_key /etc/letsencrypt/example.com/example.com.key;
 # ECDSA
 ssl_certificate /etc/letsencrypt/example.com_ecc/fullchain.cer;
 ssl_certificate_key /etc/letsencrypt/example.com_ecc/example.com.key;

 ssl_protocols TLSv1.2 TLSv1.3;
 ssl_ciphers 'ECDHE-ECDSA-AES256-GCM-SHA384:ECDHE-RSA-AES256-GCM-SHA384:ECDHE-ECDSA-CHACHA20-POLY1305:ECDHE-RSA-CHACHA20-POLY1305:ECDHE-ECDSA-AES128-GCM-SHA256:ECDHE-RSA-AES128-GCM-SHA256:ECDHE-ECDSA-AES256-SHA384:ECDHE-RSA-AES256-SHA384:ECDHE-ECDSA-AES128-SHA256:ECDHE-RSA-AES128-SHA256';
 ssl_prefer_server_ciphers on;
}
Finally, verify the configuration and reload Nginx.
# nginx -t
# systemctl reload nginx.service
Enable TLS 1.3 in Apache
Beginning from Apache 2.4.37, you can take advantage of TLS 1.3. If you are running the older version of Apache, you need to first upgrade to the latest version.
# apt install apache2
# yum install httpd
Once installed, you can verify the Apache and the OpenSSL version against which Apache was compiled.
# httpd -V
# openssl version
Now start, enable and verify the nginx installation.
-------------- On Debian/Ubuntu --------------
# systemctl start apache2.service
# systemctl enable apache2.service
# systemctl status apache2.service

-------------- On RHEL/CentOS/Fedora --------------
# systemctl start httpd.service
# systemctl enable httpd.service
# systemctl status httpd.service
Now open the Apache virtual host configuration file using your favorite editor.
# vi /etc/httpd/conf.d/vhost.conf
OR
# vi /etc/apache2/apache2.conf
and locate ssl_protocols directive and append TLSv1.3 at the end of the line as shown below.
<VirtualHost *:443>
SSLEngine On

# RSA
ssl_certificate /etc/letsencrypt/example.com/fullchain.cer;
ssl_certificate_key /etc/letsencrypt/example.com/example.com.key;
# ECDSA
ssl_certificate /etc/letsencrypt/example.com_ecc/fullchain.cer;
ssl_certificate_key /etc/letsencrypt/example.com_ecc/example.com.key;

ssl_protocols TLSv1.2 TLSv1.3
ssl_ciphers 'ECDHE-ECDSA-AES256-GCM-SHA384:ECDHE-RSA-AES256-GCM-SHA384:ECDHE-ECDSA-CHACHA20-POLY1305:ECDHE-RSA-CHACHA20-POLY1305:ECDHE-ECDSA-AES128-GCM-SHA256:ECDHE-RSA-AES128-GCM-SHA256:ECDHE-ECDSA-AES256-SHA384:ECDHE-RSA-AES256-SHA384:ECDHE-ECDSA-AES128-SHA256:ECDHE-RSA-AES128-SHA256';
ssl_prefer_server_ciphers on;
SSLCertificateFile /etc/letsencrypt/live/example.com/cert.pem
SSLCertificateKeyFile /etc/letsencrypt/live/example.com/privkey.pem
SSLCertificateChainFile /etc/letsencrypt/live/example.com/chain.pem

 ServerAdmin [email protected]
 ServerName www.example.com
 ServerAlias example.com
 #DocumentRoot /data/httpd/htdocs/example.com/
 DocumentRoot /data/httpd/htdocs/example_hueman/
 # Log file locations
 LogLevel warn
 ErrorLog /var/log/httpd/example.com/httpserror.log
 CustomLog "|/usr/sbin/rotatelogs /var/log/httpd/example.com/httpsaccess.log.%Y-%m-%d 86400" combined
</VirtualHost>
Finally, verify the configuration and reload Apache.
-------------- On Debian/Ubuntu --------------
# apache2 -t
# systemctl reload apache2.service

-------------- On RHEL/CentOS/Fedora --------------
# httpd -t
# systemctl reload httpd.service
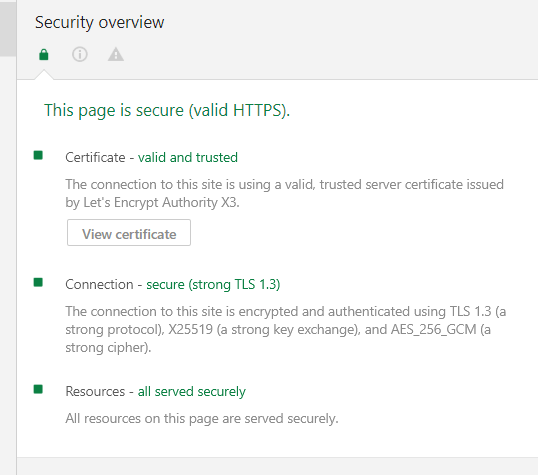
Verify Site is Using TLS 1.3
Once you’ve configured through a web server, you can check that your site is handshaking over TLS 1.3 protocol using chrome browser development tools on Chrome 70+ version.
That’s all. You have successfully enabled TLS 1.3 protocol on your domain hosted on Apache or Nginx web servers. If you have any queries about this article, feel free to ask in the comment section below.
If this article helped you solve a problem, consider buying a coffee. It helps keep TecMint free, supports the authors, and keeps the project going.
Got Something to Say? Join the Discussion... Cancel reply