
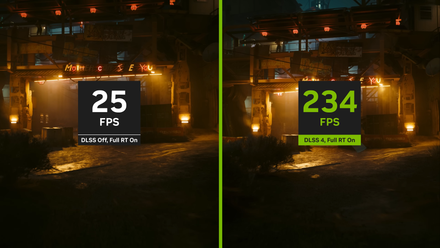
NVIDIA's latest version of their Super Resolution upscaler, DLSS 4.5, just saw a global release a little over a week ago. Beta users of the NVIDIA app had been using it a little before that, and now that DLSS 4.5 is available for all, it has proved to be a rather significant upgrade over DLSS 4. It was also all the rage at CES 2026, where, for all the AI-centered, anti-consumer tech that was shown off, NVIDIA presented DLSS 4.5 and 6x Multi-Frame Generation at its booth where users could play games in real time to test out Team Green's new upscaling.
One thing that was particularly unique about NVIDIA's CES booth for DLSS 4.5 testing, however, was a hotkey that the devs had provided to switch between DLSS 4 and 4.5 on the fly. That's a feature that the NVIDIA app for consumers doesn't have. Since current discourse on the new DLSS models is all about trying them out for yourself to see which one suits your hardware, here's how you can switch between DLSS models and presets anyway.
DLSS 4.5 is expensive, but it’s the best thing to happen to my aging RTX PC
The upside is remarkable, but the cost isn't equal for all.
Making changes to the NVIDIA App
Opt into beta features and replace the DLSS DLL
First thing's first: make sure your NVIDIA app and drivers are up-to-date. Head into the NVIDIA app and ensure you're on the latest graphics driver. Next, you'll need to be on the beta branch of the NVIDIA app, so hit Settings. Click on the About tab, and right under there, check the box that says Opt in to access Beta or experimental features. Once that's done, close the app (quit from the system tray), and download the developer DLL file for DLSS from the official GitHub (nvngx_dlls.dll).
Now comes the tricky part. Once you've downloaded the developer DLL, rename it "160_E658700.bin". Make sure you have file extension names turned on. Before proceeding, head to Local Disk (C:) > ProgramData > NVIDIA > NGX > models > dlss > versions. Here, in the latest folder (20317442 at the time of writing this), you'll see a folder named Files, which houses another .bin file with the same name you just gave the DLL you downloaded. Back it up somewhere safe, and then, replace it with the DLL file you changed the name of. You're now ready to switch between DLSS preset models using your NVIDIA Overlay (just make sure it's turned on).
NVIDIA App
Setting your Super Resolution override model
This won't work without NVIDIA Overlay
Head back into the app, and select Graphics from the pane on the left side. This window lets you optimize your games according to your hardware on a per-application basis, but you want to go straight to the Global Settings tab. Here, select DLSS Override – Model Presets, and a small window will open that lets the app override your Super Resolution, Frame Generation, and Ray Reconstruction models. Select Super Resolution, and pick Preset K for DLSS 4 or Preset M for DLSS 4.5.
Next, open the NVIDIA Overlay, and click on the Statistics bar at the bottom. In the Statistics View category, select Custom, hit VIEW ALL, and go all the way down to check Super Resolution Model Overdrive (SR Model OVR). When you hit Alt+R, you should see SR Model OVR on the top right of your screen, which will say Inactive until you run a game.
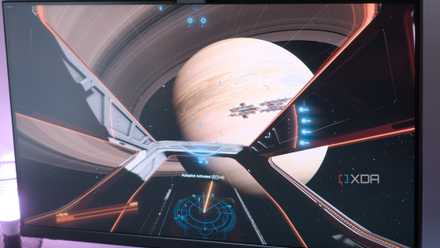
Head into whichever game you want to test the DLSS 4.5 presets on — I picked Black Myth: Wukong — and load into the game. With DLSS on, the NVIDIA Overlay will tell you what DLSS Override you're running. Then, it's all a matter of hitting Alt+Shift+] to toggle between the different presets of DLSS to check which one you like best. The app will cycle through different DLSS model presets as you hit the hotkey combination, and the statistics bar will tell you which one is on your screen.
4 reasons why Nvidia's DLSS is ruining PC gaming
DLSS works like magic, but it's actually making your games worse
There's another method to do this
Nothing in the world there isn't software for
If the first method doesn't work for you, don't worry. You can still see what the difference between Presets L and M on the new DLSS 4.5 upscaling is. In fact, you can select DLSS Presets all the way from Preset A to Preset M using this method, all while your game of choice continues to run.
OptiScaler is a free tool you can download, and it lets you switch upscalers in your games, even if your GPU doesn't have official support for them. In fact, this is almost a non-negotiable tool for gamers with older AMD GPUs, since it allows them to use DLSS and even newer versions of FSR in their games.
It's basically a clever intermediary that lets you force modern upscalers like DLSS, FSR, and XeSS into games that don't officially support them. It's a tweak-heavy, community-driven tool, and it can do some serious wonders for you when it comes to cleaning up performance and image quality. Of course, you have to be open to a little trial and error and some tinkering, and since it modifies game files, you shouldn't be using it for online multiplayer games.
AMD open-sourcing FSR 4 might be the best thing to happen to the GPU market
Dear AMD, please do it.
Using OptiScaler to switch between DLSS models on the fly
As easy as 1-2-3
Download OptiScaler from the official Github page. Don't extract the zipped file just yet — select the game you want to use it in, and head over to its installed location. Depending on what launcher you've downloaded the game from, head into its installation folder, and get to the root folder of the game's EXE file. This isn't the first folder with the .exe file you see. Instead, the folder you need will almost always be in the game's Binaries or bin paths.
Here, extract the OptiScaler files you just downloaded, replace whichever files it asks you to replace, and then run setup_windows.bat. In the new window that opens up, select [1] when it asks you to choose a filename, and then go through the next prompts according to what GPU you're using.
With that out of the way, run the game through your launcher the normal way, and once you're in game, just hit the Insert key. The OptiScaler menu should pop up, where you'll see an option saying Render Presets Overdrive under DLSS Settings. If OptiScaler asks you to restart the app after turning it on, go ahead and do that.
Once that's out of the way, get back into the game, bring up OptiScaler, and you'll then be able to see which DLSS Preset you're currently using. Choose the one you want from the dropdown menu, hit Apply Changes, and you'll see the changes occurring in real time. Whether you choose DLSS Performance, Balanced, or Quality from the in-game settings, you'll be able to compare DLSS 4's Presets J and K against DLSS 4.5's Presets L and M in real time.
To remove OptiScaler from your game files, go to where you unzipped it, and just hit Remove OptiScaler.bat. You can also reset your NVIDIA app by replacing the downloaded DLL file (that you renamed into a .bin file) with the one you backed up. Either that or just reinstall your latest NVIDIA driver in the app.
3 reasons gamers prefer upscaling over frame generation
Gamers don't consider frame generation all that hot, but happily use upscaling to boost frames
It's good to be able to switch DLSS models to gauge the difference better
DLSS 4.5 is absolutely a meaningful leap forward, but right now, it's also a very "know your hardware" upgrade. If you're on an RTX 40 or 50 series card (and maybe even a beefy RTX 30 series GPU), you're basically in the sweet spot. The image quality improvements feel tangible, and the performance hit isn't a dealbreaker nine times out of ten.
However, if you're rocking older RTX hardware, it's still awesome that NVIDIA is even letting you experiment with DLSS 4.5 in the first place. Sadly, it's not quite the free upgrade that it is for everyone else. VRAM usage and power draw is heavier on older RTX cards, and depending on the game, your overall performance might actually take a hit instead of improving. That's why the smartest move is to test it properly before committing.
The best way to do that, of course, is to switch DLSS versions on the fly, comparing presets in real time with OptiScaler, and stick with whatever actually feels best.