 |
VOOZH | about |
|
VOOZH | about |
Deep Learning is a very rampant field right now – with so many applications coming out day by day. And the best way to get deeper into Deep Learning is to get hands-on with it. Take up as much projects as you can, and try to do them on your own. This would help you grasp the topics in more depth and assist you in becoming a better Deep Learning practitioner.
In this article, we will take a look at an interesting multi modal topic where we will combine both image and text processing to build a useful Deep Learning application, aka Image Captioning. Image Captioning refers to the process of generating textual description from an image – based on the objects and actions in the image. For example:
This process has many potential applications in real life. A noteworthy one would be to save the captions of an image so that it can be retrieved easily at a later stage just on the basis of this description.
Let’s get on with it!
Note: This article assumes that you know the basics of Deep Learning and have previously worked on image processing problems using CNN. If you want to brush up on the concepts, you can go through these articles first:
Suppose you see this picture –
What is the first thing that comes to you mind? (PS: Let me know in the comments below!).
Here are a few sentences that people could come up with :
A man and a girl sit on the ground and eat .
A man and a little girl are sitting on a sidewalk near a blue bag eating .
A man wearing a black shirt and a little girl wearing an orange dress share a treat .
A quick glance is sufficient for you to understand and describe what is happening in the picture. Automatically generating this textual description from an artificial system is the task of image captioning.
The task is straightforward – the generated output is expected to describe in a single sentence what is shown in the image – the objects present, their properties, the actions being performed and the interaction between the objects, etc. But to replicate this behaviour in an artificial system is a huge task, as with any other image processing problem and hence the use of complex and advanced techniques such as Deep Learning to solve the task.
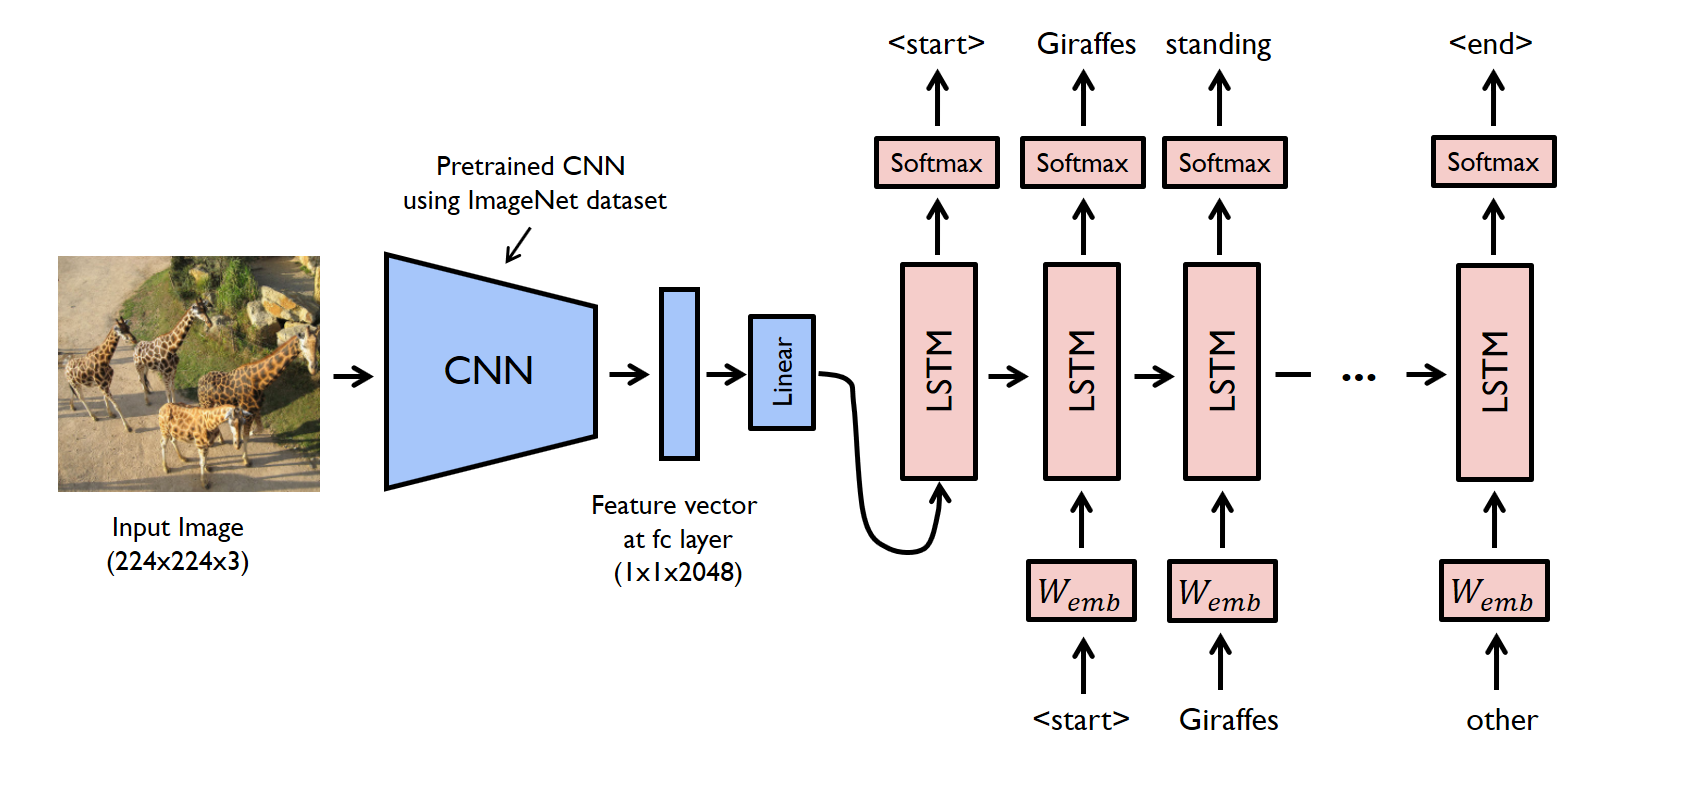
The task of image captioning can be divided into two modules logically – one is an image based model – which extracts the features and nuances out of our image, and the other is a language based model – which translates the features and objects given by our image based model to a natural sentence.
For our image based model (viz encoder) – we usually rely on a Convolutional Neural Network model. And for our language based model (viz decoder) – we rely on a Recurrent Neural Network. The image below summarizes the approach given above.
Usually, a pretrained CNN extracts the features from our input image. The feature vector is linearly transformed to have the same dimension as the input dimension of the RNN/LSTM network. This network is trained as a language model on our feature vector.
For training our LSTM model, we predefine our label and target text. For example, if the caption is “A man and a girl sit on the ground and eat.”, our label and target would be as follows –
Label – [ <start>, A, man, and, a, girl, sit, on, the, ground, and, eat, . ]
Target – [ A, man, and, a, girl, sit, on, the, ground, and, eat, ., <end> ]
This is done so that our model understands the start and end of our labelled sequence.
Let’s look at a simple implementation of image captioning in Pytorch. We will take an image as input, and predict its description using a Deep Learning model.
The code for this example can be found on GitHub. The original author of this code is Yunjey Choi. Hats off to his excellent examples in Pytorch!
In this walkthrough, a pre-trained resnet-152 model is used as an encoder, and the decoder is an LSTM network.
To run the code given in this example, you have to install the pre-requisites. Make sure you have a working python environment, preferably with anaconda installed. Then run the following commands to install the rest of the required libraries.
git clone https://github.com/pdollar/coco.git

cd coco/PythonAPI/
make
python setup.py build
python setup.py install

cd ../../

git clone https://github.com/yunjey/pytorch-tutorial.git
cd pytorch-tutorial/tutorials/03-advanced/image_captioning/

pip install -r requirements.txt
After you have setup your system, you should download the dataset required to train the model. Here we will be using the MS-COCO dataset. To download the dataset automatically, you can run the following commands:
chmod +x download.sh
./download.sh
Now you can go on and start your model building process. First – you have to process the input:
# Search for all the possible words in the dataset and
# build a vocabulary list
python build_vocab.py

# resize all the images to bring them to shape 224x224
python resize.py
Now you can start training your model by running the below command:
python train.py --num_epochs 10 --learning_rate 0.01
Just to peek under the hood and check out how we defined our model, you can refer to the code written in the model.py file.
import torch
import torch.nn as nn
import torchvision.models as models
from torch.nn.utils.rnn import pack_padded_sequence
from torch.autograd import Variable

class EncoderCNN(nn.Module):
 def __init__(self, embed_size):
 """Load the pretrained ResNet-152 and replace top fc layer."""
 super(EncoderCNN, self).__init__()
 resnet = models.resnet152(pretrained=True)
 modules = list(resnet.children())[:-1] # delete the last fc layer.
 self.resnet = nn.Sequential(*modules)
 self.linear = nn.Linear(resnet.fc.in_features, embed_size)
 self.bn = nn.BatchNorm1d(embed_size, momentum=0.01)
 self.init_weights()

 def init_weights(self):
 """Initialize the weights."""
 self.linear.weight.data.normal_(0.0, 0.02)
 self.linear.bias.data.fill_(0)

 def forward(self, images):
 """Extract the image feature vectors."""
 features = self.resnet(images)
 features = Variable(features.data)
 features = features.view(features.size(0), -1)
 features = self.bn(self.linear(features))
 return features


class DecoderRNN(nn.Module):
 def __init__(self, embed_size, hidden_size, vocab_size, num_layers):
 """Set the hyper-parameters and build the layers."""
 super(DecoderRNN, self).__init__()
 self.embed = nn.Embedding(vocab_size, embed_size)
 self.lstm = nn.LSTM(embed_size, hidden_size, num_layers, batch_first=True)
 self.linear = nn.Linear(hidden_size, vocab_size)
 self.init_weights()

 def init_weights(self):
 """Initialize weights."""
 self.embed.weight.data.uniform_(-0.1, 0.1)
 self.linear.weight.data.uniform_(-0.1, 0.1)
 self.linear.bias.data.fill_(0)

 def forward(self, features, captions, lengths):
 """Decode image feature vectors and generates captions."""
 embeddings = self.embed(captions)
 embeddings = torch.cat((features.unsqueeze(1), embeddings), 1)
 packed = pack_padded_sequence(embeddings, lengths, batch_first=True)
 hiddens, _ = self.lstm(packed)
 outputs = self.linear(hiddens[0])
 return outputs

 def sample(self, features, states=None):
 """Samples captions for given image features (Greedy search)."""
 sampled_ids = []
 inputs = features.unsqueeze(1)
 for i in range(20): # maximum sampling length
 hiddens, states = self.lstm(inputs, states) # (batch_size, 1, hidden_size),
 outputs = self.linear(hiddens.squeeze(1)) # (batch_size, vocab_size)
 predicted = outputs.max(1)[1]
 sampled_ids.append(predicted)
 inputs = self.embed(predicted)
 inputs = inputs.unsqueeze(1) # (batch_size, 1, embed_size)
 sampled_ids = torch.cat(sampled_ids, 1) # (batch_size, 20)
 return sampled_ids.squeeze()
Now we can test our model using:
python sample.py --image='png/example.png'
For our example image, our model gives us this output:
<start> a group of giraffes standing in a grassy area . <end>
And that’s how you build a Deep Learning model for image captioning!
The model which we saw above was just the tip of the iceberg. There has been a lot of research done on this topic. Currently, the state-of-the-art model in image captioning is Microsoft’s CaptionBot. You can look at a demo of the system on their official website (link : www.captionbot.ai).
I will list down a few ideas which you can use to build a better image captioning model.
In this article, I have covered Image Captioning, a multimodal task which constitutes deciphering the image and describing it in natural sentences. I have then explained the methodology to solve the task and given a walk-through of it’s implementation. For the curious, I have also included a list of the methods you can use to improve the model performance.
I hope this article motivates you to discover more such tasks that can be solved using Deep Learning, so that more and more breakthroughs and innovations happen in the industry. If you have any suggestions/feedback, let me know in the comments below!
Faizan is a Data Science enthusiast and a Deep learning rookie. A recent Comp. Sc. undergrad, he aims to utilize his skills to push the boundaries of AI research.
GPT-4 vs. Llama 3.1 – Which Model is Better?
Llama-3.1-Storm-8B: The 8B LLM Powerhouse Surpa...
A Comprehensive Guide to Building Agentic RAG S...
Top 10 Machine Learning Algorithms in 2026
45 Questions to Test a Data Scientist on Basics...
90+ Python Interview Questions and Answers (202...
8 Easy Ways to Access ChatGPT for Free
Prompt Engineering: Definition, Examples, Tips ...
What is LangChain?
What is Retrieval-Augmented Generation (RAG)?
very nice article. Thanks for sharing.
Hey! I am using ubuntu with a limited space os. Can you tell me how much space does this dataset occupies my memory?
Hi, The dataset occupies 25Gb of space. You can use cloud services to resolve the issue.
Edit
Resend OTP
Resend OTP in 45s