 |
VOOZH | about |
|
VOOZH | about |
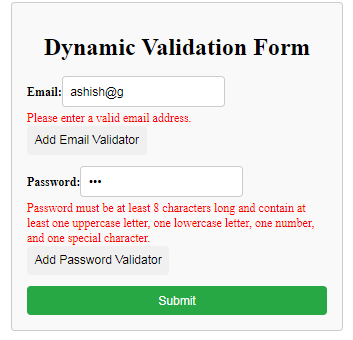
Adding a validator to a form typically refers to the process of defining rules or conditions that suggest whether the data entered into the form fields is valid or not. Initially, the form can be submitted without any validation. However, after adding a validation rule, submission is only allowed if the input meets the specified criteria.
👁 Screenshot-2024-03-29-231959
Step 1: Set Up Angular Project
Install Angular CLI: If you haven't already, install the Angular CLI globally by running the following command:
npm install -g @angular/cliStep 2: Create Angular Project: Create a new Angular project using Angular CLI:
ng new dynamic-validation-form-angularNavigate to Project Directory: Enter the project directory:
cd dynamic-validation-form-angularGenerate Component: Generate a new component for the dynamic validation form:
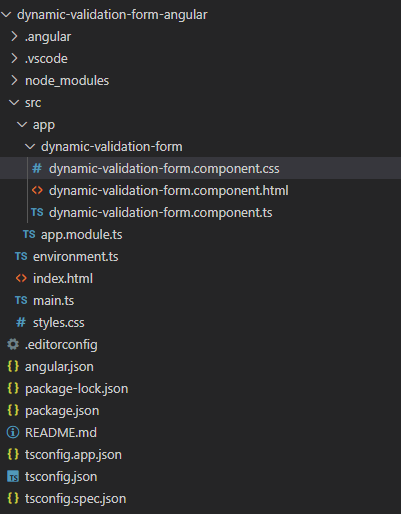
ng generate component dynamic-validation-formProject Structure:
👁 Screenshot-2024-04-04-150430
Dependencies:
"dependencies": {
 "@angular/animations": "^17.3.0",
 "@angular/common": "^17.3.0",
 "@angular/compiler": "^17.3.0",
 "@angular/core": "^17.3.0",
 "@angular/forms": "^17.3.0",
 "@angular/platform-browser": "^17.3.0",
 "@angular/platform-browser-dynamic": "^17.3.0",
 "@angular/router": "^17.3.0",
 "rxjs": "~7.8.0",
 "tslib": "^2.3.0",
 "zone.js": "~0.14.3"
 }
Changing file structure:
ng serve