 |
VOOZH | about |
|
VOOZH | about |
A Pod represents a single instance of a running process in your cluster and can contain one or more containers. Think of a Pod as a lightweight, application-specific "logical host". All containers within a single Pod are guaranteed to be co-located on the same worker node, and they share the same environment. This shared context is the magic of the Pod abstraction and includes:
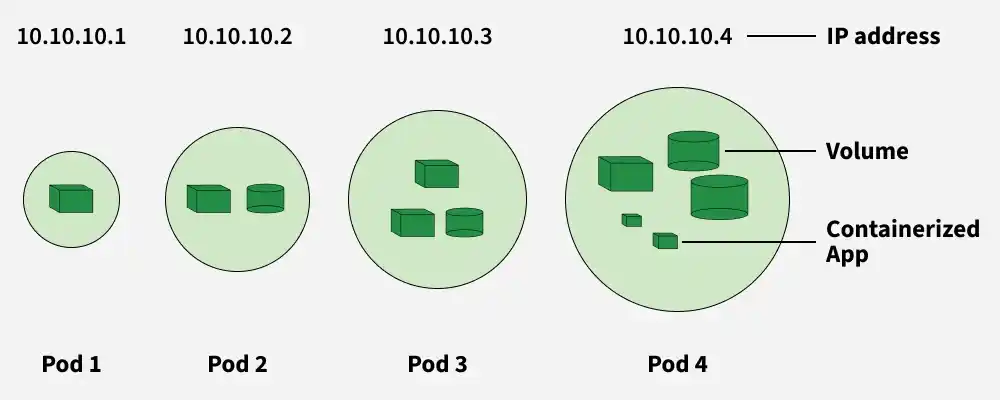
In the following diagram, you can see cube-like structures; they are called containers Each of the containers will have one container. The cylinder-like structure is called volume, where the data of the containers will be stored and the circles are called pods.
A Pod can contain one or more containers, and all containers inside a Pod share:
Pods allow easy movement of containers within a cluster. They are created and managed by controllers, which handle:
If a node fails in the cluster, the controller detects the unresponsive Pod and replicates it on another node to continue the same function.
The three commonly used controllers are:
A Pod follows a defined lifecycle and exists in one of several high-level phases.
The operating system (OS) running inside pods is typically determined by the container image used to create the pod's containers. Pods in Kubernetes can run containers based on various Linux distributions, such as Ubuntu, Alpine Linux, or CentOS, among others.
The pod will not be rescheduled to a different node when it expires because it is ephemeral (lasting only a very brief time). , we shouldn't directly construct or use pods; instead, we should deploy pod-like deployment, replica sets, and daemon sets to maintain the pod with the aid of Kubernetes services. We have to deploy the pods with the help of objects. The main objects are
1. Create a Pod Imperatively
For a quick test, you can create a simple Nginx Pod with a single command. This is a great way to verify that your cluster is working.
kubectl run nginx --image=nginxThis command instructs Kubernetes to create a Pod named nginx using the official nginx container image.
2. Generate a Declarative Manifest
Writing YAML from scratch can be tedious. A powerful technique is to use an imperative command to generate the YAML for you. The --dry-run=client -o yaml flags tell kubectl to output the YAML representation of the object without actually creating it in the cluster.
kubectl run nginx --image=nginx --dry-run=client -o yaml > pod.yamlNow, open the pod.yaml file. It will look something like this:
apiVersion: v1
kind: Pod
metadata:
 creationTimestamp: null
 labels:
 run: nginx
 name: nginx
spec:
 containers:
 - image: nginx
 name: nginx
 resources: {}
 dnsPolicy: ClusterFirst
 restartPolicy: Always
status: {}
Let's break down the key fields:
v1 is the core API group.Pod.name and labels.containers to run, their images, ports, and more. 3. Create a Pod Declaratively
First, let's clean up the Pod we created imperatively.
kubectl delete pod nginxNow, apply the configuration from the manifest file you just created. The kubectl apply command is the cornerstone of the declarative approach. It tells Kubernetes to make the cluster's live state match the state defined in the file.
kubectl apply -f pod.yamlKubernetes will read the file and create the Pod. If you were to change the file and run kubectl apply again, Kubernetes would intelligently update the existing Pod to match your new desired state.
Once a Pod is running, you'll need a set of commands to check its status, view its logs, and debug any issues.
kubectl get pods
# NAME READY STATUS RESTARTS AGE
# nginx 1/1 Running 0 60s
kubectl describe pod nginxkubectl logs nginx-it flags connect your terminal to the container's standard input and output. Once inside, you have a shell where you can run commands like ls, cat, or ps to inspect the container's environment from within.kubectl exec -it nginx -- bashContainers in a Pod are so tightly coupled, you can use them to create powerful, cohesive application units. Two common patterns are Init Containers and Sidecar Containers.
An Init Container is a specialized container that runs and completes before the main application containers are started. They are defined in a separate initContainers block in the Pod manifest. You can have multiple Init Containers, and they will run sequentially. Each one must exit successfully before the next one is started.
Use cases for Init Containers:
A Sidecar container runs alongside your main application container within the same Pod. Unlike an Init Container, it starts with and continues to run for the full life of the application container. This pattern allows you to extend or enhance the functionality of the main container without adding complexity to the application's own codebase.
Use cases for Sidecar Containers:
cbr0). Each Pod has a unique private IP, allowing them to send packets directly to one another without NAT.In Kubernetes, updating and swapping out pods is like applying an additional application of create to your application.
Static Pods in Kubernetes
Static pods are managed directly by the kubelet on a specific node rather than through the API server. You define them using a pod manifest file placed in a folder like /etc/kubernetes/manifests, and the kubelet automatically starts the pod. They are node-specific, cannot be managed by Deployments or ReplicaSets, and are often used for critical system components like kube-apiserver or monitoring agents.
Create Pod: A pod can be created by using the create command format.
kubectl create -f [FILENAME]In the [FILENAME], you need to insert the required filename with which you want to create your file, and then a new pod with the name GeeksforGeeks will be created.
👁 kubectl createTo Delete Kubernetes Pod: Delete the pod using the below command.,
kubectl delete -f FILENAME Here the pod named GeeksforGeeks will be deleted
👁 Kubectl delete podTo Get Kubernetes Pod: To see the number of pods available in the particular namespace can be seen using the below command.
Kubectl get pod <name> --namespace