 |
VOOZH | about |
|
VOOZH | about |
HashiCorp Vault is an invaluable resource for safeguarding confidential data and managing secrets in dynamic systems like Kubernetes. Applications can safely access secrets while preserving encryption and access control by integrating Vault with Kubernetes. You will learn how to set up authentication, install Helm for HashiCorp Vault in Kubernetes, and safely store and retrieve secrets from this article.
Let's establish a few crucial terms related to HashiCorp Vault and Kubernetes before getting started with the setup:
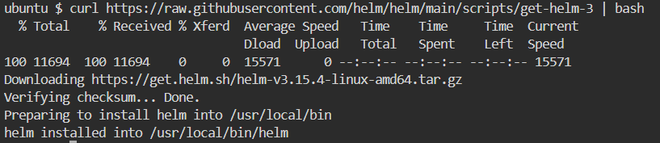
Helm is a key component that simplifies the deployment of HashiCorp Vault in Kubernetes. Begin by installing Helm on your local machine.
curl https://raw.githubusercontent.com/helm/helm/main/scripts/get-helm-3 | bashhelm versionNext, you need to add the official HashiCorp Helm repository to your local Helm installation.
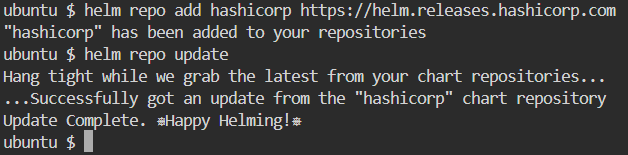
helm repo add hashicorp https://helm.releases.hashicorp.com/helm repo updateOnce Helm is set up, you can deploy HashiCorp Vault in your Kubernetes cluster using the Helm chart.
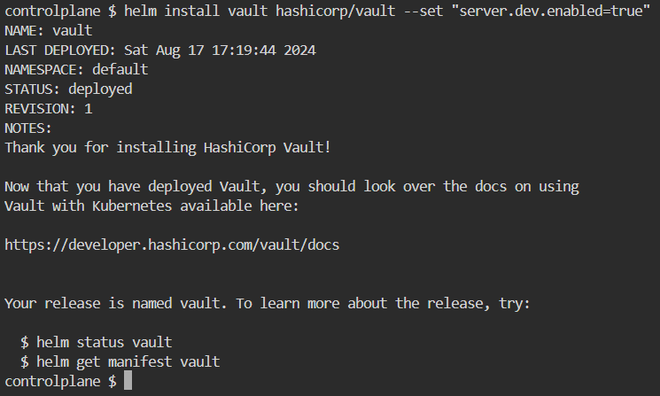
helm install vault hashicorp/vault --set "server.dev.enabled=true"This command deploys a development instance of Vault. For production environments, configure a high-availability setup by changing the ` values.yaml ` file accordingly.
After the Vault deployment, you need to initialize and unseal Vault. Initialization generates master keys and a root token, which will be needed to manage the Vault.
kubectl exec -it vault-0 -- vault operator initThis command outputs unseal keys and a root token. To unseal Vault, use the following command three times, providing different unseal keys each time:
kubectl exec -it vault-0 -- vault operator unseal <unseal-key>Vault can authenticate applications using Kubernetes service accounts. First, enable the Kubernetes authentication method in Vault:
kubectl exec -it vault-0 -- vault auth enable kubernetesThen, configure Vault to trust your Kubernetes cluster by setting up a role for your service account:
kubectl
 bound_service_account_namespaces=default \
 policies=default \
 ttl=24h
With Vault and Kubernetes integrated, you can now store secrets in Vault and retrieve them from your Kubernetes pods. First, store a secret in Vault:
kubectl exec -it vault-0 -- vault kv put secret/myapp/config username="user" password="password"To retrieve the stored secret, use:
kubectl exec -it vault-0 -- vault kv get secret/myapp/configYou can also configure your Kubernetes pods to automatically inject these secrets into your applications.
This is a real-world illustration of how to insert secrets from Vault into your Kubernetes pods. This example is predicated on the assumption that Vault is set up with Kubernetes authentication.
apiVersion: v1
kind: Pod
metadata:
 name: example-pod
 annotations:
 vault.hashicorp.com/agent-inject: "true"
 vault.hashicorp.com/role: "example"
 vault.hashicorp.com/agent-inject-secret-config: "secret/myapp/config"
spec:
serviceAccountName: example-sa
containers:
- name: example-container
 image: nginx
With this setup, secrets from Vault will be securely injected into your pod.
HashiCorp Vault can be set up in Kubernetes to manage secrets securely and automatically, safeguarding your private information in dynamic cloud-native settings. You can install Vault in your Kubernetes cluster, set up authentication, and integrate it with your apps easily by following the instructions in this article. By automating access restriction, rotating secrets, and offering centralized secret management, Vault improves security.