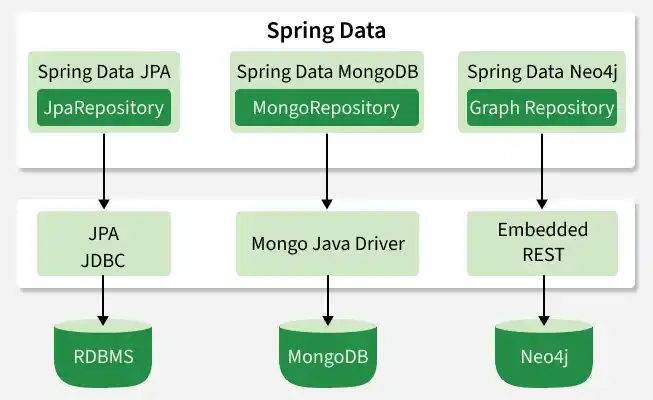
Spring Data JPA simplifies database access in Spring Boot applications by providing an abstraction layer over the Hibernate ORM implementation of the Java Persistence API. It allows developers to interact with relational databases using Java objects instead of writing complex SQL queries.
Converts Java objects into relational database tables using ORM (Object Relational Mapping).
Reduces boilerplate code by providing repository interfaces for common database operations.
Since this is a Maven project, dependencies are managed using pom.xml.
pom.xml:
Step 3: Configure Database Connection
Open application.properties and configure the MySQL database connection.
application.properties:
This configuration connects the Spring Boot application to the MySQL database.
Step 4: Create the Entity Class
Create an Employee class inside the model package with some JPA annotation.
@Entity: This annotation defines that a class can be mapped to a table
@Id: This annotation specifies the primary key of the entity.
@GeneratedValue: This annotation is used to specify the primary key generation strategy to use. i.e. Instructs database to generate a value for this field automatically. If the strategy is not specified by default AUTO will be used.
Employee.java:
Step 5: Create Repository Layer
Create EmployeeRepository.java inside the repository package.
@Repository: The @Repository annotation is a marker for any class that fulfills the role or stereotype of a repository (also known as Data Access Object or DAO).
JpaRepository<Employee, Long>: JpaRepository is a JPA-specific extension of the Repository. It contains the full API of CrudRepository and PagingAndSortingRepository. So it contains API for basic CRUD operations and also API for pagination and sorting. Here we enable database operations for Employees.
Step 6: Create Service Layer
Create a service interface.
@Service is a stereotype annotation in Spring Framework used to mark a class as a service layer component that contains business logic in a Spring Boot application.
EmpService.java
Service Implementation
EmpServiceImpl.java:
Step 7: Create Controller Layer
Create EmpController.java inside the controller package.
@RestController: This is a Spring annotation that is used to build REST API in a declarative way. RestController annotation is applied to a class to mark it as a request handler, and Spring will do the building and provide the RESTful web service at runtime.
@Autowired: This annotation can be used to autowire bean on the setter method just like @Required annotation, constructor, a property, or methods with arbitrary names and/or multiple arguments.
@PostMapping: This annotation maps HTTP POST requests onto specific handler methods. It is a composed annotation that acts as a shortcut for @RequestMapping(method = RequestMethod. POST)
@GetMapping: This annotation is a specialized version of @RequestMapping annotation that acts as a shortcut for @RequestMapping(method = RequestMethod. GET). The @GetMapping annotated methods in the @Controller annotated classes handle the HTTP GET requests matched with the given URI expression.
@DeleteMapping: This annotation maps HTTP DELETE requests onto specific handler methods. It is a composed annotation that acts as a shortcut for @RequestMapping(method = RequestMethod. DELETE)
EmpController.java
Step 8: Build the Maven Project
Run the following command:
mvn clean install
Step 9: Run the Application
Run the Spring Boot application:
mvn spring-boot:run
The application will start on:
http://localhost:8080
Step 10: Test the APIs
We can test the APIs using Postman or a web browser.
