 |
VOOZH | about |
|
VOOZH | about |
We all have seen BottomNavigationBar in so many apps, such as Instagram, Quora. In this article, we will learn how to add bottom navigation in Jetpack Compose. Below is a sample of how it will look.
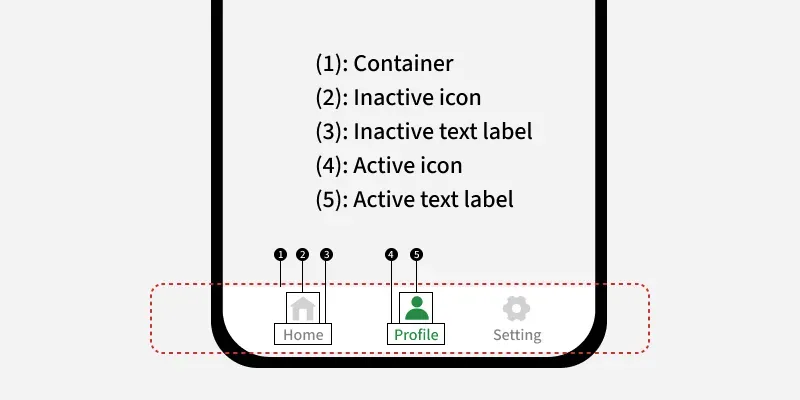
Anatomy diagram for the Bottom Navigation Bar:
👁 Bottom-Navigation-Bar-in-AndroidTo create a new project in the Android Studio, please refer to How to Create a new Project in Android Studio with Jetpack Compose.
Note: Select Kotlin as the programming language.
Open build.gradle.kts (Module: app) and add the following dependency.
implementation("androidx.navigation:navigation-compose:2.8.8")Let's create a data class to hold data related to bottom nav items like label, icon, route. Navigate to app > {package-name} and right click on the folder, then go to New > Package. Create a new package with the name "models". Then right click on models folder and select New > Kotlin Class/File. Set the name as "BottomNavItem", select Data class and the add the following code the file.
BottomNavItem.kt:
Let's create a objectto define data related to separate bottom nav items like label, icon, and route. Navigate to app > {package-name} and right click on the folder, then go to New > Package. Create a new package with the name "utils". Then right click on utils folder and select New > Kotlin Class/File. Set the name as "Constants", select Object and the add the following code the file.
Constants.kt:
Let's create three Composables to store the UI for three screens - Home, Search and Profile. Navigate to app > {package-name} > ui and right click on the folder, then go to New > Package. Create a new package with the name "components". Then right click on components folder and select New > Kotlin Class/File. Set the name as "Screens", select File and the add the following code the file.
Screens.kt:
Navigate to app> kotlin+java> {package-name} > MainActivity.kt. Here, we will be creating two composables with the name NavHostContainer() and BottomNavigationBar() in MainActivity.kt which will contain NavHost and the Composable for navigation and the setup for the Navigation Bar. Add the following code in MainActivity.kt. Comments are added for better understanding.
MainActivity.kt: