
Fail2ban is a free, open-source and widely used intrusion prevention tool that scans log files for IP addresses that show malicious signs such as too many password failures, and much more, and it bans them (updates firewall rules to reject the IP addresses). By default, it ships with filters for various services including sshd.
Read Also: Initial Server Setup with CentOS/RHEL 8
In this article, we will explain how to install and configure fail2ban to protect SSH and improve SSH server security against brute force attacks on CentOS/RHEL 8.
Installing Fail2ban on CentOS/RHEL 8
The fail2ban package is not in the official repositories but it is available in the EPEL repository. After logging into your system, access a command-line interface, then enable the EPEL repository on your system as shown.
# dnf install epel-release
OR
# dnf install https://dl.fedoraproject.org/pub/epel/epel-release-latest-8.noarch.rpm
Afterward, install the Fail2ban package by running the following command.
# dnf install fail2ban
Configuring Fail2ban to Protect SSH
The fail2ban configuration files are located in the /etc/fail2ban/ directory and filters are stored in the /etc/fail2ban/filter.d/ directory (the filter file for sshd is /etc/fail2ban/filter.d/sshd.conf).
The global configuration file for the fail2ban server is /etc/fail2ban/jail.conf, however, it is not recommended to modify this file directly, as it will probably be overwritten or improved in case of a package upgrade in the future.
As an alternative, it is recommended to create and add your configurations in a jail.local file or separate .conf files under the /etc/fail2ban/jail.d/ directory. Note that configuration parameters set in jail.local will override whatever is defined in jail.conf.
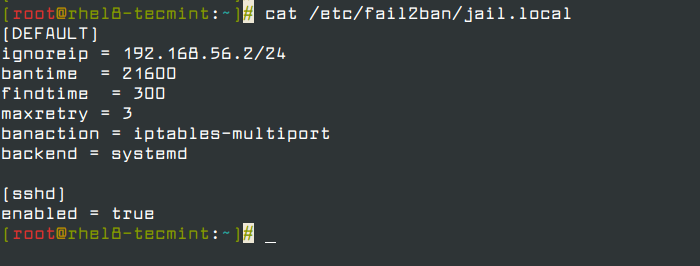
For this article, we will create a separate file called jail.local in the /etc/fail2ban/ directory as shown.
# vi /etc/fail2ban/jail.local
Once the file is open, copy and paste the following configuration in it. The [DEFAULT] the section contains global options and [sshd] contains parameters for the sshd jail.
[DEFAULT]
ignoreip = 192.168.56.2/24
bantime  = 21600
findtime  = 300
maxretry = 3
banaction = iptables-multiport
backend = systemd

[sshd]
enabled = true
Let’s briefly explain the options in the above configuration:
- ignoreip: specifies the list of IP addresses or hostnames not to ban.
- bantime: specified the number of seconds that a host is banned for (i.e effective ban duration).
- maxretry: specifies the number of failures before a host gets banned.
- findtime: fail2ban will ban a host if it has generated “maxretry” during the last “findtime” seconds.
- banaction: banning action.
- backend: specifies the backend used to get log file modification.
The above configuration, therefore, means if an IP has failed 3 times in the last 5 minutes, ban it for 6 hours, and ignore the IP address 192.168.56.2.
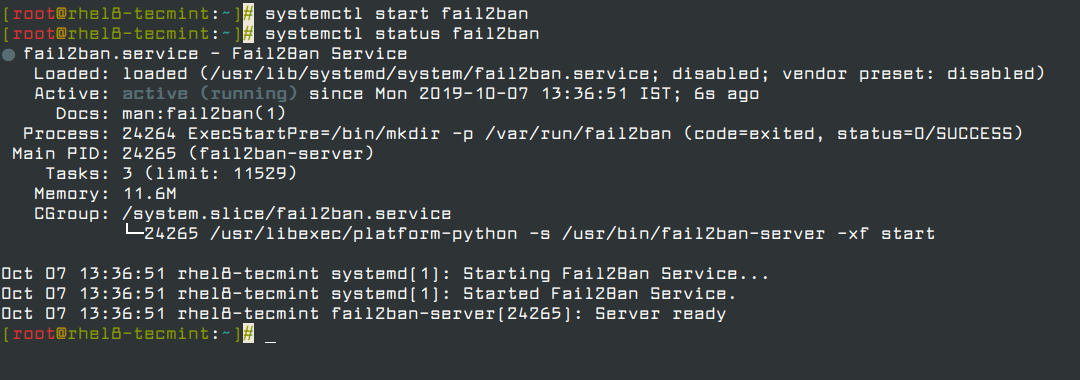
Next, start and enable the fail2ban service for now and check if it is up and running using the following systemctl command.
# systemctl start fail2ban
# systemctl enable fail2ban
# systemctl status fail2ban
Monitoring Failed and Banned IP Address Using fail2ban-client
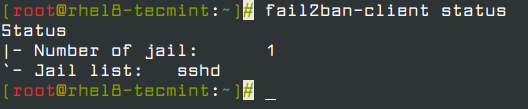
After configuring fail2ban to secure sshd, you can monitor failed and banned IP addresses using the fail2ban-client. To view the current status of the fail2ban server, run the following command.
# fail2ban-client status
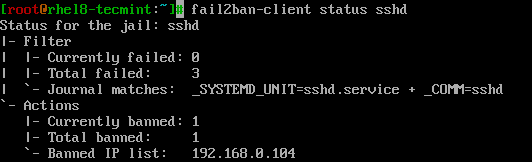
To monitor the sshd jail, run.
# fail2ban-client status sshd
To unban an IP address in fail2ban (in all jails and database), run the following command.
# fail2ban-client unban 192.168.56.1
For more information on fail2ban, read the following man pages.
# man jail.conf
# man fail2ban-client
That sums up this guide! If you have any questions or thoughts you want to share about this topic, do not hesitate to reach us via the feedback form below.
If this article helped you solve a problem, consider buying a coffee. It helps keep TecMint free, supports the authors, and keeps the project going.
Got Something to Say? Join the Discussion... Cancel reply