VOOZH about

URL: https://www.tecmint.com/install-ntp-server-in-centos/

⇱ How to Install Chrony to Synchronize Time in RHEL Systems


Skip to content

NTP (Network Time Protocol) is a protocol that runs over port 123 UDP at the transport layer and allows computers to synchronize time over networks for an accurate system time.

While time passes by, the computer’s internal clocks tend to drift which can lead to inconsistent time issues, especially on servers and client’s logs files or if you want to replicate servers’ resources or databases.

This tutorial will demonstrate how you can install and configure NTP (chrony) server on RHEL-based distribution to automatically synchronize time with the closest geographical peers available for your server location by using the NTP Public Pool Time Servers list.

TecMint Weekly Newsletter
Get the Learn Linux 7 Days Crash Course free when you join 34,000+ Linux professionals reading every Thursday.
Check your email for a magic link to get started.
Something went wrong. Please try again.

How to Install Chrony in Linux

Chrony is an implementation of the Network Time Protocol (NTP), which is used to synchronize the system clocks across a network of computers to a high degree of accuracy.

Chrony is specifically designed to address some limitations and challenges associated with other NTP implementations. It is the default NTP implementation in many Linux distributions, including Red Hat Enterprise Linux (RHEL) 8.

To install Chrony, use the following dnf or yum command.

sudo dnf install chrony
OR
sudo yum install chrony

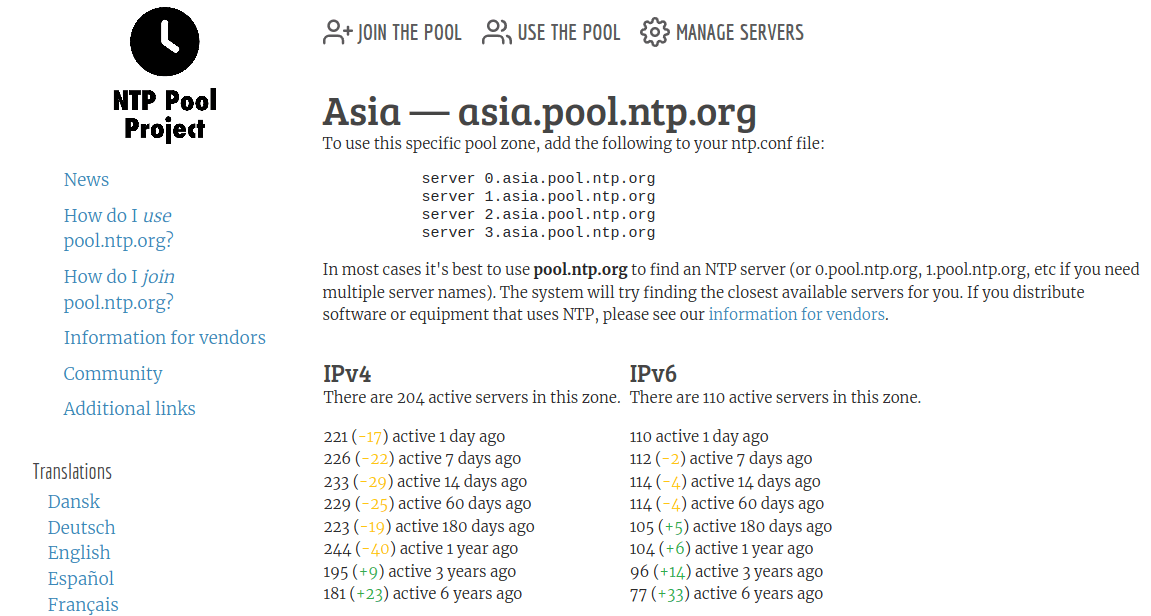
After the server is installed, first go to the official NTP Public Pool Time Servers, choose your Continent area where the server physically is located, then search for your Country location and a list of NTP servers should appear.

👁 NTP Pool Server
NTP Pool Server

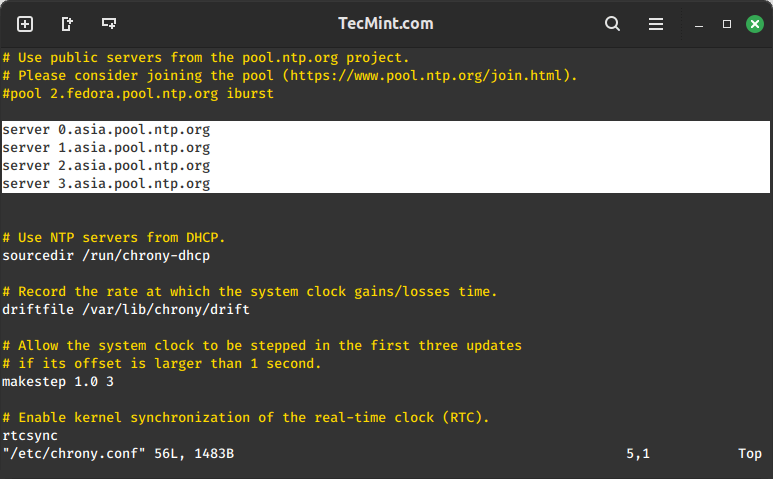
Then open the NTP daemon main configuration file (/etc/chrony.conf) for editing, comment on the default list of Public Servers from the pool.ntp.org project and replace it with the list provided for your country like in the screenshot below.

$ sudo vi /etc/chrony.conf
👁 Add NTP Servers
Add NTP Servers

Further, you need to allow clients from your networks to synchronize time with this server. To accomplish this, add the following line to the NTP configuration file, where restrict statement controls, what network is allowed to query and sync time – replace network IPs accordingly.

restrict 192.168.1.0 netmask 255.255.255.0 nomodify notrap

The nomodify notrap statements suggest that your clients are not allowed to configure the server or be used as peers for time sync.

If you need additional information for troubleshooting in case there are problems with your NTP daemon add a log file statement which will record all NTP server issues into one dedicated log file /var/log/chrony.

Allow Chrony in the Firewall

NTP service uses UDP port 123 on the OSI transport layer (layer 4), which is designed particularly to resist the effects of variable latency (jitter).

If the firewall is enabled, allow Chrony to communicate through it:

sudo firewall-cmd --add-service=ntp --permanent
sudo firewall-cmd --reload

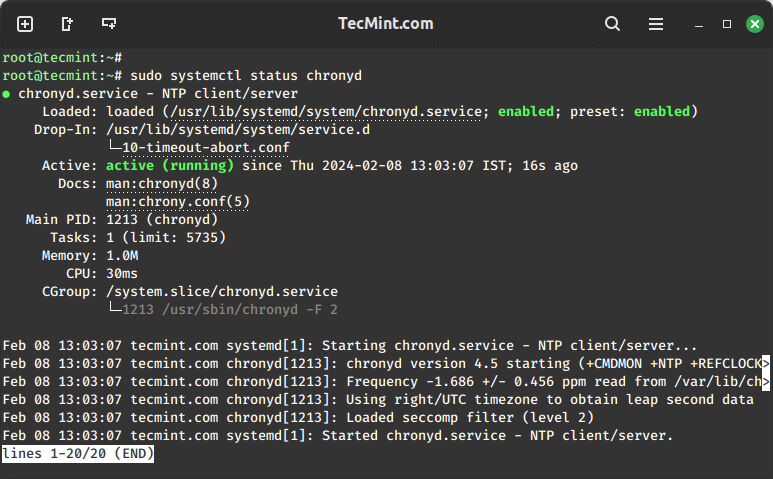
After you have opened firewall port 123, restart the Chrony server and make sure you enable it system-wide.

sudo systemctl restart chronyd
sudo systemctl enable chronyd
sudo systemctl status chronyd
👁 Check Chrony Status
Check Chrony Status

Check Time Synchronization with NTP

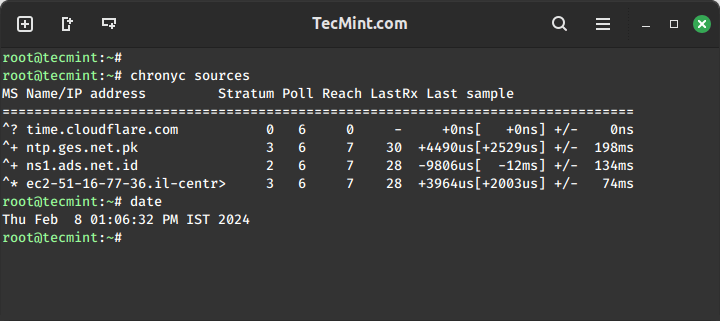
After the NTP daemon has been started, wait a few minutes for the server to synchronize time with its pool list servers, then run the following commands to verify the NTP peers’ synchronization status and your system time.

chronyc sources
👁 Check Chrony Synchronization
Check Chrony Synchronization

That’s all! setting up a local NTP chrony on your network ensures that all your servers and clients have the same time set in case of an Internet connectivity failure and they all are synchronized with each other.

If this article helped, share it with someone on your team.
TecMint Weekly Newsletter
Get the Learn Linux 7 Days Crash Course free when you join 34,000+ Linux professionals reading every Thursday.
Check your email for a magic link to get started.
Something went wrong. Please try again.
TecMint has been free for 14 years. Help keep it that way.
Google AI Overviews and tools like ChatGPT have cut into search traffic for independent tech sites like TecMint. Running this site costs over $2,000 every month for hosting, infrastructure, and paying authors to keep the content accurate and tested.

If this article helped you solve a problem, consider buying a coffee. It helps keep TecMint free, supports the authors, and keeps the project going.
☕ Buy Me a Coffee
Matei Cezar
I'am a computer addicted guy, a fan of open source and linux based system software, have about 4 years experience with Linux distributions desktop, servers and bash scripting.

Each tutorial at TecMint is created by a team of experienced Linux system administrators so that it meets our high-quality standards.

32 Comments

Leave a Reply
  1. Hi,

    I am a bit surprised on the restrict directive. On chrony.conf manual it is not mentioned and on red hat official documentation neither.

    My understanding is that the allow directive is used in chrony.conf file to enable your computer to be a ntp server (https://access.redhat.com/documentation/en-us/red_hat_enterprise_linux/7/html/system_administrators_guide/ch-configuring_ntp_using_the_chrony_suite#sect-Understanding_the_chrony_configuration_commands)

    To me the restrict directive was used in former ntpd server configuration. Maybe it is still valid for legacy purpose?

    Reply
    • @Sed,

      Yes, you are right the “restrict” directive was employed in the previous configuration of the ntpd server. It’s possible that it still holds relevance for legacy purposes in the chrony.conf file.

      Reply
  2. I can’t configure the NTP client on centos 7. I just can´t find a good tutorial.

    Reply
  3. Excellent post on setting up NTP! very simple instructions worked without any errors…

    Reply
  4. Excellent article on setting up NTP on CentOS. Thank you!

    Reply
  5. Step 3: Then open NTP daemon main configuration file.

    Which file?? Why didn’t you mention it

    Reply
    • /etc/ntp.conf is the file to be edited.

      Reply
  6. On my Centos 7 machine the following command has been labeled as erroneous in ntp log file:

    restrict 192.168.1.0 netmask 255.255.255.0 nomodify notrap
    

    I changed it to.

    restrict 192.168.1.0 mask 255.255.255.0 nomodify notrap
    

    and it worked fine.

    Reply
  7. Can you mention in your article that apparently Centos7 comes with Chrony (seems to be default). When both services are enabled, it seems that Chrony stops the NTP daemon. So I had to stop and disable NTPD and use Chrony instead.

    Reply
    • You can remove or disable Chrony service, which is installed by default in latest versions of CentOS 7 and enable NTP service.

      Reply
      • If you than install the “kde-desktop” YUM group, it again makes sure ‘chronyd‘ is install and activated, disabling ‘ntpd‘.

        The packages that are coming down from the ‘script kiddies’ at Fedora aren’t being screened for issues affecting enterprise implementations…

        Reply
  8. how to ntp client password setting ?

    Reply
  9. How to configure NTP daemon to use the system’s local clock as its primary time source ?

    Reply
    • Add this to ntp config file:

      server 127.127.1.0 # local clock
      fudge 127.127.1.0 stratum 10

      Reply
      • I’ve tried that but i got the error as
        ntpdate[28681]: no server suitable for synchronization found

        when i did “ntpdate -dv” it throws an error as “Server dropped: strata too high”. But i see the server doing a transfer & receive from NTP Server.

        I tried changing the stratum value from 0-16 but still the same error.

        I’ve this error only when i set up the NTP Server and Client with immediate IP’s like x.x.x.137 (NTP Server) & x.x.x138 (NTP Client).
        I’ve an another server where the NTP server setup x.x.x.96 which syncs with external IP. With this NTP client x.x.x.138 is able to sync.

        But I want to know what I am missing to set immediate NTP server and client IP’s to configure NTP sync between them?

        Reply
  10. While trying to configure ntp server, i came across this issue. The user/group should be ntp/ntp.
    You need the add the following steps if you come across this error “No association ID’s returned”:
    chown ntp:ntp /etc/ntp.conf
    chmod 0640 /etc/ntp.conf
    systemctl stop ntpd
    systemctl start ntpd
    systemctl status ntpd

    Reply
    • @Labanda,

      Thanks for sharing the tip, hope it will help other users who will face similar error..:)

      Reply
  11. I am configure ntp server on centos 7 and i want to sync it on windows 10 but when i update it can’t syn from ntp server. it show message : An error occurred while windows was synchronising with x.x.x.x.

    Reply
    • You have the same issue with other nodes trying to sync time with centos ntp server? verify if ntp port is open on server (123 tcp and udp).

      Reply
  12. I have configured ntp server on centos 6.7 and entered public ntp server address ” in.pool.ntp.org”. when i run command “ntpq -np” or “ntpstat” then its showing its syncing the time from public ntp server but in actual its not syncing the time automatically. when i set wrong time in my ntp server and wait for some time then it doesn’t correct my system time, Now if i run “ntpq -np, it says it is syncing time from local clock. In this condition i have to restart ntp service, then again it shows time syncing from public ntp server and correct the time also. But its not done automatically.
    We are using clients on windows os here. i have done the necessary settings in internet time tab (Given our ntp server ip) and in registery also but those are also not syncing automatically but if i click on update now button then it corrects the time.

    Please suggest on this.

    Reply
    • Add a cronjob to sync time, for instance every hour, using the ntpdate command: sudo ntpdate -s in.pool.ntp.org.

      Reply
  13. One slight correction:

    In step 8, the line
    # sytemctl status ntp
    should read:
    # sytemctl status ntpd

    Reply
    • @Penguin,
      Thanks for correction…corrected

      Reply
      • sytemctl ntpd -> systemctl ntpd ?

        S is missing ?

        Reply
        • @Prasath,
          Thanks for pointing out typo..corrected in the article…

          Reply
  14. Good -ish! In section 3 you say “open NTP daemon main configuration file” but give no clue as to where it is!

    Reply
    • # vim /etc/ntp.conf

      Reply
  15. Excellent manual, thank you!

    One subtle note – you have misspelled in p. 7 (incorrect typographic dash). It should be:
    firewall-cmd –add-service=ntp –permanent

    Reply
    • @Denis,
      Thanks for pointing out, corrected in the article..

      Reply
  16. how to bypass it through squid proxy

    Reply
  17. Do you find that ntpdate -q is much slower under RHEL 7 versus RHEL 6?

    This is what we found running ntpdate. It takes almost 7 seconds to get results back. In RHEL 6, it is quicker.

    $ time ntpdate -q 0.ro.pool.ntp.org
    server 194.102.255.19, stratum 2, offset -0.004015, delay 0.23289
    server 89.36.93.9, stratum 2, offset 0.009549, delay 0.20610
    server 85.204.240.2, stratum 2, offset -0.004843, delay 0.21089
    server 91.216.151.202, stratum 2, offset -0.009425, delay 0.21852
    29 Oct 11:22:26 ntpdate[22202]: adjust time server 85.204.240.2 offset -0.004843 sec

    real 0m6.913s
    user 0m0.002s
    sys 0m0.006s

    Reply

Got Something to Say? Join the Discussion... Cancel reply

Free Course
Get a free Linux course before you go.
Subscribe to TecMint Weekly and get the Learn Linux 7 Days Crash Course free. Read by 34,000+ Linux professionals every Thursday.
Check your email for a magic link to get started.