Diffusion models like DALL-E 2 and Stable Diffusion use U-Net CNNs as their backbone. U-Nets are good at capturing local pixel details but struggle with understanding the overall structure and relationships in an image.
A Diffusion Transformer is an AI model that combines transformers with a step by step process called diffusion to gradually create or improve data. Diffusion Transformers (DiTs) replace U-Nets with transformers that work on latent image patches. This allows them to capture global context, generate high quality images efficiently and support conditional generation from text, labels or other inputs.
Need for Diffusion Transformers
U-Nets cannot capture global image relationships effectively.
Transformers can model long range dependencies across the image.
High resolution and efficient image generation is needed.
Conditional generation from text or labels is required.
Core Concepts in Image Generation Models
Convolutional U-Net Architecture: U-Nets use an encoder–decoder design with skip connections to capture both local details and global structure, making them effective for image generation tasks.
Vision Transformers (ViT): ViTs split images into patches and process them with self-attention, allowing the model to learn long-range relationships efficiently.
Classifier-Free Guidance (CFG): CFG strengthens conditioning signals (like text or labels) during sampling to make generated images more aligned with the given prompt.
Latent Diffusion Models (LDMs): Generate images by performing diffusion and denoising in a compressed latent space, making the process faster and more efficient than operating on full-resolution images.
Workflow of DiTs
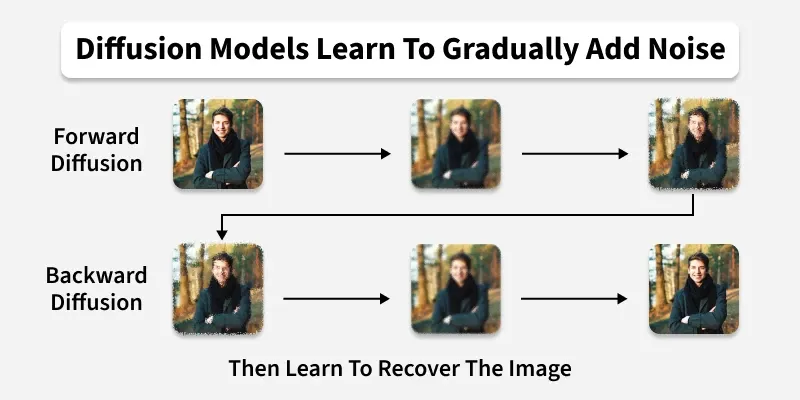
Diffusion Transformers generate images or videos by adding noise to data and training a model to remove that noise. The overall workflow includes preprocessing data, adding noise, training the model and finally generating new outputs.
Data Preprocessing: The input image or video is split into fixed size patches and each patch is converted into a feature vector that the transformer can process.
Noise Introduction: Noise is gradually added to these feature vectors to create a diffusion process turning clean data into increasingly noisy versions.
Model Training: The Diffusion Transformer is trained to reverse this noise process, learning how to recover clean data from noisy inputs.
Image or Video Generation: After training, the model takes random noise (or noisy data) and denoises it step by step to produce new images or videos using what it learned.
Understanding the DiT Architecture
Diffusion Transformers follow the Latent Diffusion Model (LDM) framework but replace the traditional U-Net with a Vision Transformer (ViT). This transformer-based design helps DiTs model long range relationships scale efficiently and generate high quality images and videos.
The Diffusion Transformer (DiT) architecture can be explained through two closely connected aspects:
latent diffusion workflow which describes how noisy data is processed and denoised
transformer-based building blocks, which define how the model performs this processing.
DiT Diffusion Workflow
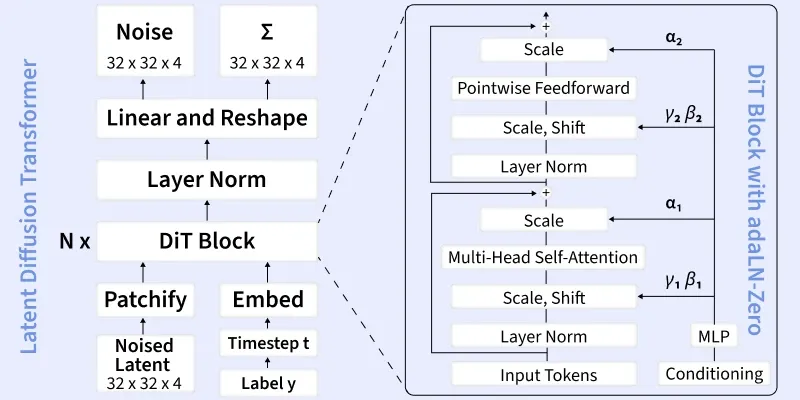
Input and Conditioning: DiT operates in latent space where a noised latent tensor (e.g. 32 × 32 × 4) is taken as input. Conditioning information such as timestep embeddings and class labels is embedded and used to guide generation so the output aligns with the desired condition.
Patchify and Tokenization: The noisy latent is split into fixed-size patches using a Patchify operation. Each patch is converted into a token forming a sequence that can be processed by transformer layers.
Forward Diffusion (Noise Addition): During training noise is progressively added to the latent representation following a predefined noise schedule producing increasingly noisy latents at each timestep.
Reverse Diffusion (Denoising): At inference DiT predicts the noise at each step and gradually removes it transforming noisy latent tokens back into a clean latent representation that can be decoded into an image.
Transformer Based Architecture of DiT
1. Token-Based Spatial Modeling: Instead of convolutions DiT treats image patches as tokens and processes them using transformer operations enabling global context modeling across the entire image.
2. Positional Encoding: Positional embeddings are added to the patch tokens so the transformer can preserve spatial relationships between patches.
3. DiT Block with adaLN-Zero: Each DiT block replaces U Net convolutional blocks with transformer components and consists of:
Layer Normalization
Multi-Head Self-Attention to model long-range dependencies across patches
Pointwise Feedforward (MLP) for token wise feature transformation
Adaptive LayerNorm (adaLN-Zero) where timestep and label embeddings generate scale and shift parameters () that modulate both attention and MLP layers
Residual Connections scaled by learnable parameters () ensuring stable training and efficient information flow
This adaLN-Zero design allows conditioning to directly control the behavior of each transformer block.
4. Conditioning Mechanisms: DiTs incorporate conditioning through adaLN for in context embedding, cross attention to mix image and conditioning tokens and optional extra conditioning tokens that enhance semantic alignment and performance in larger models.
5. Output Projection: After multiple DiT blocks, the tokens are normalized, reshaped back into spatial form and passed through a linear layer to predict the noise residual used for denoising.
Step by Step Implementation of DiT for Image Generation
Here we load a pretrained Diffusion Transformer (DiT) model, generates image latents using diffusion sampling with classifier-free guidance, decodes them using a VAE and generated images.
Step 1: Clone Repository & Set Working Directory
Enter the repo so scripts and imports work correctly.
Update PYTHONPATH to make the DiT package importable.
Step 2: Install Required Python Dependencies
Install diffusers and timm libraries required for model, VAE and image utilities.
Step 3: Import Modules & Disable Gradients
Import PyTorch, helper utilities, DiT components and VAE loader.
Disable gradients to enable faster inference.
Step 4: Configure Model Settings & Initialize DiT
Define image size, VAE name and latent size.
Create the DiT model and move it to device.
Step 5: Load Pretrained DiT Checkpoint and VAE
Load official DiT weights for the chosen resolution.
Load Stable Diffusion VAE for decoding latent outputs.
Step 6: Set Sampling Parameters & Class Labels
Fix randomness seed.
Set sampling steps, CFG scale and class labels for conditional generation.
Step 7: Create the Diffusion Sampler
Build diffusion scheduler for the required number of steps.
Step 8: Prepare Latent Noise and Labels for CFG Sampling
Create latent noise for sampling.
Duplicate latents for classifier free guidance.
Prepare label tensors and pack into model_kwargs.
Step 9: Run Diffusion Sampling
Iteratively denoise latents into images.
Apply classifier-free guidance.
Extract the conditioned outputs.
Step 10: Decode Latents
Convert DiT latent outputs to real images using the VAE decoder.
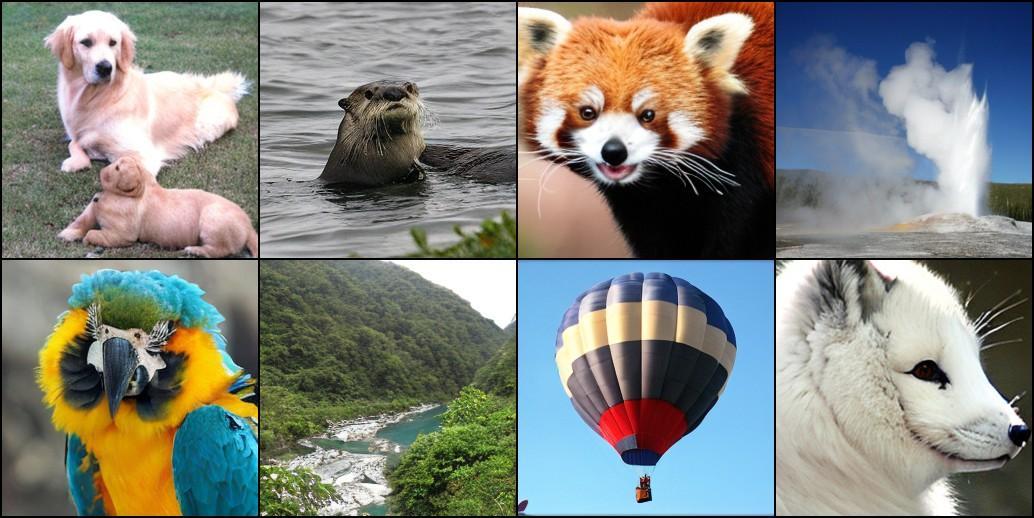
The output shows images generated by DiT (Diffusion Transformer) where each image is created by gradually transforming random noise into a latent representation guided by the specified class label. The model uses a diffusion process to refine the noise step by step and then the VAE decodes these latent representations into actual pixel images, producing class-specific visual outputs.
