In this article we will build a Retrieval-Augmented Generation (RAG) system that improves AI answers by combining large language models with a smart document search. It reads documents, breaks them into smaller parts, turns them into searchable vectors. When user queries it uses context from documents to produce accurate, context-aware answers. Here we will also use:
LangChain which loads and splits documents into chunks, creates vector embeddings to represent text and interfaces with language models to generate answers.
LangGraph controls the order of retrieval and generation steps, manages state and data flow across the system and enables modular, maintainable AI workflows.
Each chunk is converted into a vector embedding for fast searching.
When a user asks a question, it is sent to the LangGraph workflow.
LangGraph orchestrates the process, using stored vectors and the user query.
The system retrieves relevant chunks using LangChain’s search.
LangChain and LangGraph together generate a smart answer using a language model.
The final answer is presented back to the user.
Step-by-Step Implementation
Let's build a RAG system with the help of LangChain and LangGraph:
Step 1: Install Dependencies
We will install the require packages that will be needed such as langchain, langgraph, langchain-openai, langchain-text-splitter, langchain-community, networkx and matplotlib.
Step 2: Setup API Keys
We configure the environment variable for the OpenAI API key. This is required to authenticate and access OpenAI models.
os.environ["OPENAI_API_KEY"]: Sets the API key as an environment variable so that LangChain/OpenAI libraries can automatically pick it up when calling the model.
To know how to acess
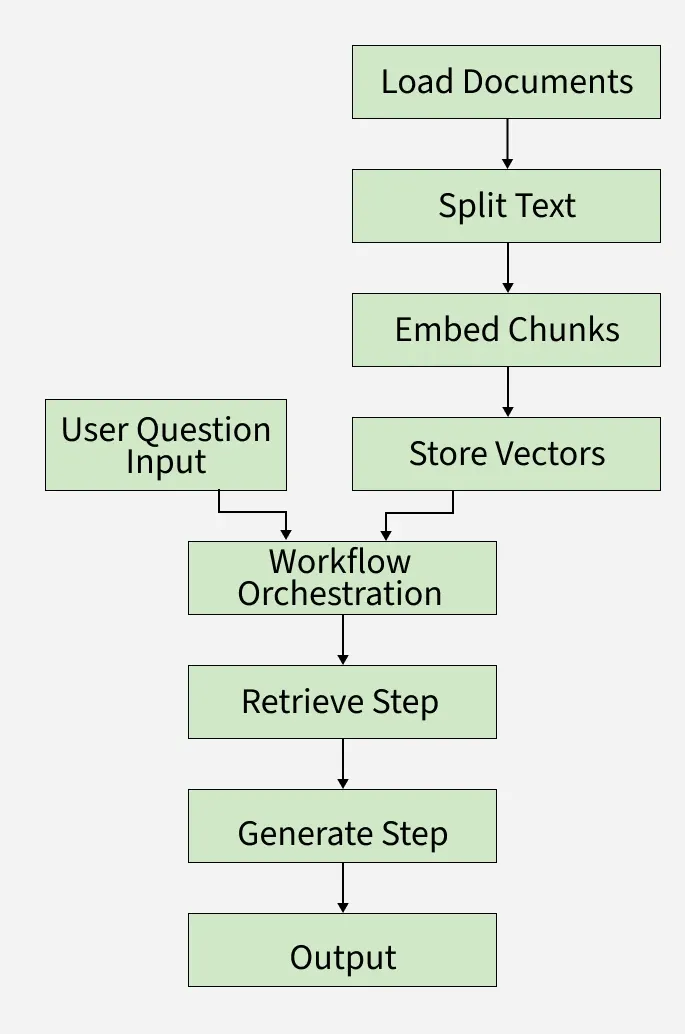
Step 3: Define the Application State
We define a TypedDict called State to represent the flow of data across our RAG pipeline.
question: The user’s query.
context: A list of retrieved Document objects relevant to the query.
answer: The final generated response from the language model.
Step 4: Load and Split Documents
Used knowledge based file can be downloaded from here.
We will unzip, loads documents and split it into smaller chunks.
RecursiveCharacterTextSplitter: Breaks down long documents into chunks (chunk_size=1000) with overlap (chunk_overlap=200) to maintain context.
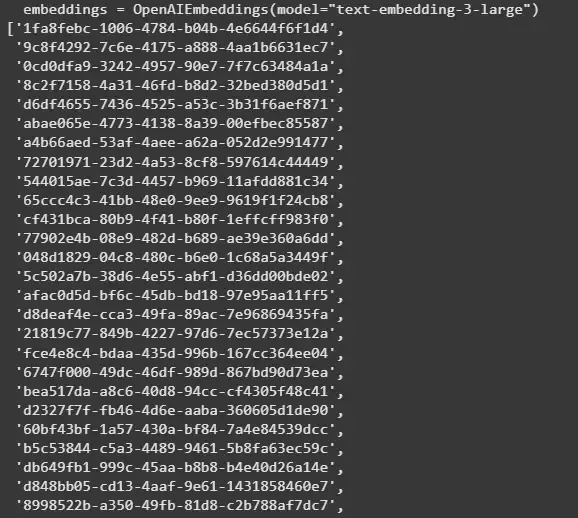
Step 5: Create Embeddings and Vector Store
We convert the document chunks into embeddings and store them in a vector database for similarity search.
OpenAIEmbeddings: Generates embeddings using OpenAI’s embedding model text-embedding-3-large.
InMemoryVectorStore: A lightweight in-memory store for embeddings.
add_documents: Stores the vector representations of all document chunks.
Output:
👁 embeddings List of Document Chunks IDs from the Model
Step 6: Define Custom Prompt and Initialize LLM Model
Define a custom prompt template guiding the LLM to use retrieved context to answer user questions clearly and concisely. Initialize OpenAI GPT-4.1 chat model with temperature 0.3 for manageable creativity in answers.
Step 7: Define Workflow Functions
Define individual LangGraph node functions for each pipeline step:
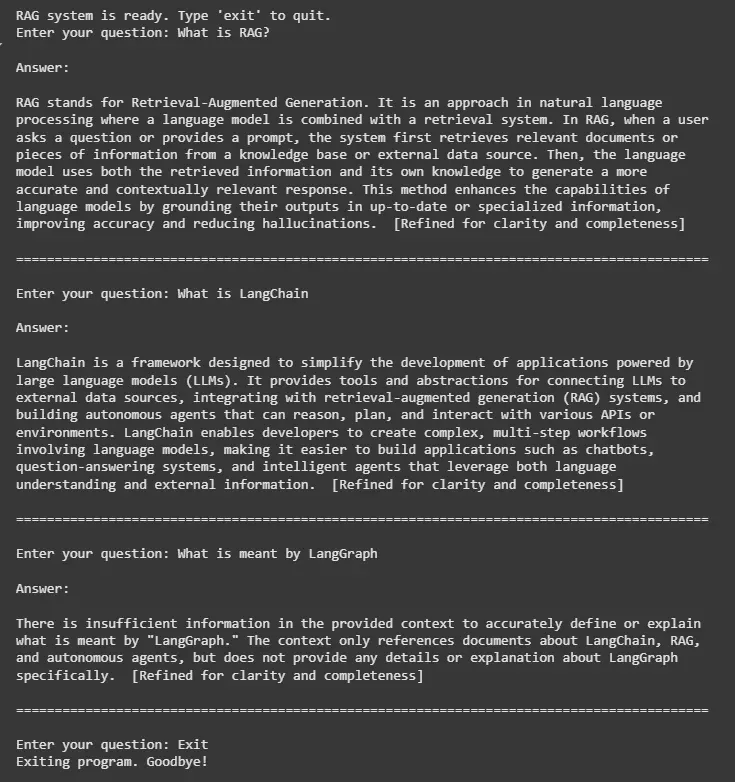
retrieve(state): Perform similarity search on the vector store to get top 5 matched document chunks related to the question.
generate(state): Format the prompt with question + retrieved context, invoke the LLM and return the generated answer.
classify(state): Dummy function that identifies "advanced" questions but currently passes the question unchanged.
refine(state): Append a refinement note to the generated answer for clarity.
Step 8: Build the LangGraph Workflow
We define the pipeline as a graph using LangGraph.
StateGraph(State): Defines a graph where nodes pass along State.
add_sequence([retrieve, generate]): Runs retrieval first, then generation.
add_edge(START, "retrieve"): Connects the start of the graph to the first node.
compile(): Finalizes the graph for execution.
Step 9: Visualize the LangGraph Workflow
Using NetworkX and Matplotlib, we will visualize our workflow,
G = nx.DiGraph(): Creates an empty directed graph where edges have direction, modeling workflow steps.
nx.draw_networkx_nodes(...): Draws graph nodes with specified colors, sizes and borders.
nx.draw_networkx_edges(...): Draws arrows between nodes with custom style and curvature for clarity.
plt.title(), plt.tight_layout(), plt.axis('off'): Sets title, adjusts layout and hides axes for a clean plot.
Let's see the advantages that are offered by this system:
Grounded Responses: Unlike vanilla LLMs that may hallucinate, RAG grounds the model’s answers in actual documents, improving factual accuracy.
Domain Adaptability: We can easily load custom datasets (PDFs, web pages, internal notes) and make the system specialized for finance, healthcare, legal, research, etc.
Up-to-date Knowledge: The system retrieves the latest information from external sources, overcoming the LLM’s fixed training cutoff.
Efficient Context Management: By using document chunking and vector search, the model only processes the most relevant text instead of the entire dataset, reducing token costs and speeding up inference.
