Textures are images applied to 3D objects to give them color and detail. Sprites are 2D images used for characters, objects, and UI in 2D games.
| Texture | Sprite |
|---|
| Used on 3D objects (cubes, spheres, models) | Used for 2D objects (characters, items, UI) |
| Wraps around 3D surfaces | Rendered flat on screen |
| Needs a Material to apply | Can be directly used in Sprite Renderer |
Importing Images as Textures
Step 1: Drag any .png or .jpg into Unity's Project window.
Step 2: Click the imported image.
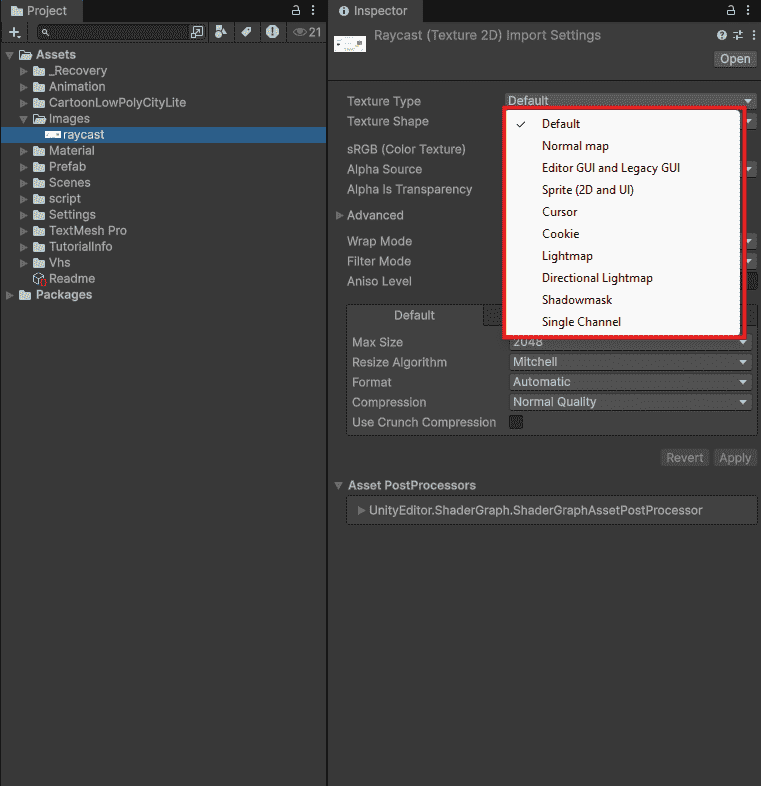
Step 3: In Inspector, set Texture Type:
- Default: For 3D objects
- Sprite (2D and UI): For 2D games and U
👁 Importing-Images-as-Textures
Importing Image as TextureTexture Import Settings
Select any texture in Project window. These settings matter most:
Texture Type
- Defines how Unity interprets the image
- Options: Default (for 3D), Sprite (for 2D)
Wrap Mode
- Controls behavior at texture edges
- Options: Repeat (tiling), Clamp (no repeat)
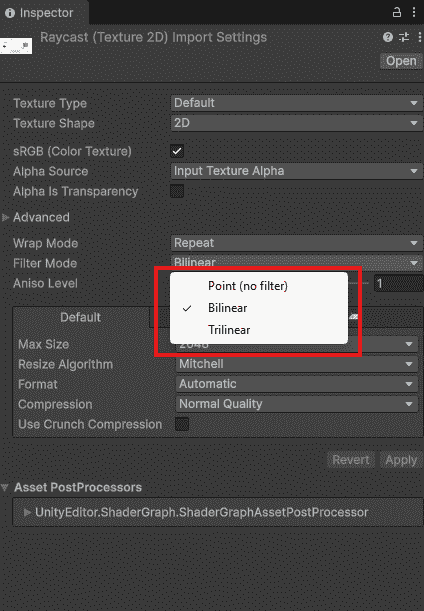
Filter Mode
- Determines how texture looks when scaled
- Options: Point (pixel art), Bilinear (smooth)
Compression
- Reduces file size of the texture
- Options: High Quality (no compression), Normal
Max Size
- Sets the maximum resolution of the texture
- Example: 2048 for HD, 512 for mobile
Filter Modes Explained
- Point (No Filter): Pixels stay sharp. Best for pixel art games.
- Bilinear: Smooth blur. Best for realistic textures.
- Trilinear: Like Bilinear but smoother at distance.
👁 Filter-Mode-In-Unity
Filter Mode In UnityCreating Sprites for 2D Games
Method 1: Single Sprite
- Import image.
- Set Texture Type to "Sprite (2D and UI)".
- Drag image from Project into Scene.
Method 2: Sprite Sheets (Multiple Sprites from one image)
- Import image with Texture Type = Sprite
- Set Sprite Mode = Multiple
- Click Sprite Editor button
- Click Slice - Automatic - Slice
- Apply – Each sprite becomes separate
Now you can drag individual sprites from the Project window.
Applying Textures to 3D Objects
Textures cannot be applied directly to 3D objects. They need a Material.
Step 1: Create Material
- Right-click in Project - Create - Material
- Name it (example: "WoodMaterial")
Step 2: Assign Texture
- Select Material
- Drag your texture into Albedo or Base Map slot
Step 3: Apply to Object
- Drag Material onto your 3D object in Scene
Optimizing Textures for Performance
- Set Max Size to lowest acceptable value (512 for mobile)
- Enable Compression to reduce file size
- Use Sprite Atlas to combine multiple sprites (reduces draw calls)
