 |
VOOZH | about |
|
VOOZH | about |
Before learning Kubernetes (or K8S in Short), you should have some knowledge of Docker and Containers. Docker is a tool that helps the developer create containers in which applications can run in an isolated environment. Containers are just an abstraction for the applications inside. Docker also provides some facilities for these containers to talk to each other, store data on the host machine, and much more. Similarly, Kubernetes is used to control these containers and enhance their availability as well as functionality. Docker has containers, but Kubernetes has Containers, Pods, and then Nodes. Nodes contain pods, and pods have containers. Kubernetes ensures more isolation of the container.
A service is a functionality that is by default disabled on containers, pods, and nodes. We need to mention a specific service that we want to enable. Some of the services offered by the Kubernetes cluster are NodePort and Load Balancer services. We have discussed in detail the load balancer service below in the article.
Kubernetes load balancer uses the Kubernetes Endpoints API to track pod availability. When the Kubernetes load balancer gets a request for a specific Kubernetes service, it sorts or rounds robins the request among the service’s relevant Kubernetes pods. They can work with your pods, provided they are externally rout table. Google and AWS both have this functionality built in.
In terms of Amazon, this corresponds precisely to ELB, and Kubernetes running on AWS can automatically launch and configure an ELB instance for each load balancer service deployed.
There are two main types of load balancers: internal and external. Internal load balancers are designed to balance traffic within the cluster, ensuring that the distribution of requests among the pods is even and efficient. This type of load balancer is particularly useful for services that do not need to be accessed from outside the cluster, allowing them to communicate seamlessly within the private network. On the other hand, external load balancers handle traffic coming from the internet, making services accessible to users over the web. They ensure that incoming requests from external sources are evenly distributed among the available pods, maintaining service availability and reliability even during high traffic volumes. This makes external load balancers ideal for public-facing applications that require robust and scalable access points.
There are four main types of services to expose your applications:
<NodeIP>:<NodePort>. It's useful for simple external access without a load balancer.example.com. It's useful for directing traffic to an external service or integrating external systems.To Know more about the difference between the cluster ip, Nodeport, Load Balancer and External name refer this link.
For applications used on Kubernetes clusters, external load balancer providers provide essential amenities for dividing up incoming network traffic among several servers or instances, guaranteeing maximum performance and high availability. A few of the prominent vendors are IBM Cloud Load Balancer, Microsoft Azure Load Balancer, DigitalOcean Load Balancers, Google Cloud Platform (GCP) Load Balancing, and Amazon Web Services (AWS) Elastic Load Balancer (ELB).
These are the top three cloud providers provide these load balancing techniques in the cloud:
Creation of Deployment: We could create deployment by simply executing commands on the CLI or by using YML or JSON configuration files for the deployment. Deployment communicates with the pods about the creation of containerized applications as well as about the modification that can be made to the same applications. We will be using the Nginx image for this deployment.
$ kubectl create deployment webserver-deployment --image=nginx:latest
$ kubectl get deployments
$ kubectl get pods
It will take some time to create and start the start container, that is the reason the status of the pod is showing "ContainerCreating".
We need to create a deployment manifest file. Below is an example of such a manifest file. This file is created in YAML format because it is easy to create and edit for humans. YAML is used in various other processes apart from configuration files. Like, in Log files, inter-process messaging, and for advance data structures. Create a yml file named "loadBalancerDeployment.yml".
#Deployment
apiVersion: apps/v1
kind: Deployment
metadata:
 name: deployment-nginx
 labels:
 app: nginx-application
spec:
 replicas: 1
 selector:
 matchLabels:
 app: nginx-application
 template:
 metadata:
 labels:
 app: nginx-application
 spec:
 containers:
 - name: nginx-container
 image: nginx:latest
 ports:
 - containerPort: 80
To create this deployment execute the below command.
$kubectl create -f loadBalancerDeployment.ymlTo create a load balancer service we have to create a service manifest file and to link this service to the pods we can use the labels of the pods previously used in the deployment manifest file.
#Service
apiVersion: v1
kind: Service
metadata:
 name: service-nginx
 labels:
 app: nginx-application
spec:
 selector:
 app: nginx-application
 type: LoadBalancer
 ports:
 - nodePort: 31000
 port: 80
 targetPort: 80
To create this service execute the below command.
$ kubectl create -f loadBalancerService.ymlTo check if the service is created or not execute the below command. it gives a brief introduction to the service.
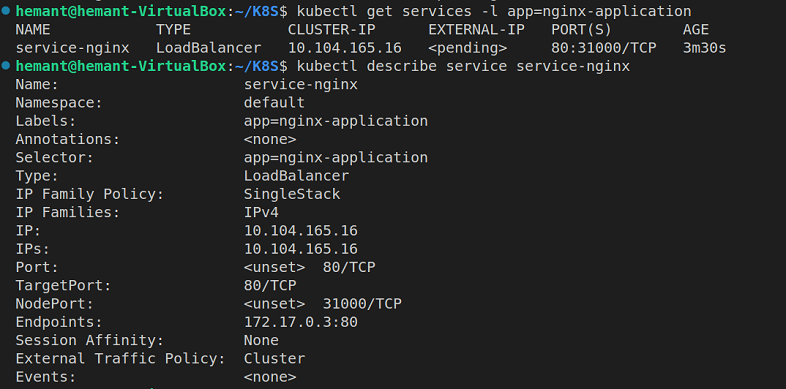
$ kubectl get services -l app: nginx-applicationTo get details about the load balancer service use the "kubectl describe" command.
$ kubectl describe service service-nginxWe have created a deployment and linked that deployment to the load balancer service. Now load balancer will take care of all the users coming to the website.
Anyone can run specific commands directly on the command line interface (CLI) in order to build a service in Kubernetes using the kubectl command in an imperative manner. With this way, you can define a YAML configuration file once and effortlessly set up services. Here are some examples and clarifications on using kubectl imperatively for developing different types of services.
kubectl expose deployment <deplyment-name> --type=LoadBalacer --name=<service-name> --port=80 --target-port=8080<deployment-name> with the name of your deployment.<service-name> with the name you want.The method of automatically removing or clearing out inactive or outdated load balancer resources in a Kubernetes cluster is referred to as "garbage collecting load balancers." A cloud provider's load balancer resource (such as the AWS Elastic Load Balancer or Google Cloud Load Balancer) typically appears when you create a LoadBalancer service in Kubernetes. However, the corresponding load balancer resource could keep running even after the service is terminated or no longer required, generating unnecessary costs and use of resources.
The setting up of mechanisms to detect and delete these not wanted load balancer resources is required for garbage disposal load balancers. This can be achieved through various means:
Load balancers split up incoming requests across multiple backend servers or instances through different traffic distribution techniques. These strategies support high availability, better application performance, and optimizing resources. These are the few strategies to load distribution on load balancer in Kubernetes.
Ensuring high availability, scalability, and performance of applications hosted on Kubernetes clusters requires operating a Kubernetes load balancer correctly. Here is the few techniques to select the right load balancer in Kubernetes.