 |
VOOZH | about |
|
VOOZH | about |
Static malware analysis often begins by examining the characteristics of a file without running it. Two of the most important characteristics are cryptographic hashes and digital signatures. Hashes act like a digital fingerprint small changes to a file produce a completely different hash and signatures prove the origin and integrity of a file using public‑key cryptography
A cryptographic hash algorithm takes arbitrary data and produces a fixed‑length output (the hash). Even a one‑bit change to the input generates a completely different output. MD5 (128 bit), SHA‑1 (160 bit) and SHA‑256 (256 bit) are widely used. Stronger algorithms like SHA‑256 produce longer hashes and are less susceptible to collisions than MD5 or SHA‑1.
A typical workflow for using hashes in static analysis involves the following steps:
Linux distributions include simple tools for computing MD5, SHA‑1 and SHA‑256. These utilities read an entire file and output the hash string. Each tool also supports a verification mode that compares files against known checksums.
Generate a hash: To compute a hash, navigate to the directory containing your sample and run md5sum filename, sha1sum filename or sha256sum filename. Each command prints the hash followed by the file name.
It produces a 64‑character SHA‑256 hash. Experts recommend using SHA‑256 rather than MD5 or SHA‑1 because it offers stronger collision resistance.
Verify against a checksum file: Many software projects publish a .sha256 or .md5 file containing known hashes. To verify integrity, run sha256sum -c checksums.sha256. A correct match prints OK; a mismatch prints
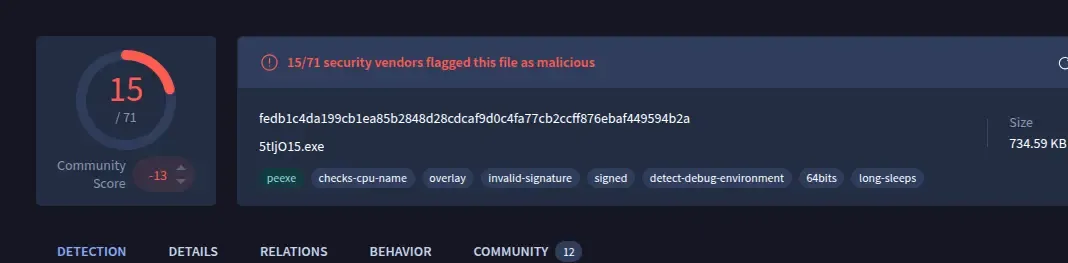
For example, I have a malware sample here is its hash
fedb1c4da199cb1ea85b2848d28cdcaf9d0c4fa77cb2ccff876ebaf449594b2aWhen downloading software from open‑source projects, you may encounter a .sig or .asc file—a detached signature produced with PGP/GPG. To verify it on Linux
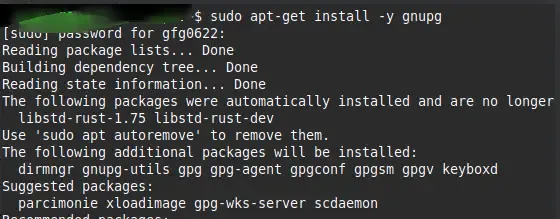
1. Download the gpg tool using the below command:
sudo apt-get install -y gnupg
2. Download the author’s public key and check its fingerprint to ensure you have the correct key
gpg --show-keys AuthorKey.asc
gpg --import AuthorKey.asc
3. Verify the signature: Provide the signature and the file as arguments:
gpg --verify package.sig package.tar.gz4. Interpret the result: GPG decrypts the signature using the public key and compares the embedded hash with the hash of your file
Once you have computed a hash, you can compare it against public databases:
Open the VirusTotal and use the above malware hash
fedb1c4da199cb1ea85b2848d28cdcaf9d0c4fa77cb2ccff876ebaf449594b2apaste the SHA-256 in the search bar.
The hash matches a known malicious sample in public databases.
While hashes prove that a file has not changed, they do not prove who created it. Digital signatures extend hashing by encrypting the hash with the signer’s private key; verifying the signature confirms both integrity and the signer’s identity
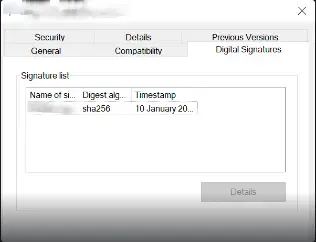
1. Windows Explorer
The Sysinternals tool sigcheck displays detailed digital signature information and can query VirusTotal for malware detection. Running:
sigcheck -u -e C:\\Windows\\System32