 |
VOOZH | about |
|
VOOZH | about |
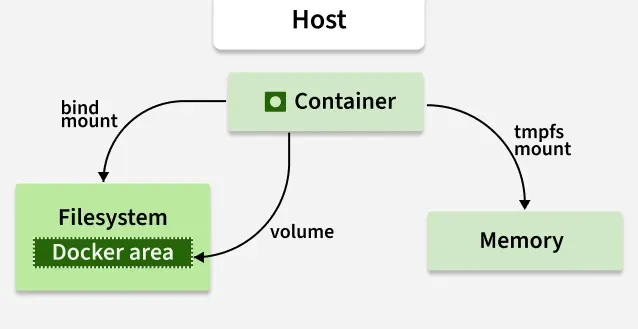
Bind mounts and the host filesystem are tightly related. The host filesystem is immediately impacted by changes made to a bind mount, and vice versa. When you use a bind mount to remove a container, the related data stays on the host.
Bind mounts may be stored anywhere on the host system. They may even be important system files or directories. Non-Docker processes on the Docker host or a Docker container can be modified at any time. You can create a file on the host system and attach it to the container where you want to maintain the state of the Docker. You can also use the bind mount for stateful applications.
In docker we mainly use two docker driver volume plugins, They are:
The Local Driver is a built-in Docker volume plugin that allows users to create volumes using local storage on the host machine. Follow the steps below to use the local driver to create the volume using a local driver.
Steps to Create Custom Volume:
docker volume create -d local <Name_Of_the_Volume> to create a Docker volume using the Local Driver.<Name_Of_the_Volume> with the desired name for the volume.docker create volume -d local <Name Of the Volume>Usage Example: Creating a volume named "GFG-Volume" using the Local Driver: docker volume create -d local GFG-Volume.
To learn more about the docker rex-ray plugin please refer to the the following article.
Read here: What Is Docker REX – RAY Plugin ?
The docker volume ls command is used to list all the volumes created on the Docker host. It provides detailed information about each volume, including its name, driver, and optionally other properties such as mount point. You can list all the docker volumes that are available in the docker by using a simple command as shown below.
docker volume ls"docker volume ls" will list all the docker volumes which are available in the docker host and also it will list the volume which are managed out side of the docker host as shown in the image below.
Follow the steps Mentioned below to create and attach the bind mount to docker container.
Step 1: Create an Empty Directory on the Docker Host
This command creates an empty directory on the Docker host. This directory will act as a volume that can be mounted to the container.
Mkdir <Name Of the Volume You wan to Create>Step 2: Attach the Bind Mount to the Docker Container
Know this directory will act as an volume on the docker host you need to mount this to the path where the data will be stored in the application as show in the image below you can use the following command to do this.
sudo docker run -d <Container ID> --name <Name Of the Container> -v <Host Path>:<Container Path><Container_ID>: The ID of the container to which you want to attach the bind mount.<Name_Of_the_Container>: The name you want to give to the container.<Host_Path>: The path of the directory on the Docker host that you created in step 1.<Container_Path>: The path inside the container where you want to mount the volume./home/ubuntu/nginx is the host path where my directory of volume is located and the /app is the container path.
When working with Docker, choosing between the -v and --mount flag depends on your specific needs and the complexity of your volume requirements.
Here's a simple breakdown to help you choose:
-v Flag:docker run -v /host/directory:/container/directory ...--mount Flag:docker run --mount type=bind,source=/host/directory,target=/container/directory ...This is particularly useful when you need to define more complex volume configurations or when using volume plugins like NFS or REX-Ray.
-v is shorthand and simpler to use. It's great for quick tasks like mounting a host directory or named volume. Example: -v /host:/container.--mount is more verbose but clearer and more flexible. You must specify type, source, and target, which makes the intent easier to understand. Example: --mount type=bind,source=/host,target=/container.-v offers fewer options. It doesn’t easily support advanced features like read-only access, consistency settings, or specifying a volume driver.--mount supports advanced features such as read only, volume driver, and better handling of different mount types (like tmpfs, bind, and volume).-v for quick, simple containers, especially during development or testing.--mount when you need precision, like in production environments, or when writing Docker Compose files and scripts.Docker bind mounts are stored on the host machine where Docker is running. When you create a bind mount, you specify a path on the host machine that you want to share with the container. Docker then links this path to a location inside the container.
Docker bind mounts are stored in directories on your computer's file system, and these directories are accessible both inside the Docker container and from outside, allowing easy sharing of files and data between the container and the host machine.
To mount a host directory in a Docker container using a Docker Compose file, you can specify the volumes configuration within the services section. Here's a simple example:
version: '3.8'

services:
 my_container:
 image: my_image:latest
 volumes:
 - /path/on/host:/path/in/container
my_container: This is the name of your container service.image: Specifies the Docker image to use for the container.volumes: Defines the volumes to mount into the container./path/on/host: This is the path to the directory on the host machine that you want to mount./path/in/container: This is the path inside the container where you want to mount the directory.
.png)
.png)
-(1).png)