 |
VOOZH | about |
|
VOOZH | about |
React is a JavaScript library created by Facebook to help create user interfaces, especially for single-page applications where the interface changes often and data updates a lot. It lets developers build reusable pieces of the interface, each managing its own state, which makes apps more efficient and simpler to maintain.
To start using React, you typically set up a development environment using tools like create-react-app
Step 1: Install Node.js
Ensure Node.js is installed on your system.You can download it from nodejs.org.
Step 2: Create a New React Application
Use npx create-react-app my-app to set up a new React project.
npx create-react-app my-appStep 3: Develop Components
Create and organize your UI into components, which can be either class components or functional components with hooks.
Step 4: Render Components
Use ReactDOM to render these components into the HTML page.
Class components are traditional React components that extend from React.Component and must contain a render method. They can manage their own state and lifecycle methods.
Example: In this example, we define a class component MyComponent that renders a simple "Geeks For Geeks" message.
import React, { Component } from 'react';

class MyComponent extends Component {
 render() {
 return <div>Geeks For Geeks</div>;
 }
}

export default MyComponent;
Output:
Functional components are simple JavaScript functions that return JSX. With the introduction of Hooks in React 16.8, functional components can manage state and side effects.
Example: In this example, we define a functional component MyComponent that uses the useState hook to manage a count state. The component renders a button that, when clicked, increments the count.
import React, { useState } from 'react';

const MyComponent = () => {
 const [count, setCount] = useState(0);

 return (
 <div>
 <p>You clicked {count} times</p>
 <button onClick={() => setCount(count + 1)}>Click me</button>
 </div>
 );
};

export default MyComponent;
Output:
JSX is a syntax extension for JavaScript that looks similar to XML. It allows you to write HTML-like code within JavaScript, which React then transforms into React.createElement calls.
Example: In this example, we use JSX to create an h1 element with the text "Hello, GFG". React converts this JSX into a React.createElement call.
const element = <h1>Hello, World!</h1>;Output:
React.createElement is a way to create React elements without JSX. It's useful for more dynamic use cases.
Example: In this example, we use React.createElement to create an h1 element with the text "GFG". This approach does not use JSX.
const element = React.createElement('h1', null, 'GFG');Output:
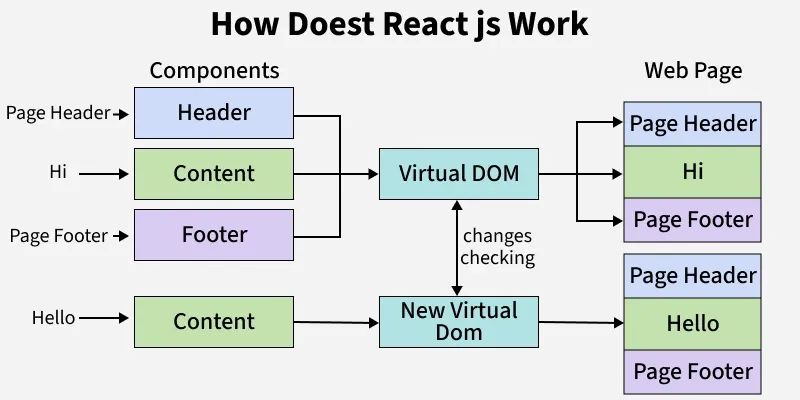
The Virtual DOM (VDOM) is an in-memory representation of the real DOM. React uses it to optimize the process of updating the user interface by minimizing direct manipulations of the actual DOM.
Step 1: Render Phase: When a React component renders, it creates a Virtual DOM representation of the UI.
Step 2: Diffing Algorithm: React compares the current Virtual DOM with a previous version to determine what has changed.
Step 3: Reconciliation: React applies only the necessary changes to the real DOM, improving performance and minimizing reflows and repaints.
import React, { useState } from 'react';

const App = () => {
 const [count, setCount] = useState(0);

 return (
 <div>
 <p>You clicked {count} times</p>
 <button onClick={() => setCount(count + 1)}>Click me</button>
 </div>
 );
};

export default App;
React components go through several lifecycle phases, which are hooks or methods that allow you to run code at specific points during a component's existence.
Step 1: Mounting
Step 2: Updating
Step 3: Unmounting
import React, { useEffect, useState } from 'react';

const App = () => {
 const [count, setCount] = useState(0);

 useEffect(() => {
 console.log('Component mounted or updated');
 return () => console.log('Component will unmount');
 }, [count]);

 return (
 <div>
 <p>You clicked {count} times</p>
 <button onClick={() => setCount(count + 1)}>Click me</button>
 </div>
 );
};

export default App;
One-way data binding means that data flows in a single direction—from parent components to child components. The child components receive data through props and can only communicate changes back to the parent using callback functions.
import React, { useState } from 'react';

const ChildComponent = ({ count, onIncrement }) => {
 return (
 <div>
 <p>Count: {count}</p>
 <button onClick={onIncrement}>Increment</button>
 </div>
 );
};

const ParentComponent = () => {
 const [count, setCount] = useState(0);

 const increment = () => setCount(count + 1);

 return <ChildComponent count={count} onIncrement={increment} />;
};

export default ParentComponent;
Reconciliation is the process React uses to update the UI efficiently. It involves comparing the Virtual DOM with the previous version to determine the minimum number of changes required.
import React, { useState } from 'react';

const App = () => {
 const [items, setItems] = useState(['Item 1', 'Item 2']);

 const addItem = () => {
 setItems([...items, `Item ${items.length + 1}`]);
 };

 return (
 <div>
 <ul>
 {items.map((item, index) => (
 <li key={index}>{item}</li>
 ))}
 </ul>
 <button onClick={addItem}>Add Item</button>
 </div>
 );
};

export default App;
Component-based architecture is a design pattern where the UI is divided into independent, reusable components. Each component encapsulates its own structure, style, and behavior.
import React from 'react';

const Header = () => <header>Header</header>;
const MainContent = () => <main>Main Content</main>;
const Footer = () => <footer>Footer</footer>;

const App = () => (
 <div>
 <Header />
 <MainContent />
 <Footer />
 </div>
);

export default App;
Fibre is a complete rewrite of React's reconciliation algorithm introduced in React 16. It improves React's ability to handle complex updates and interruptions efficiently.
Hooks are functions that let you use state and other React features without writing a class. They were introduced in React 16.8 to simplify component logic and reuse stateful logic.
import React, { useState, useEffect } from 'react';

const ExampleComponent = () => {
 const [count, setCount] = useState(0);

 useEffect(() => {
 console.log('Component mounted or updated');
 return () => console.log('Component will unmount');
 }, [count]);

 return (
 <div>
 <p>Count: {count}</p>
 <button onClick={() => setCount(count + 1)}>Increment</button>
 </div>
 );
};

export default ExampleComponent;
The Context API is a feature in React that allows you to share data across the entire component tree without having to pass props down manually at every level. It is useful for managing global state, such as user authentication, themes, or settings.
Step 1. Create Context: First, create a new context
import React, { createContext, useState } from 'react';

const MyContext = createContext();

const MyProvider = ({ children }) => {
 const [value, setValue] = useState('Hello, World!');

 return (
 <MyContext.Provider value={{ value, setValue }}>
 {children}
 </MyContext.Provider>
 );
};

export { MyContext, MyProvider };
Step 2. Consume Context: You can consume the context in a component using useContext.
import React, { useContext } from 'react';
import { MyContext } from './MyProvider';

const MyComponent = () => {
 const { value, setValue } = useContext(MyContext);

 return (
 <div>
 <p>{value}</p>
 <button onClick={() => setValue('New Value')}>Change Value</button>
 </div>
 );
};

export default MyComponent;
Step 3: App Component
import React from 'react';
import { MyProvider } from './MyProvider';
import MyComponent from './MyComponent';

const App = () => {
 return (
 <MyProvider>
 <MyComponent />
 </MyProvider>
 );
};

export default App;
To create a React application, you can use the create-react-app CLI tool, which sets up everything you need.
Step 1: Install Node.js
First, ensure you have Node.js installed. You can download it from nodejs.org.
Step 2: Create a New React Application
Open your terminal and run the following command:
npx create-react-app my-appThis will create a new directory called my-app with all the necessary files and dependencies.
Step 3: Navigate to the Application Directory
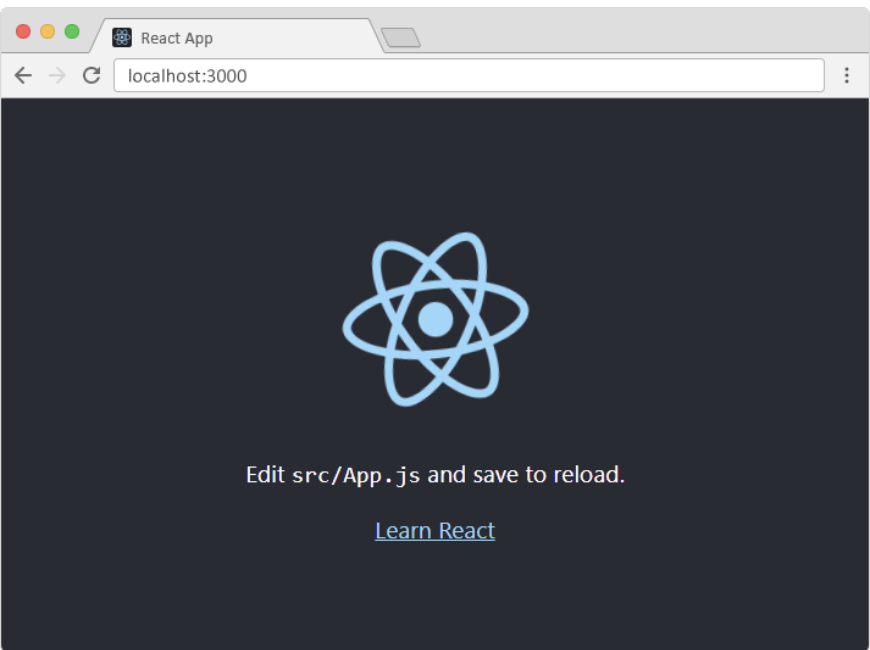
cd my-appStep 4: Start the Development Server
npm startA new browser window will pop up with your newly created React App! If not, open your browser and type localhost:3000 in the address bar.
The result:
Updated Dependencies:
dependencies: {
 "@testing-library/jest-dom": "^5.17.0",
 "@testing-library/react": "^13.4.0",
 "@testing-library/user-event": "^13.5.0",
 "react": "^18.3.1",
 "react-dom": "^18.3.1",
 "react-scripts": "5.0.1",
 "web-vitals": "^2.1.4"
 }
Example: This example shows the implementation of the above explained steps.
Output: