VOOZH about

URL: https://www.tecmint.com/boot-into-single-user-mode-in-centos-7/

⇱ How to Boot into Single User Mode in CentOS/RHEL 7


Skip to content

Single User Mode (sometimes known as Maintenance Mode) is a mode in Unix-like operating systems such as Linux operate, where a handful of services are started at system boot for basic functionality to enable a single superuser perform certain critical tasks.

It is runlevel 1 under system SysV init, and runlevel1.target or rescue.target in systemd. Importantly, the services, if any, started at this runlevel/target varies by distribution. It’s generally useful for maintenance or emergency repairs (since it doesn’t offer any network services at all), when a computer is not capable of normal operations.

Some of the low-level repairs include running such as fsck of damaged disk partitions, reset root password if you have lost it, fix “failed to mount /etc/fstab” error – just to mention the most critical of them. And also when the system fails to boot normally.

In this tutorial, we will describe how to boot into single user mode on CentOS 7. Note that practically this will help you enter the emergency mode and access an emergency shell.

How to Boot into Single User Mode

1. First restart your CentOS 7 machine, once boot process starts, wait for the GRUB boot menu to appear as shown in the screen shot below.

👁 CentOS 7 Grub Menu
CentOS 7 Grub Menu

2. Next, select your Kernel version from the grub menu item and press e key to edit the first boot option. Now use the Down arrow key to find the kernel line (starts with “linux16“), then change the argument ro to rw init=/sysroot/bin/sh as shown in the screen shot below.

👁 Edit Grub Boot Options
Edit Grub Boot Options

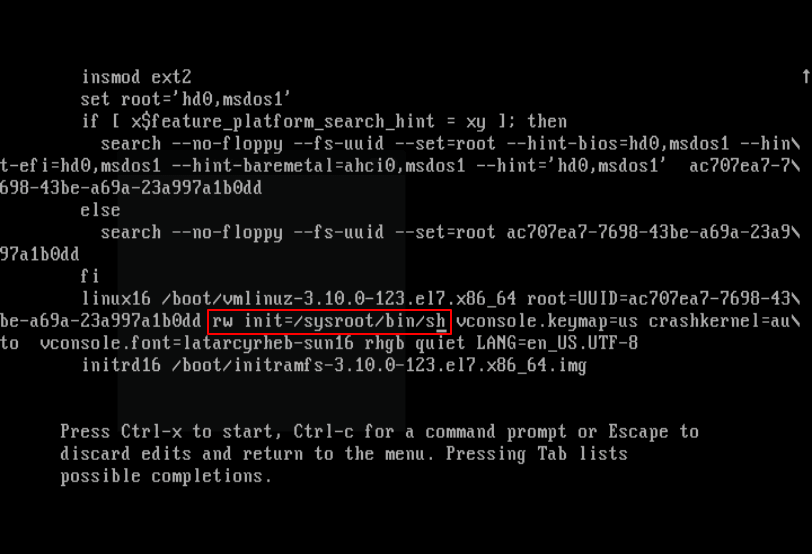
3. Once you have finished the task in the previous step, press Ctrl-X or F10 to boot into single user mode (access an emergency shell).

👁 CentOS 7 Emergency Shell
CentOS 7 Emergency Shell

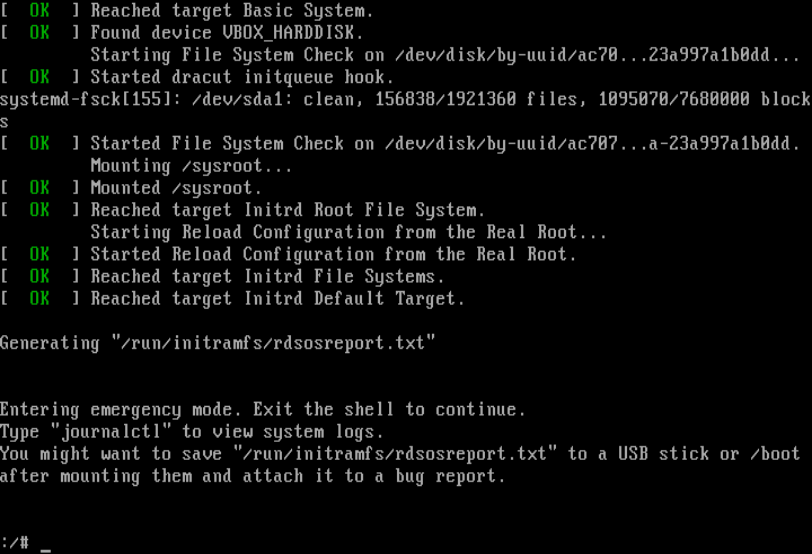
4. Now mount root (/) filesystem using the following command.

# chroot /sysroot/

At this point, you can perform all the necessary low-level system maintenance tasks. Once you are done, reboot the system using this command.

# reboot -f

You may also liked to read following articles.

  1. How to Hack Your Own Linux System
  2. Linux Directory Structure and Important Files Paths Explained
  3. How to Create and Run New Service Units in Systemd Using Shell Script
  4. How to Manage ‘Systemd’ Services and Units Using ‘Systemctl’ in Linux

Lastly, the single user mode or maintenance mode is not password-protected by default, so any one with malicious intend and physical access to your computer can enter the emergency mode and “destroy” your system.

Next, we will show you how to password-protect single user mode on CentOS 7. Until then, stay connected to Tecmint.com.

If this article helped, share it with someone on your team.
TecMint Weekly Newsletter
Get the Learn Linux 7 Days Crash Course free when you join 34,000+ Linux professionals reading every Thursday.
Check your email for a magic link to get started.
Something went wrong. Please try again.
TecMint has been free for 14 years. Help keep it that way.
Google AI Overviews and tools like ChatGPT have cut into search traffic for independent tech sites like TecMint. Running this site costs over $2,000 every month for hosting, infrastructure, and paying authors to keep the content accurate and tested.

If this article helped you solve a problem, consider buying a coffee. It helps keep TecMint free, supports the authors, and keeps the project going.
☕ Buy Me a Coffee
Aaron Kili
Aaron Kili is a Linux and F.O.S.S enthusiast, an upcoming Linux SysAdmin, web developer, and currently a content creator for TecMint who loves working with computers and strongly believes in sharing knowledge.

Each tutorial at TecMint is created by a team of experienced Linux system administrators so that it meets our high-quality standards.

20 Comments

Leave a Reply
  1. Thank you very much, it helped me a lot.

    Reply
  2. Thanks this article is technically accurate and easy to execute, it saved my Budd!!

    Reply
    • @Daniel

      Many thanks for the useful feedback.

      Reply
  3. I can’t run any commands when in single-user mode – My server just dropped to maintenance mode after the backup drive needed an fsck – but after it dropped to shell – any command I type such as fsck results in “no such file or directory”. Help! I need to either mount the filesystem to edit /etc/fstab and remove the second drive – or run fsck on it – but neither command is found!

    Reply
  4. Is it possible to edit /etc/sudoers in single user mode ? I need to edit the “PermitRootLogin” section.

    Reply
    • @Irsyad

      It should be possible, simply run this command to open the file:

      $ sudo visudo
      
      Reply
  5. Very helpful article, enabled me to fix my login service

    Reply
    • @PM

      That’s great, thanks for the useful feedback.

      Reply
  6. touch /.autorelabel
    reboot

    is needed

    Reply
    • @gzcwnk

      Okay, many thanks for mentioning this.

      Reply
  7. This article helped in solving my issue today
    Thank you

    Reply
  8. Works perfect, thanks I could recover my sudo access .. !!

    Reply
    • @Rodolfo

      We are glad that this worked for you, thanks for the feedback.

      Reply
  9. How to start the networking in RHEL 7 on single user mode?

    Errror:
    systemctl start network
    Failed to get D-Bus Connection: Operation not permitted
    
    Reply
    • @Raj,

      In single user mode on RHEL 7 or CentOS 7, the networking not enabled at startup. To get networking, you need get into runlevel 2 (local multi-user with networking) by running following command.

      # telinit 2
      
      Reply
      • that’s not correct its runlevel 3 that has networking not 2

        Reply
  10. Nice! Could you show us how to password-protect single user mode on CentOS 7?

    Reply
    • @João

      Sure, we will prepare an article about how to password-protect single user mode on CentOS 7. Thanks for the feedback.

      Reply
  11. Great, it’s very useful .Thanks for the work

    Reply
    • @Jean-Pierre

      Welcome, thanks for the kind words of appreciation, and for always following us.

      Reply

Got Something to Say? Join the Discussion... Cancel reply

Free Course
Get a free Linux course before you go.
Subscribe to TecMint Weekly and get the Learn Linux 7 Days Crash Course free. Read by 34,000+ Linux professionals every Thursday.
Check your email for a magic link to get started.